Instagram Ads
This integration is in beta
As with all beta tests, not everything will be perfect. If you run into any issues, please submit a support ticket.
Connect your Instagram Ads account with Lexer
Within Lexer you can integrate your Instagram Ads account, which will permit Lexer to build direct activations with your Instagram ad account.
In this article we will show you how to integrate your account for the first time.
Benefits of an Instagram Ads integration
Integrating your Instagram Ads account with Lexer provides a number of benefits, such as:
- Send segments as custom audiences.
Integration in a nutshell
Here's a summary of how Instagram Ads integrates with Lexer:
Direction
What direction does the data flow?
⬜️ Data in: N/A - Lexer does not take in data from Instagram Ads.
✅ Data out: send customer segments as custom audiences in Instagram.
Type
Lexer loads these types of data
N/A
Source method
How Lexer loads data from this source.
N/A
Destination method
How Lexer sends data to this source.
✅ API
Status
What is the status of the integration?
Full Release
Lexer product compatibility
What Lexer products is the integration compatible with?
✅ Activate
⬜️ Compare
⬜️ Listen
⬜️ Respond
⬜️ Segment
⬜️ Serve
⬜️ Track
Attributes
No attributes will be created as part of this integration.
Attributes
This integration allows for some flexibility, the output of the integration depends on your available data and what you send through to Lexer. In addition, your attributes could be named in a different way to other clients. If you would like a list of attributes related to this integration, please email your Success Manager.
Attributes
What attributes are created when integrated with Lexer?
N/A
Attributes
These are the standard attributes that Lexer can create from the data received via this integration. The exact attributes will depend on what data is made available and sent into Lexer. Keep in mind, your attribute names may vary slightly. If you have any questions or would like to explore custom options, please contact your Success Manager.
Customer attributes
Email engagement attributes
SMS event attributes
Transactional attributes
Product attributes
Connect your Instagram Ad account
Instagram Ads are run through your Facebook Business Manager, so to activate to Instagram, you just need to integrate a linked Facebook Ad account. We have a guide for that here.
Before we can start accessing your Instagram Ads, you will need to follow these steps.
- Integrate your Facebook Ad account.
If you have already integrated Facebook Ad's, please make sure you have check the "Consume Instagram ads via this account" box on you Facebook Ad integration. - Select ‘Consume Instagram ads via this account’
- Integrate your Instagram Business account
Creating your activation
First, you’re going to navigate to Lexer Activate. Activate allows you to send audiences to social, search, email platforms, and keep up to date on your activation status.
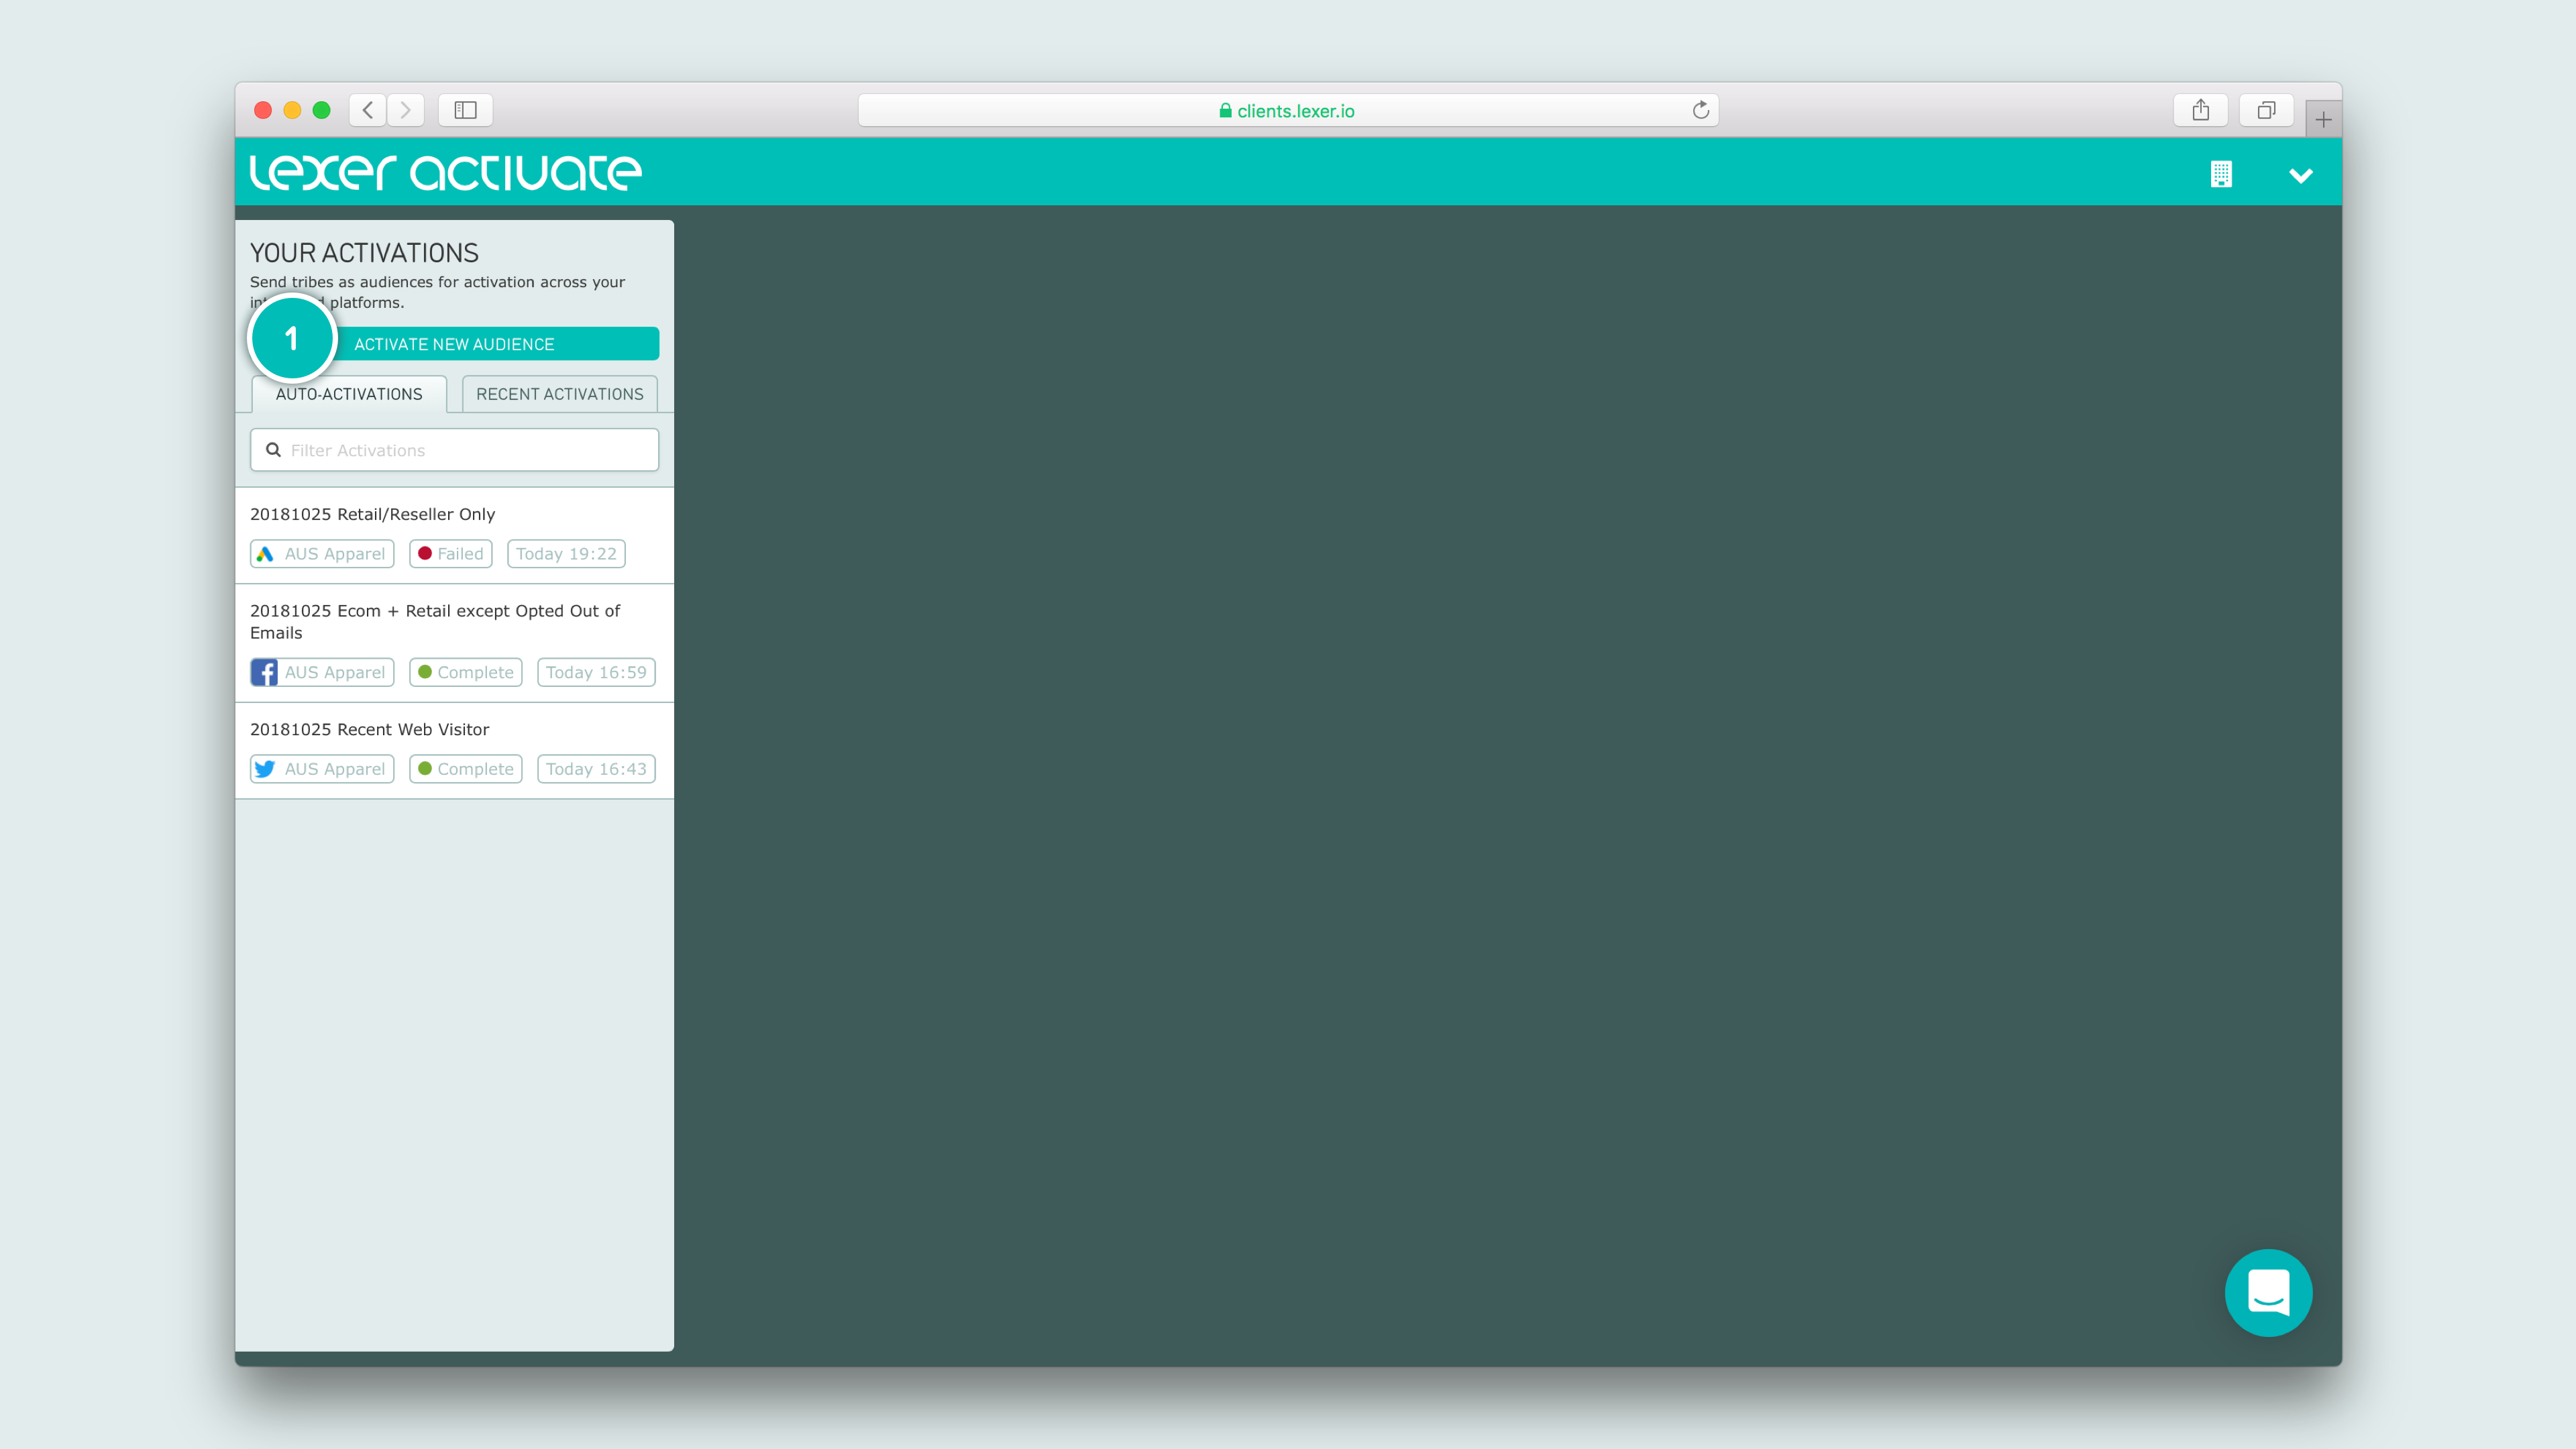
Your first step is to click ACTIVATE NEW AUDIENCE. As we’re sending this to Instagram, select the Facebook page that links to your desired Instagram account.
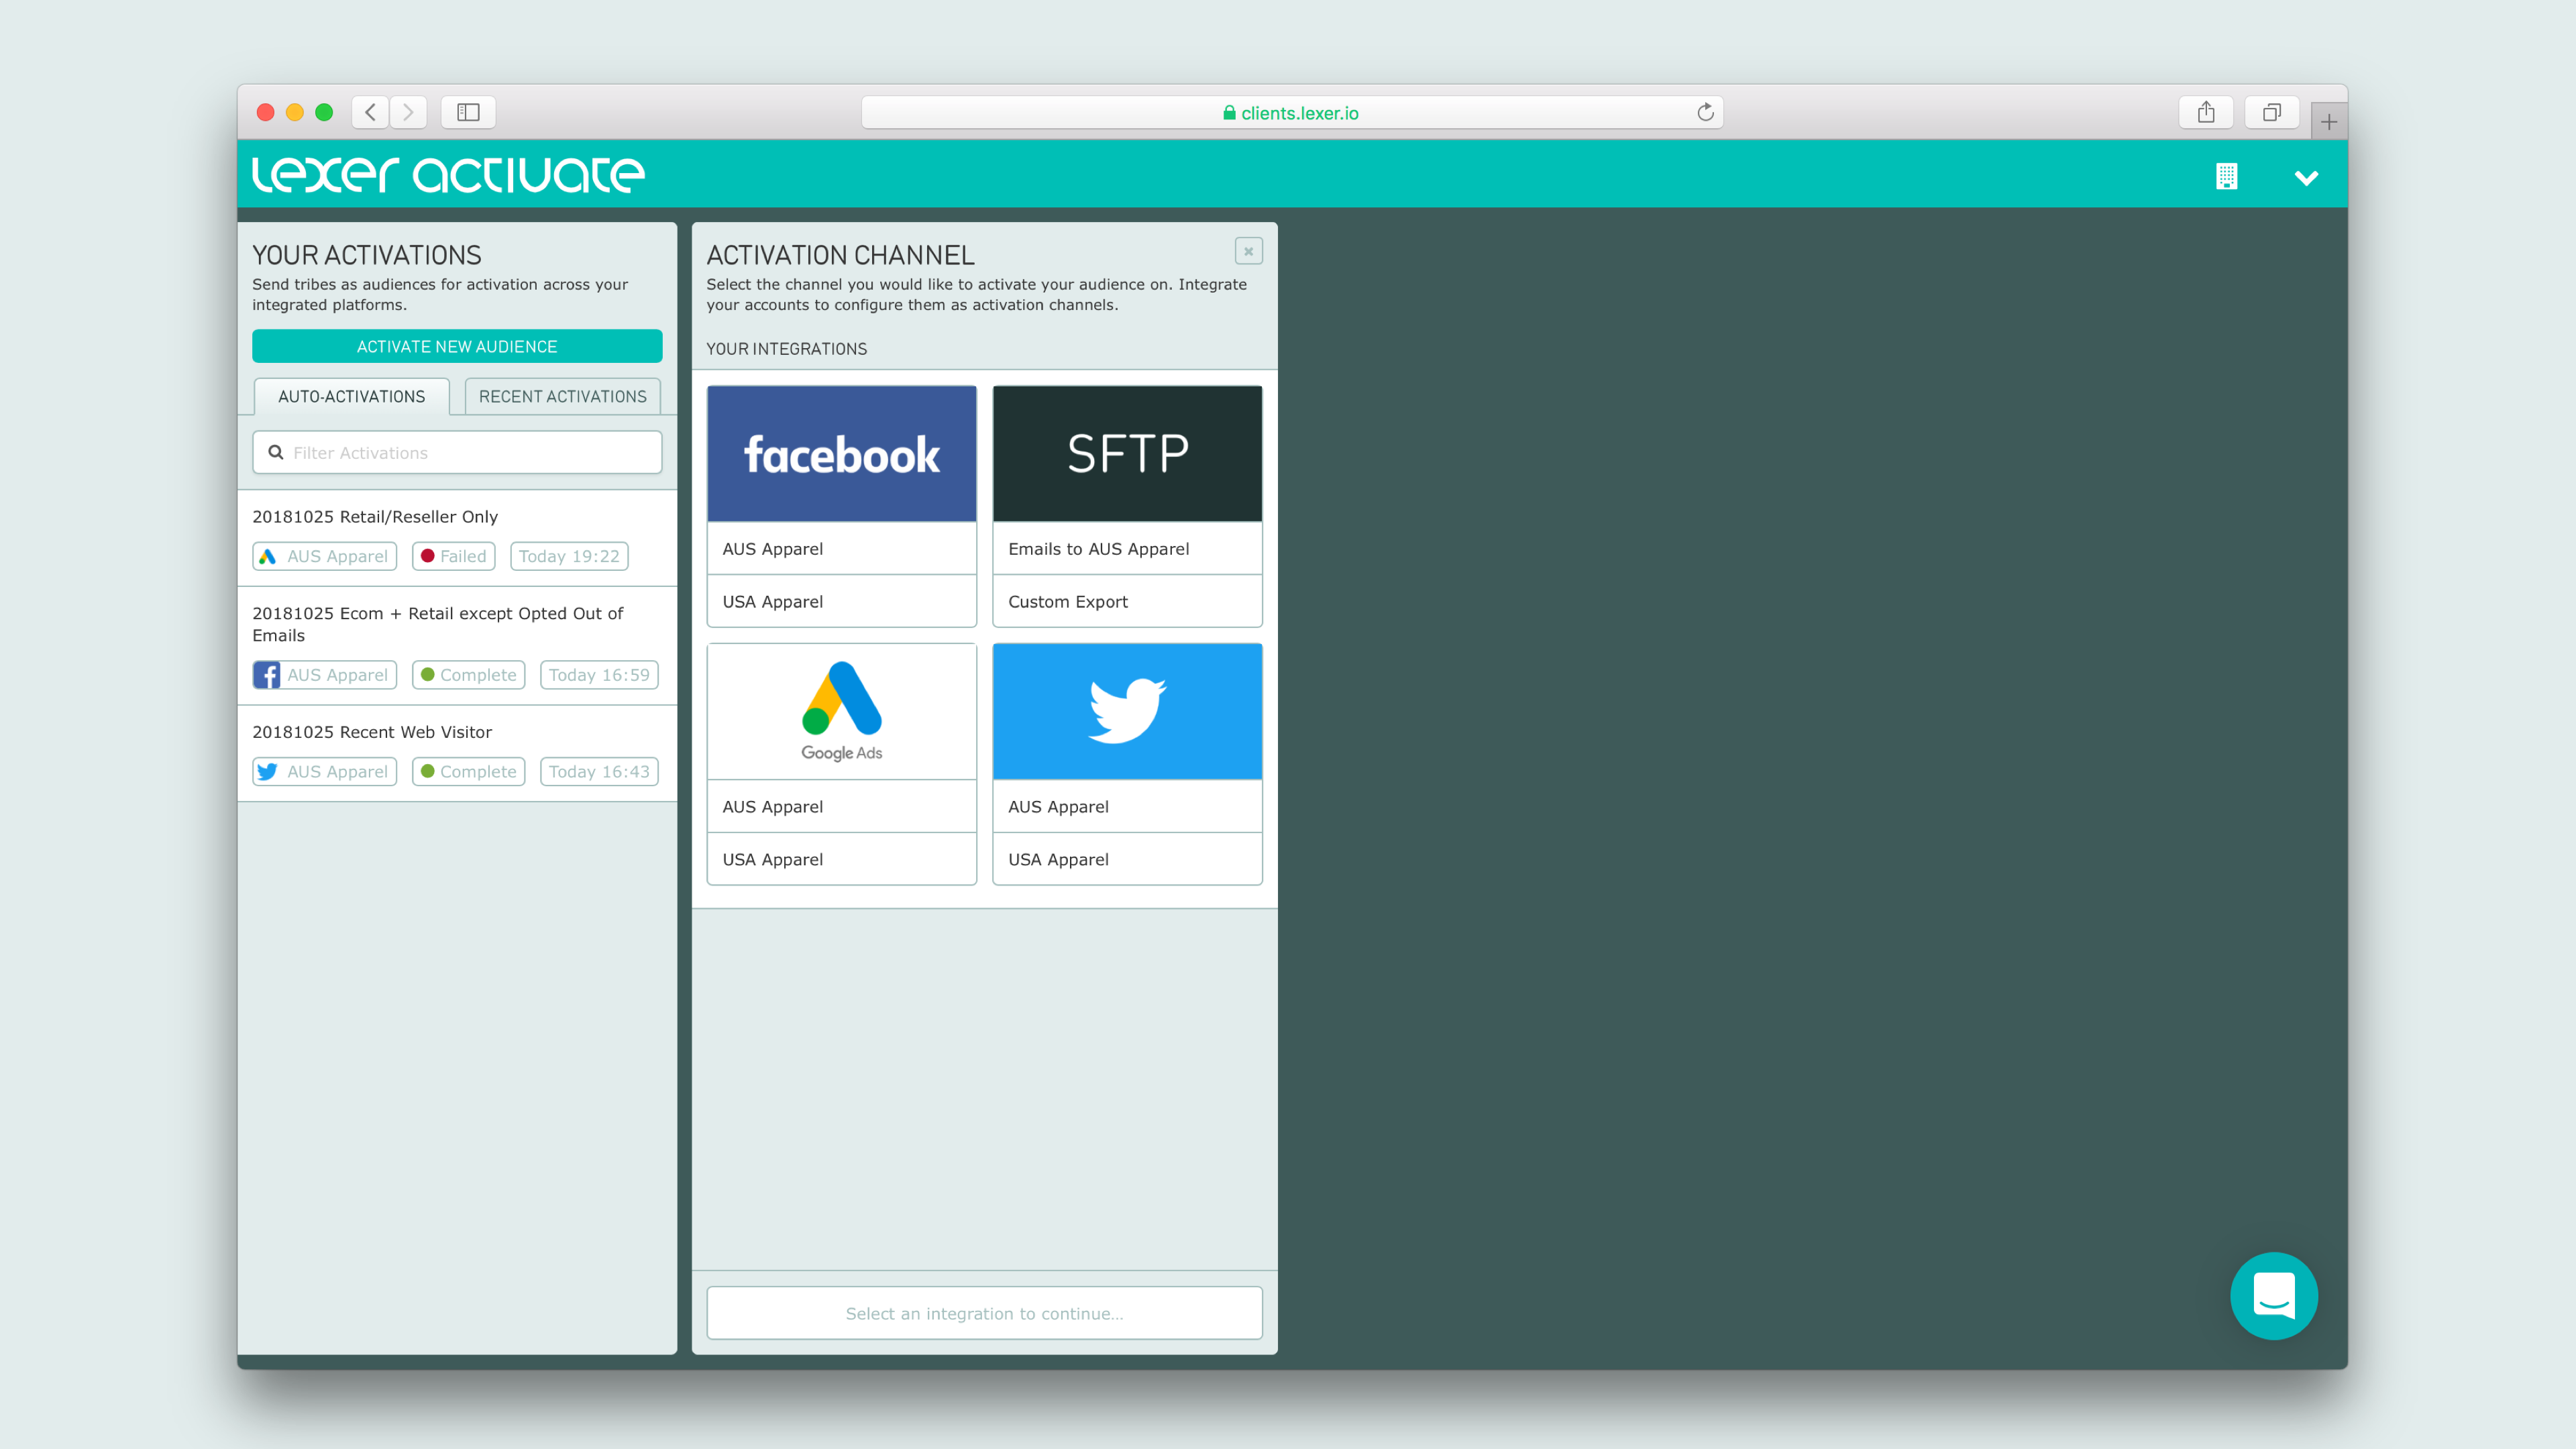
Next we’re going to pick your relevant Segment/s, and send your audience. If your combined audience size is greater than 1 million, schedule the activation and get in touch with Lexer Support (support@lexer.io) to approve the audience.

Set and forget - auto-updating audiences
You have the option to enable always-on audiences to Facebook/Instagram, which will add and subtract customers as they move in and out of your Segment. In this example we’re targeting those who have “ABANDONED CART”. This will update with new customers who abandon their shopping cart on your website. Likewise, should a customer return to purchase those goods, they will be removed from this Segment.

Ok I’ve sent my audience, what next?
Once we hit send audience we will begin building this activation and sending it to your chosen Facebook ad account. The larger the audience, the longer this can take. We will notify you once an audience has been sent via email (we’ll also email you if something goes wrong), the moment you receive that email your audience should be immediately available in your Facebook Ad account. It may take a few hours before it is ready to use, but we can start making our ad right away. Let’s get out of Lexer and head over to your Facebook Business Manager and Ads account.
Create your Instagram campaign
Facebook make regular changes to their Facebook and Instagram ad platforms, if anything in this guide doesn’t look right, let our Support team (support@lexer.io) know.
Head to business.facebook.com and make sure you’re logged into the correct account. From here head to the Facebook Ads Manager and click on + Create Campaign near the top left hand corner of the screen.

Set your campaign objective, and add your audience
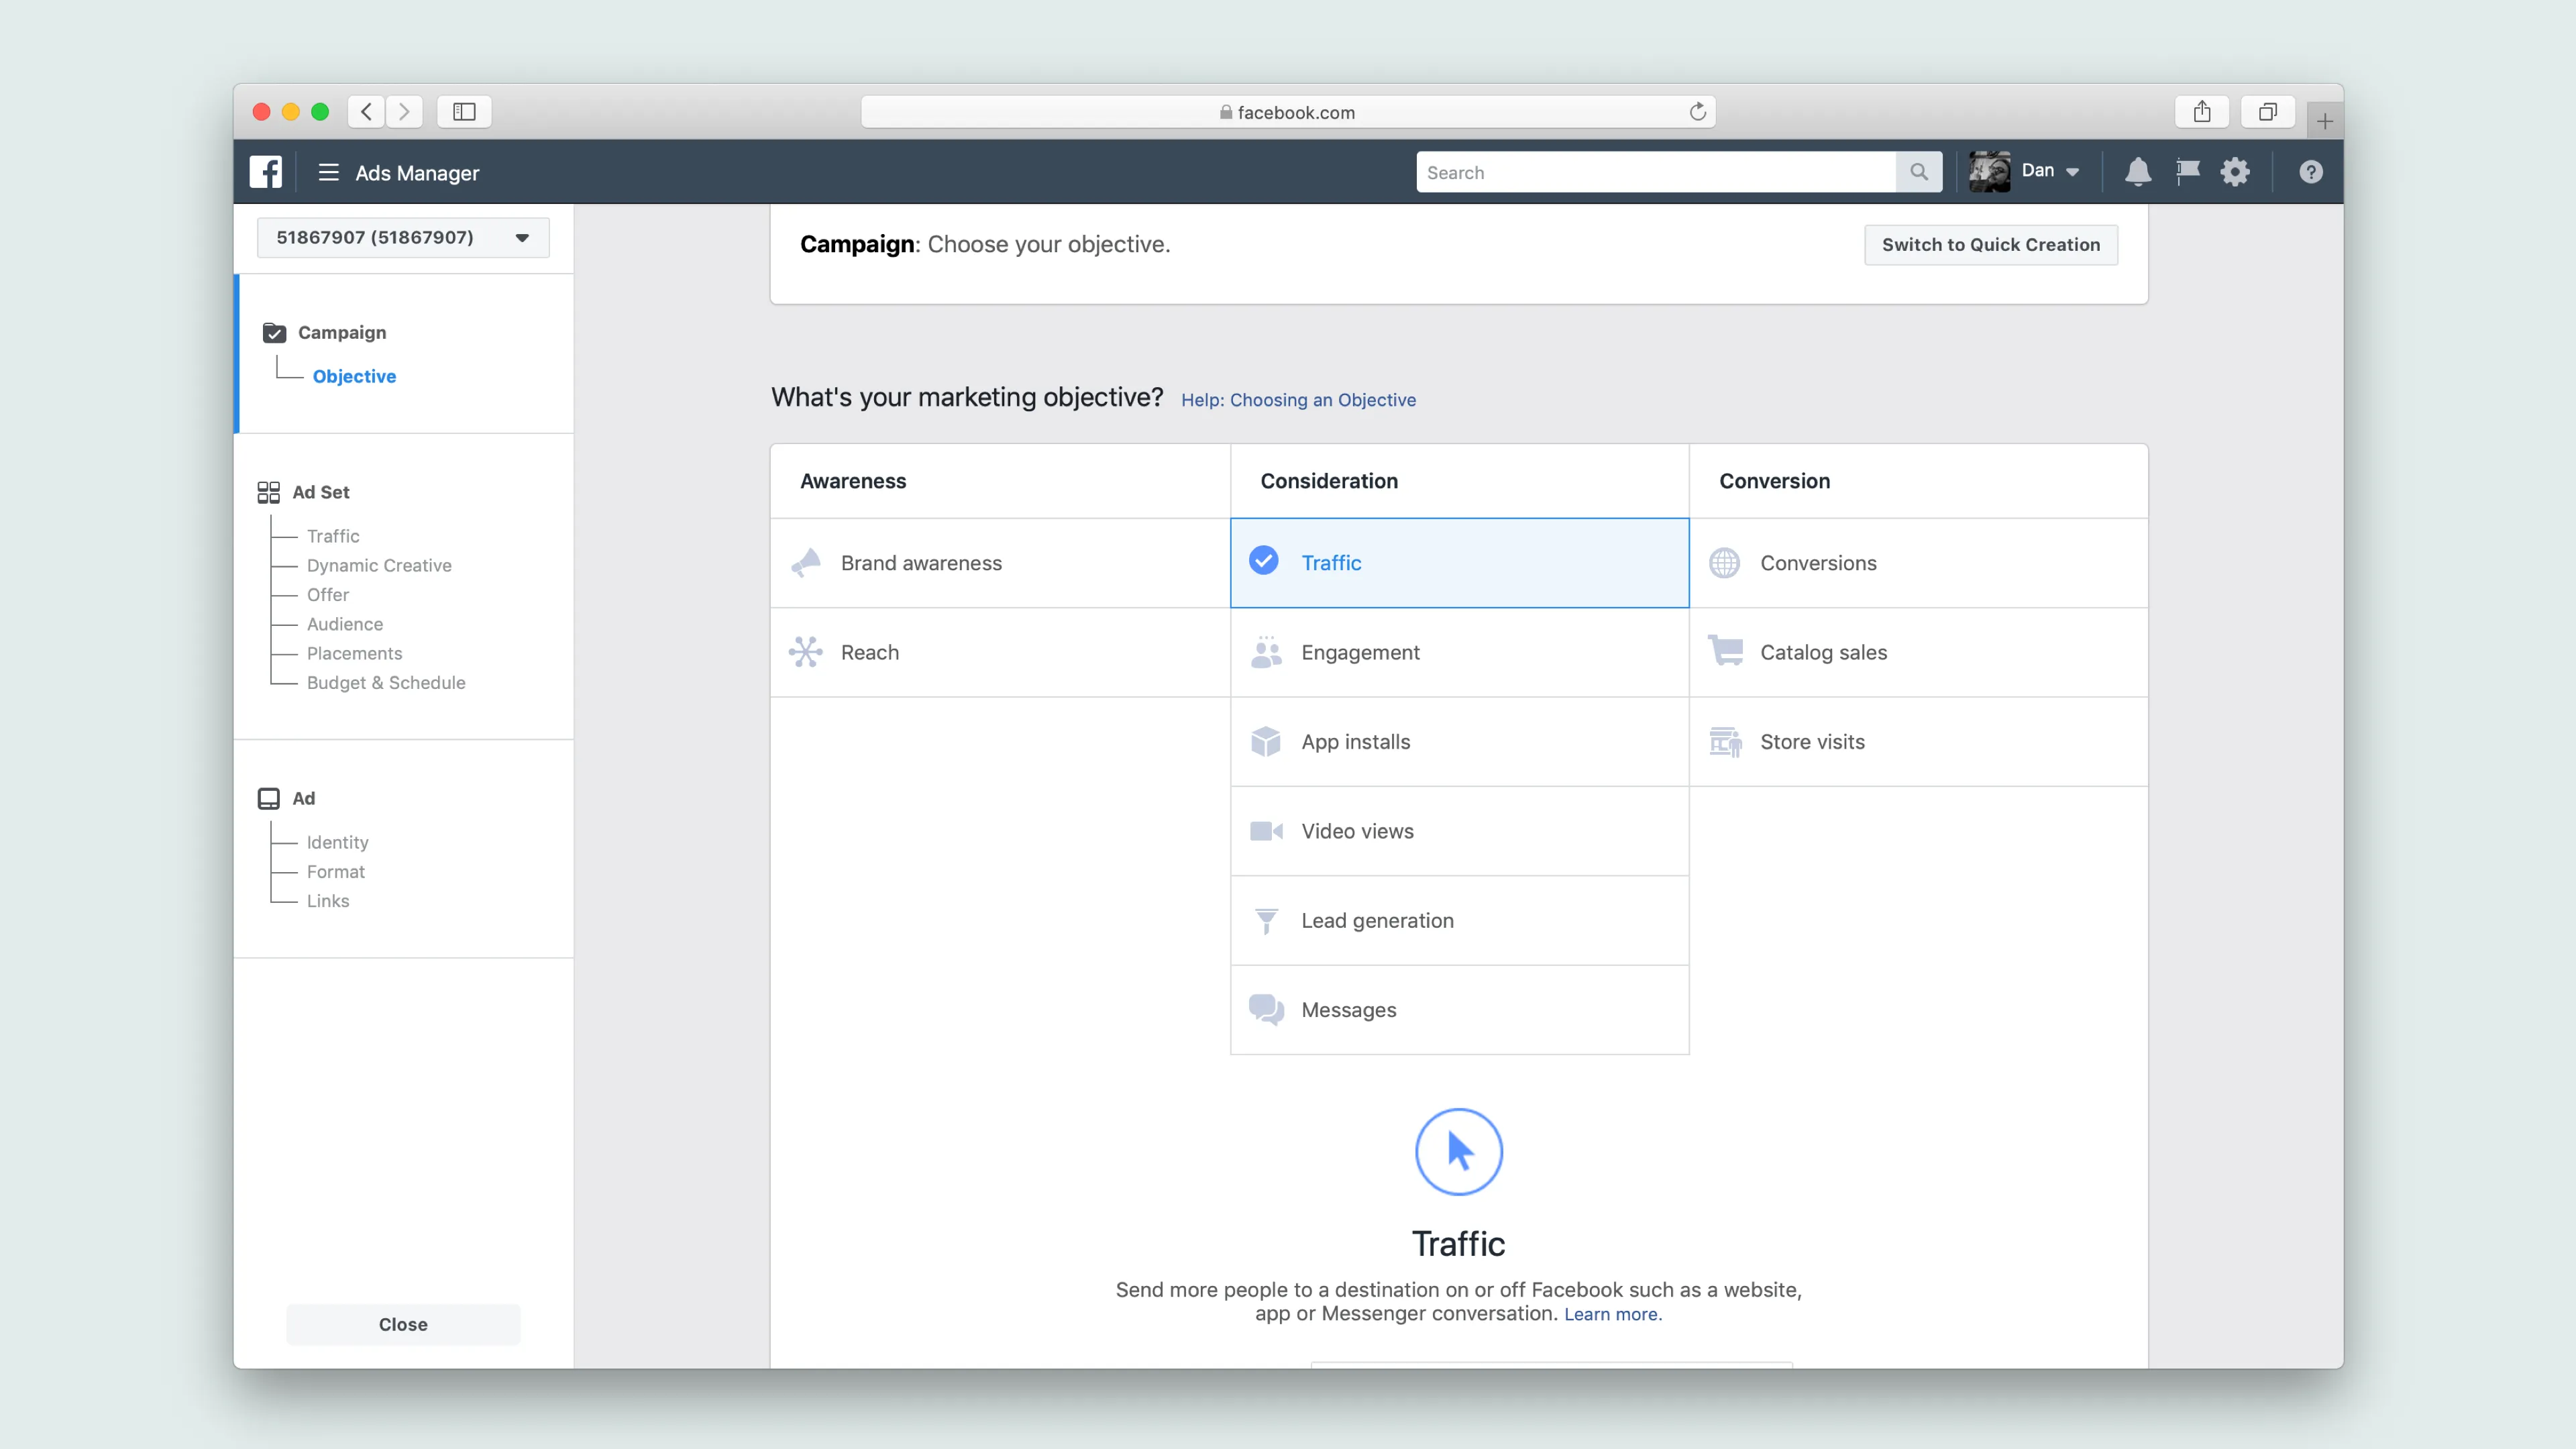
Now you’re prompted to select a campaign objective. In this example we’re wanting to direct traffic back to the cart so customers can complete their order, so we’ll select TRAFFIC. For more information on the kinds of campaigns you can run on Facebook read this article: Choose your ad objective
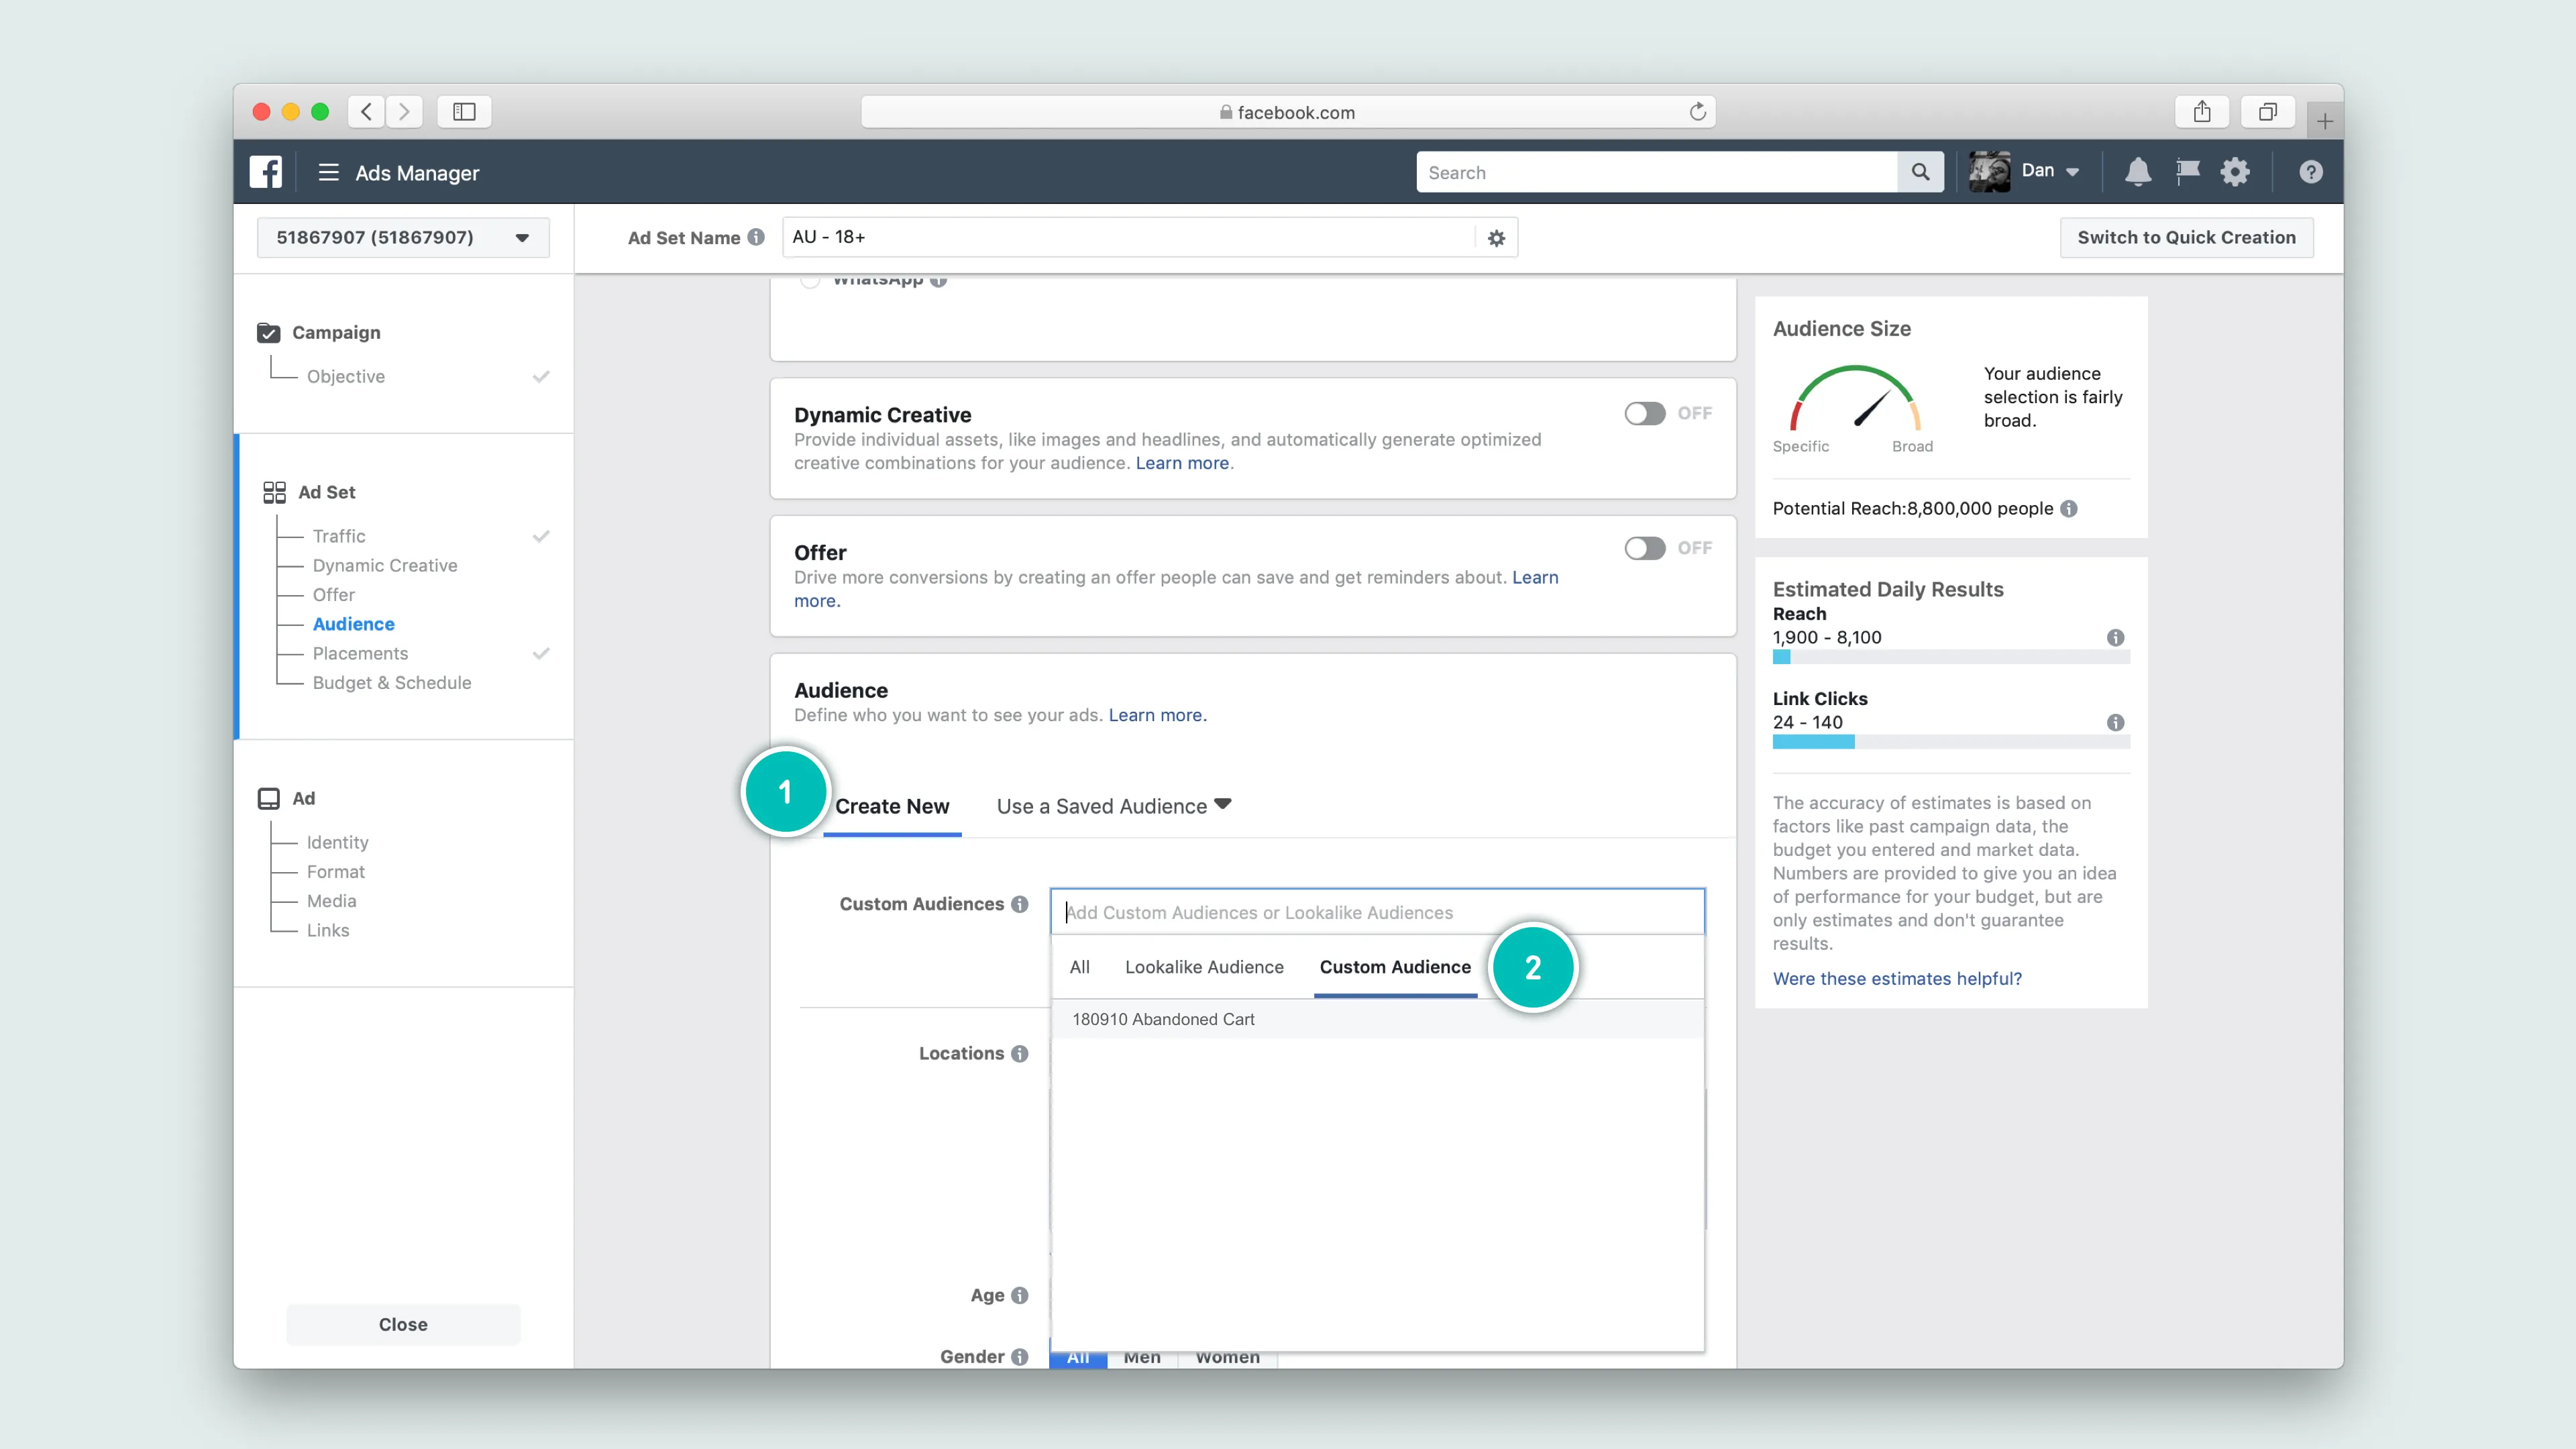
Once you’ve selected an appropriate objective, it’s time to create your Ad Set. This is where we’ll select from recently exported audience, specify where we want to publish the audience, and nominate a budget for the campaign.
Placing your ad on Instagram
Immediately after you’ve selected your audience targeting, you are will find yourself at the Placements section. Automatically selected is the “Automatic Placements (Recommended)” option. This will automatically place your ad across Facebook, Instagram, and other Facebook ad networks with the goal of optimizing your ad spend. In this example we want to select the “Edit Placements” option as we only want this to appear on Instagram.
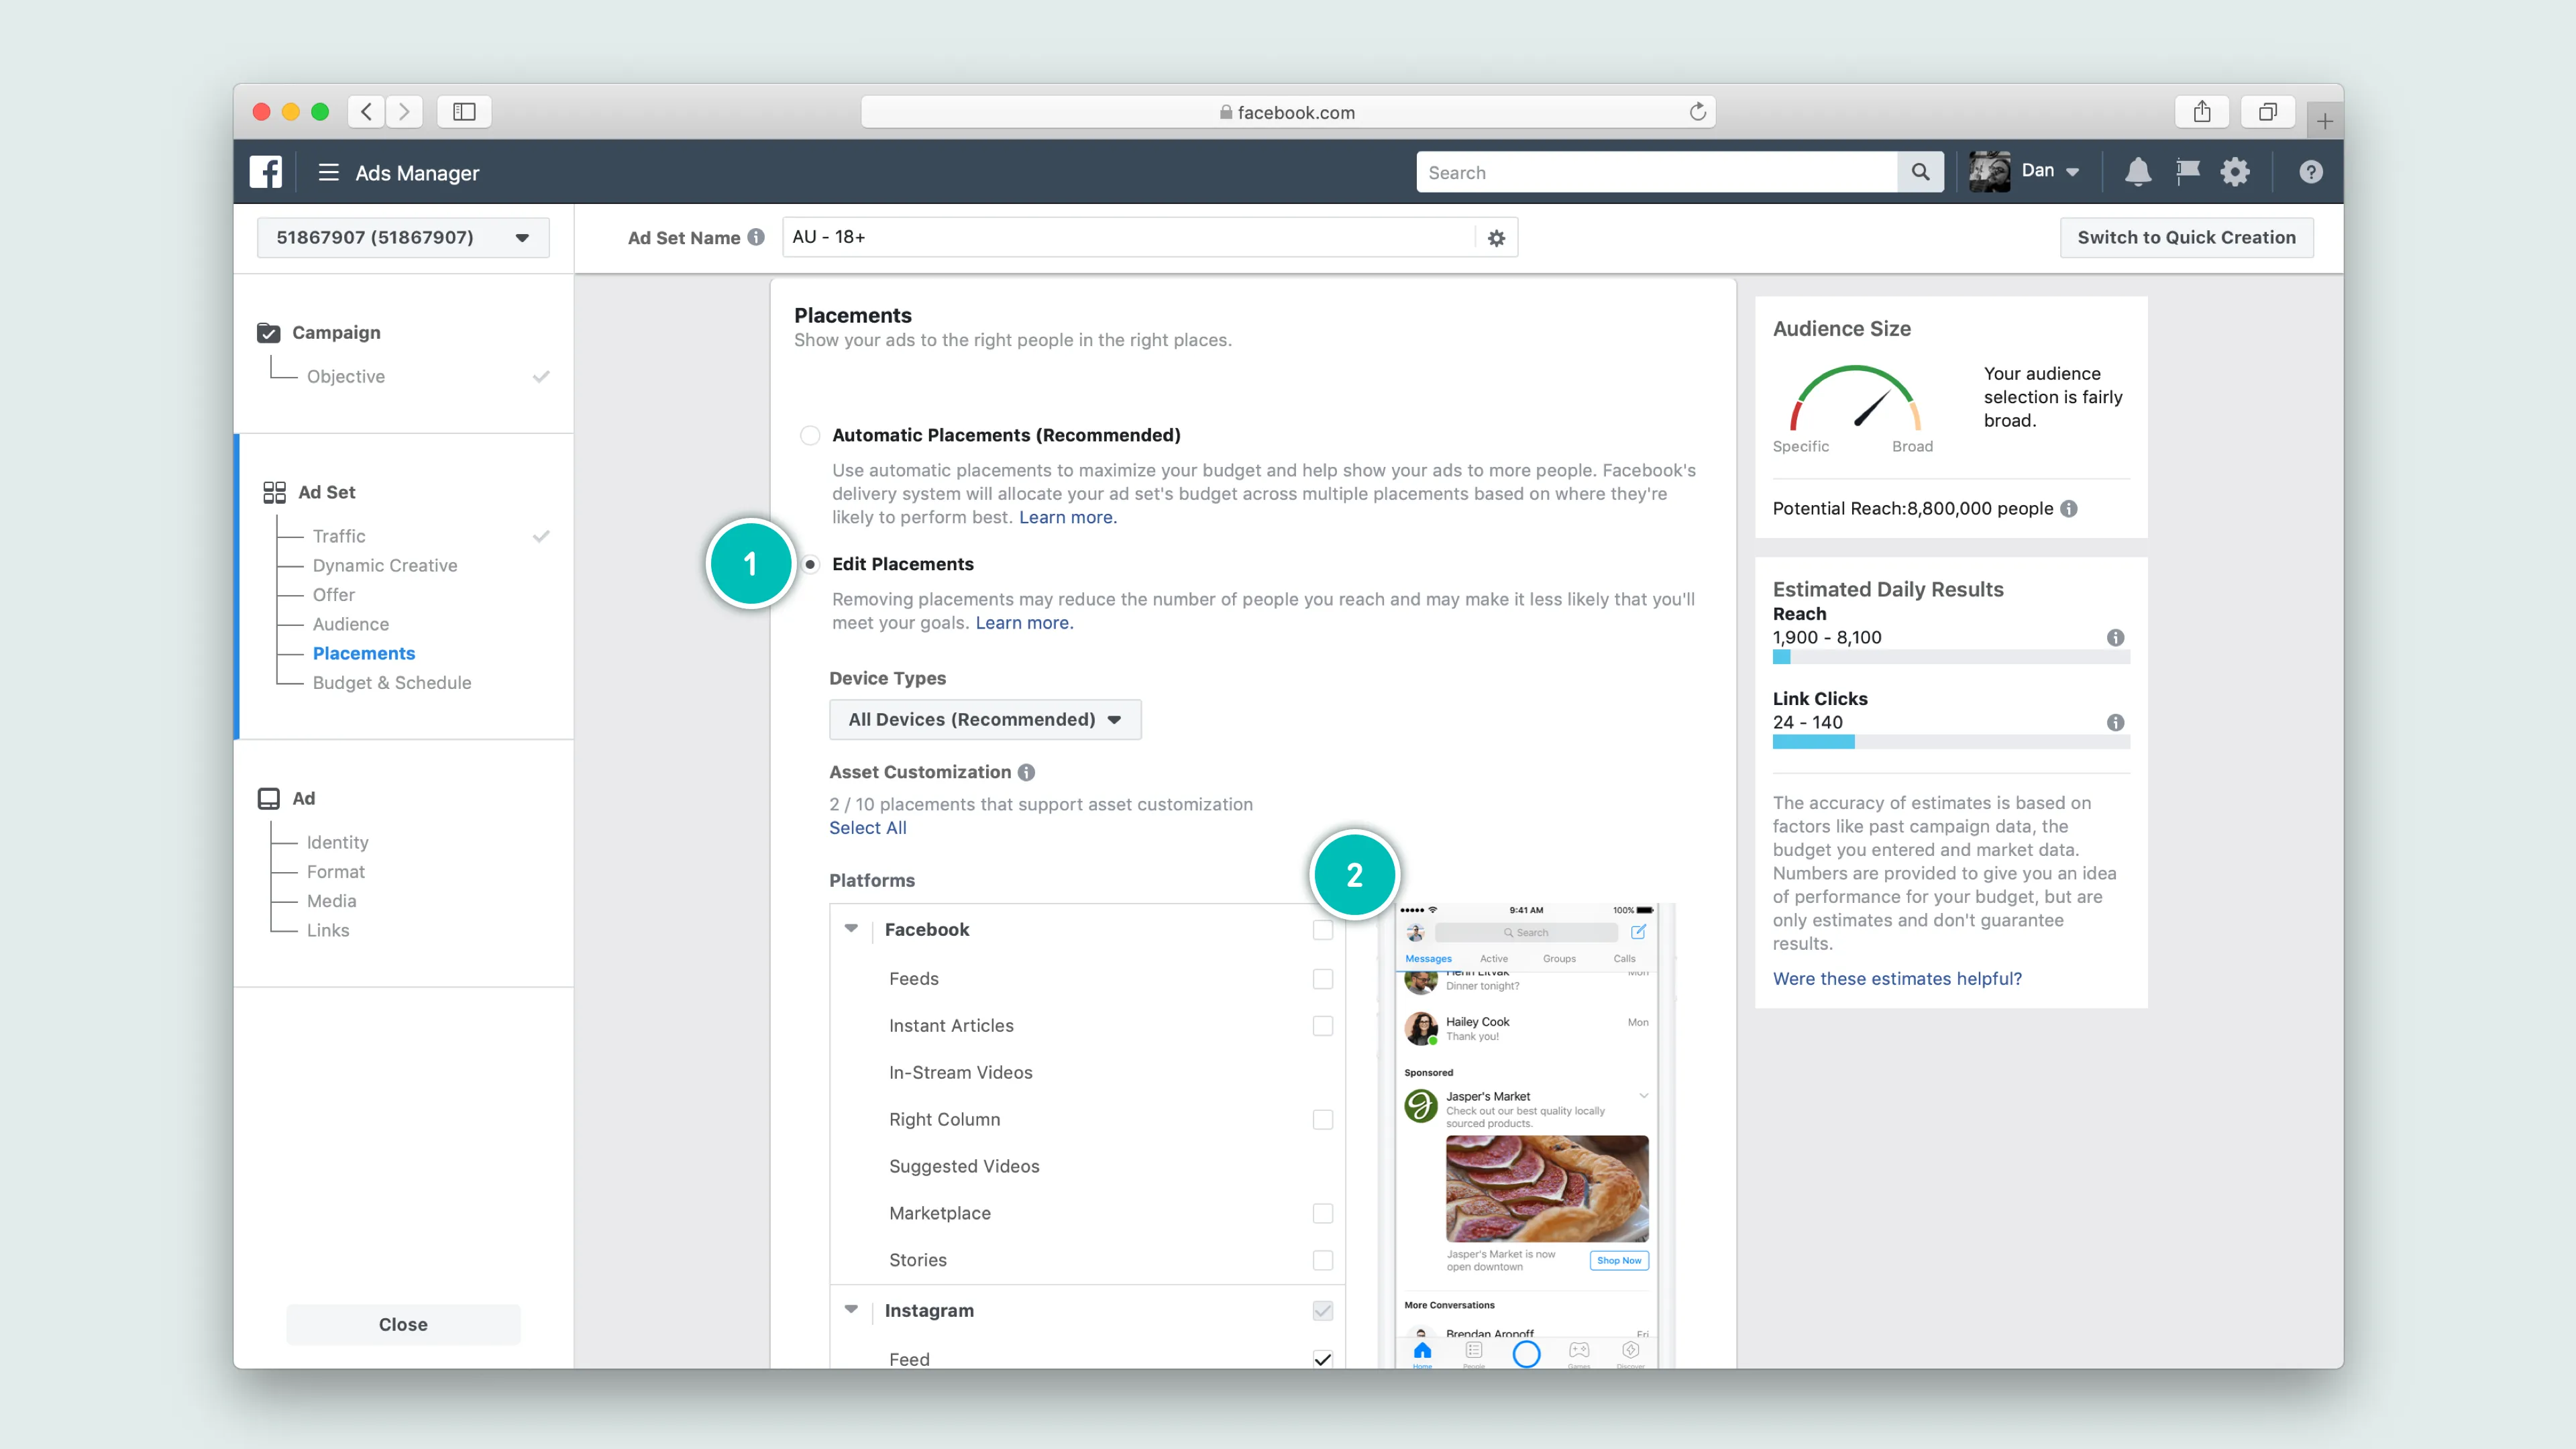
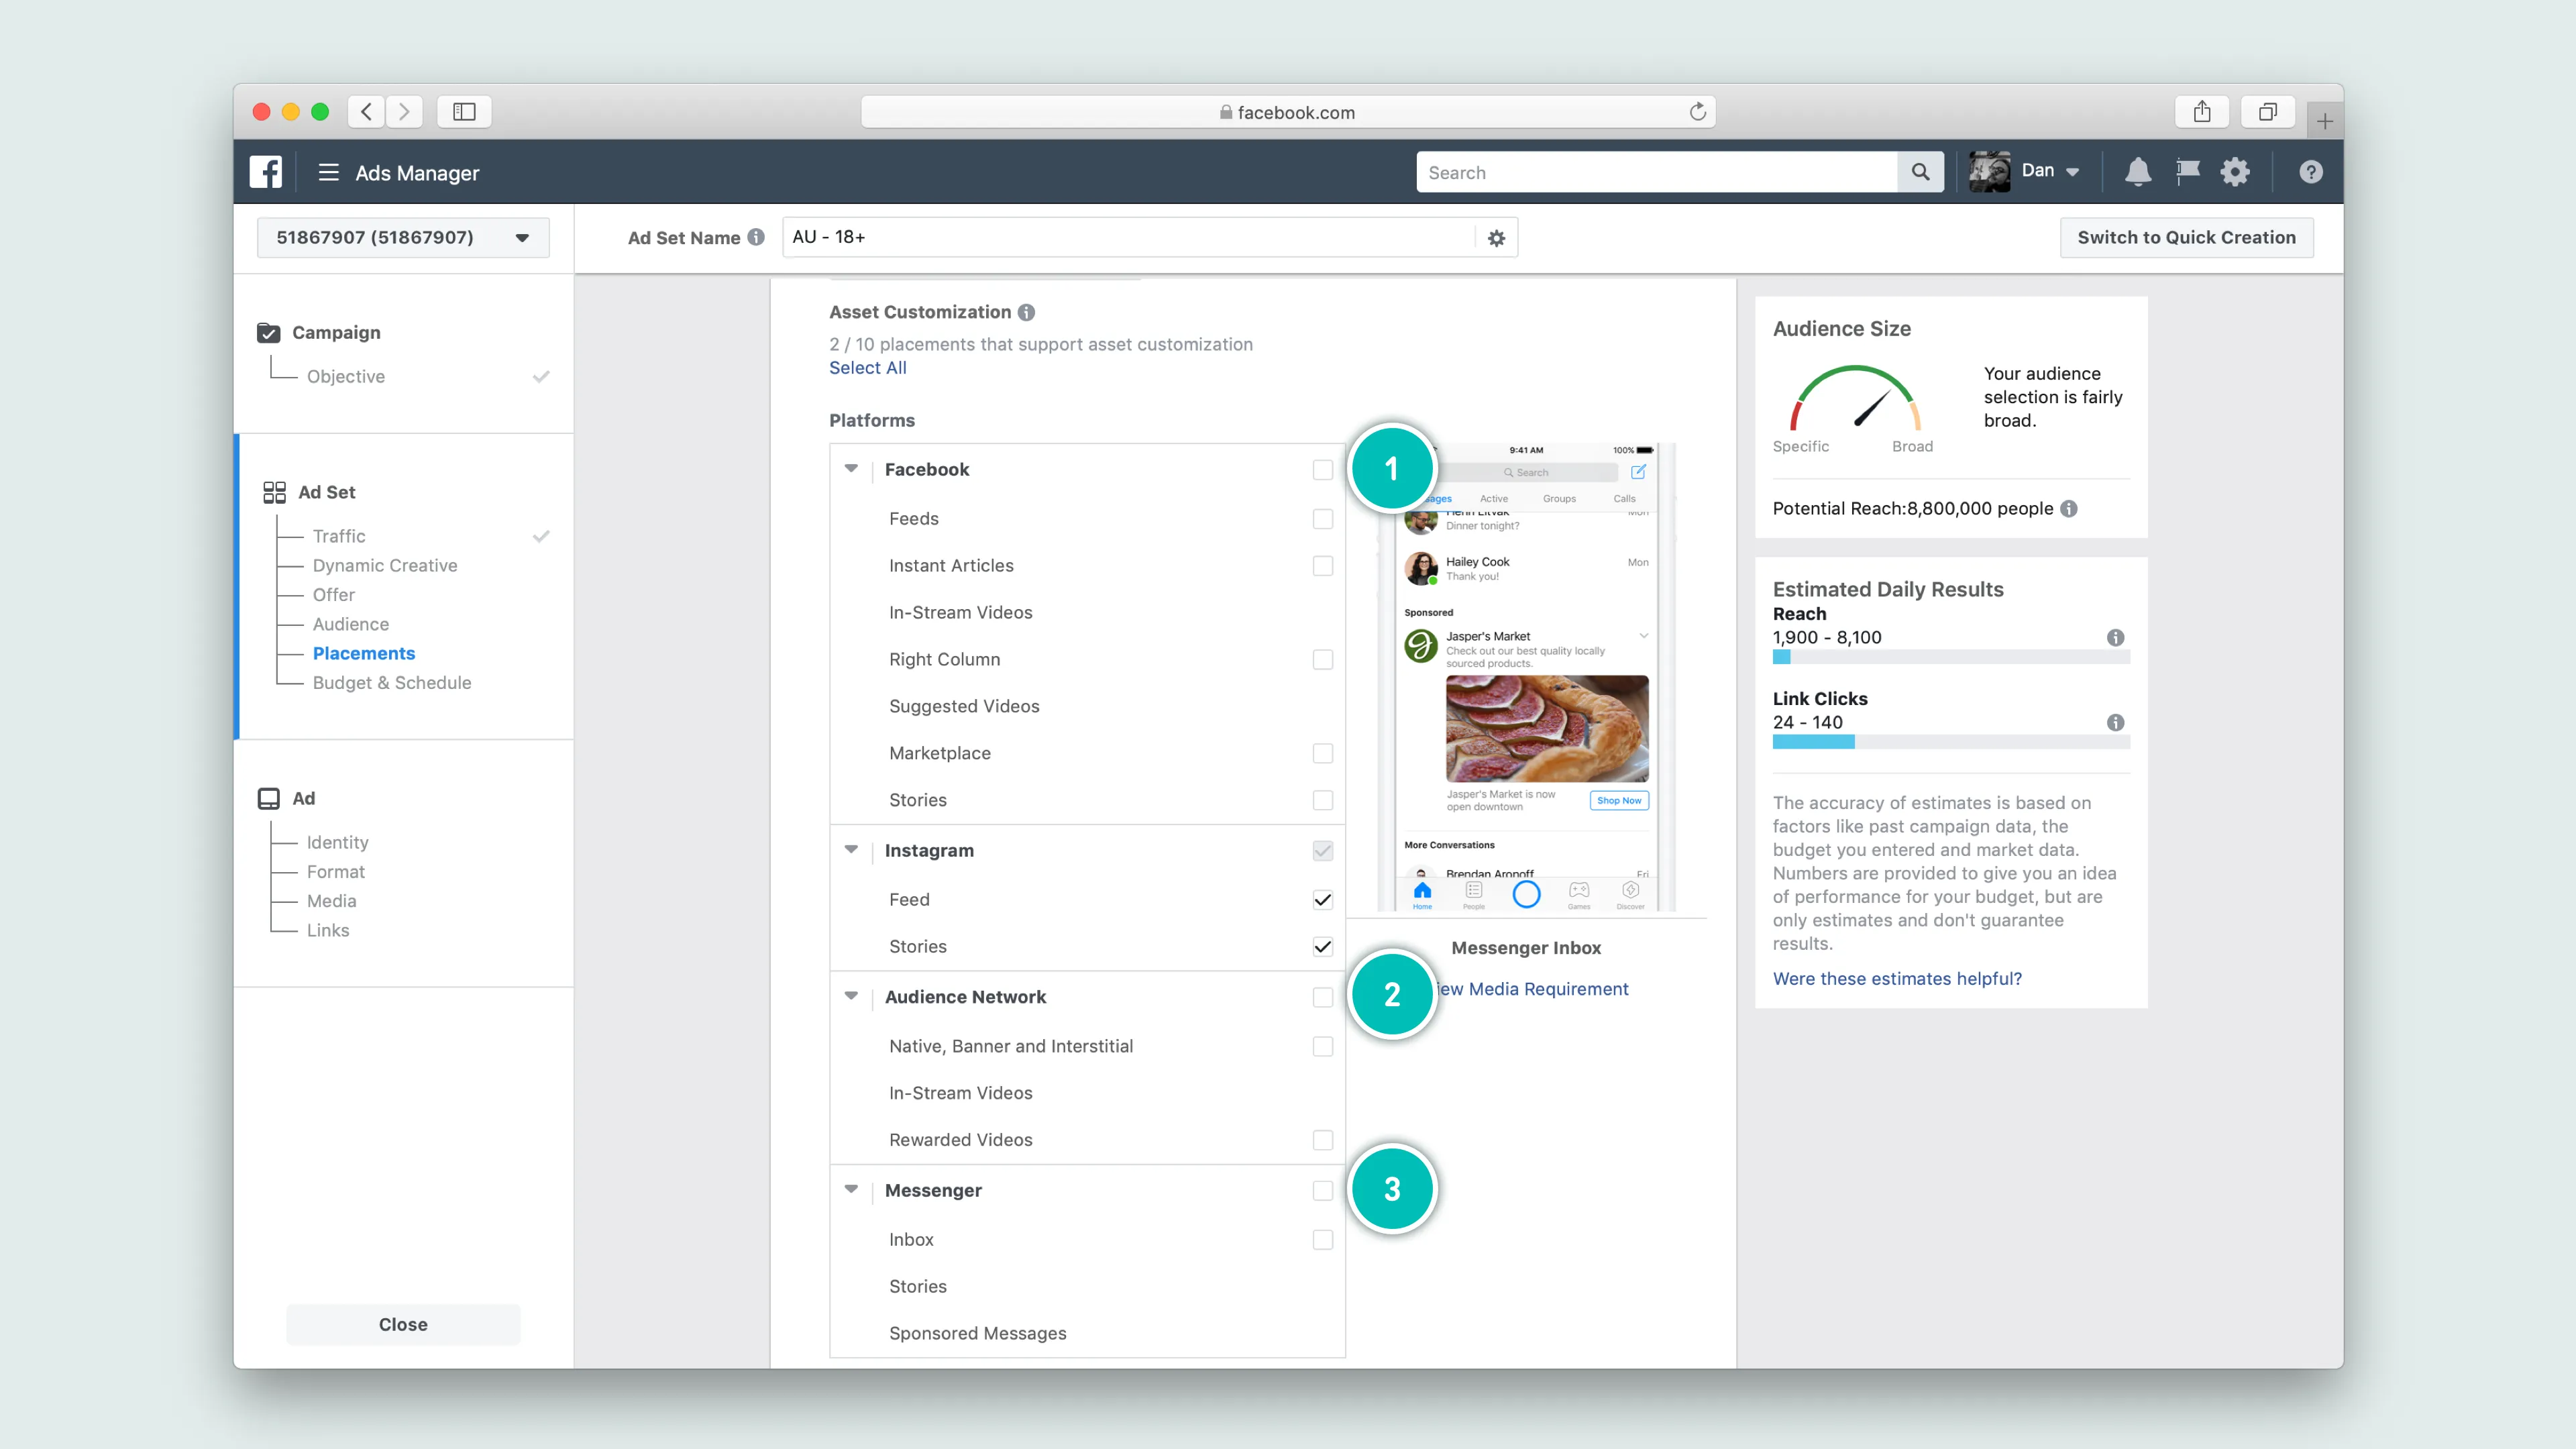
From here you can specify not only which networks to display your ad, but also if you wish to limit it to desktop or mobile only users. Leave both checked, given Instagram is predominantly a mobile used platform. In the Platforms section, remove all options except for Instagram.
Set your budget
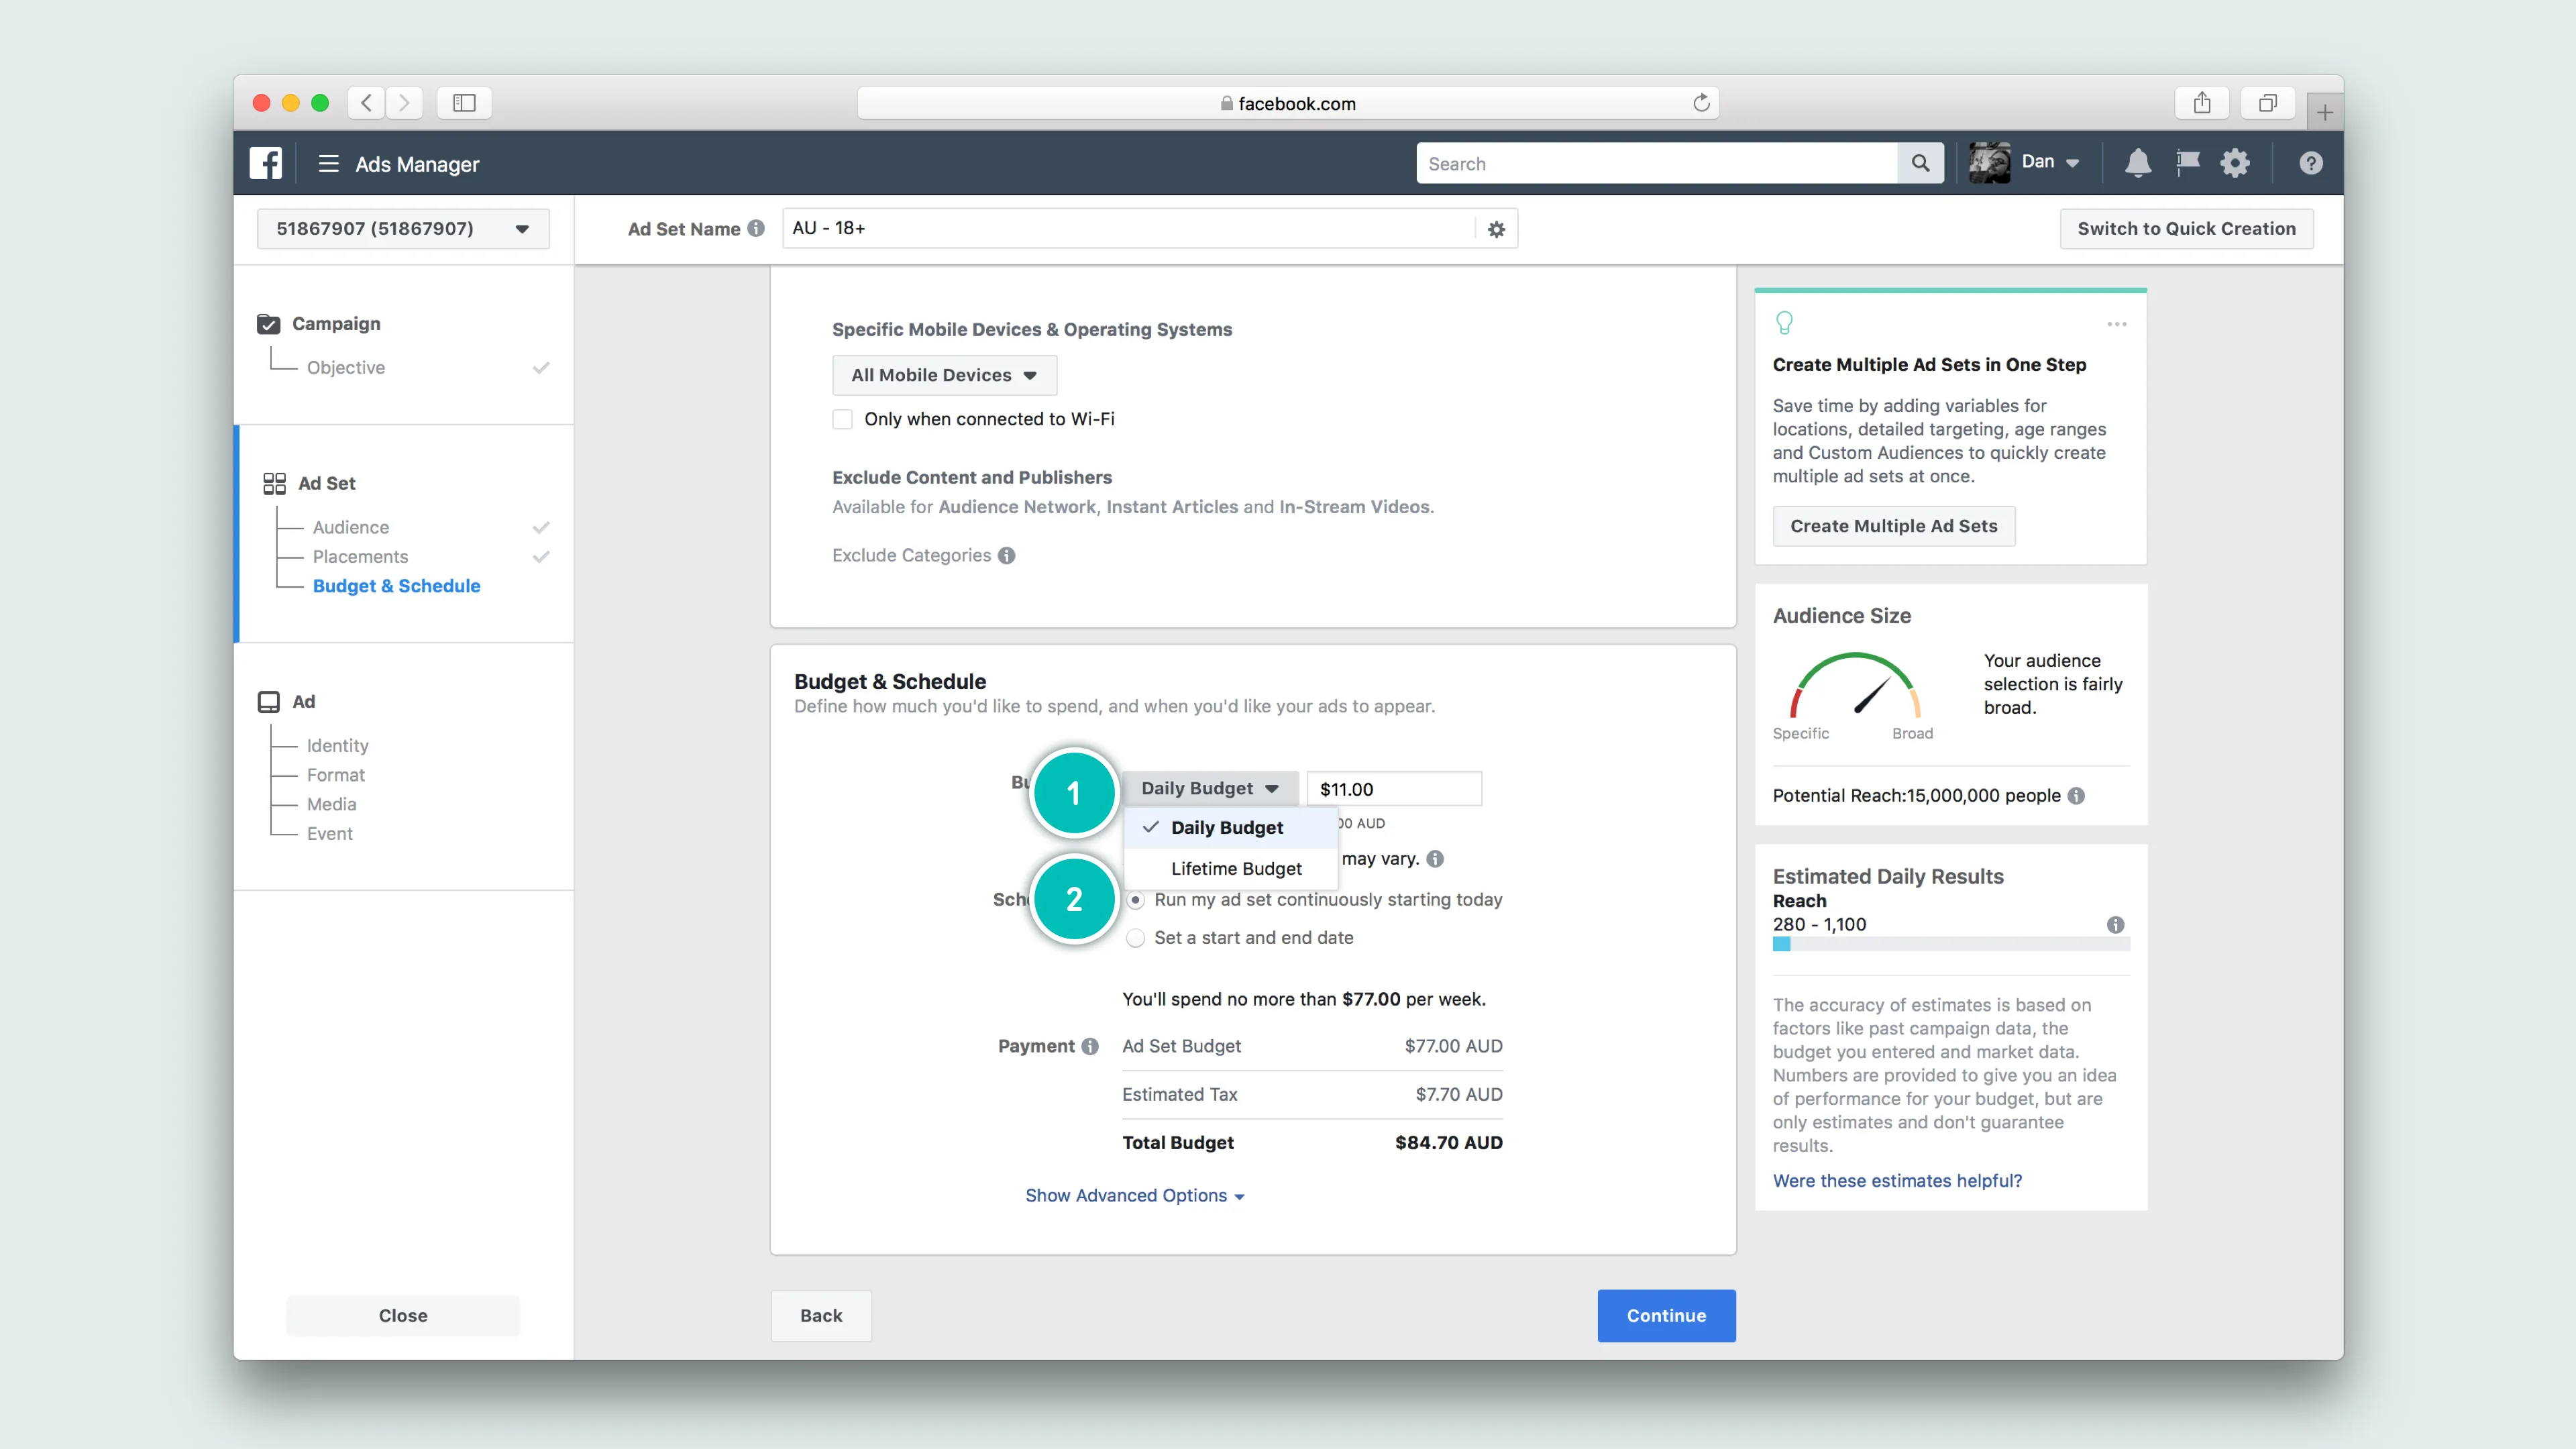
When setting a budget you have two options:
- A daily budget, which provides a cap on how much you wish to spend per day. These ads can run continuously, or you can specify a start and end date
- A lifetime budget, these have a start and end date but you select the maximum you wish to spend over the lifetime of the campaign.
The kind of campaign you’re running will largely influence which option you select, in our current example we’re targeting abandoned cart shoppers, so this will be an always on campaign and we don’t want to specify a start/end date.
Add your creative and publish
Once you’ve selected your budget, and have selected ‘Continue’, it’s time to choose your creative and copy. Here you can select a few formats of ads: a carousel of images, a single image, a single video, or a slide show (looping 10 second video). After you’ve loaded your visual content scroll down and setup your call to action, and have a look at the preview of your ad. If you’re happy with everything, select confirm and wait for your ad to be approved.
Final things to remember
- You need a Facebook Business page integrated into Lexer
- That Facebook page needs to be linked to your desired Instagram account
- If you audience is set to auto-update it will only do when it changes
