
Measure campaign effectiveness: Track your KPIs and report on campaign performance
Measuring campaign effectiveness starts at the planning stage, not the post-mortem. If you know the metrics you need before a campaign goes out, you give yourself the best chance of learning something useful, proving ROI, and making the next campaign better.
This article walks through how to use Lexer's Track tool to measure a campaign end to end. If you're new to Track, start with the Track overview first.
What are you trying to achieve?
Before anything else, get clear on the campaign's goal. Are you testing an offer, creative, or message? Looking for a lift in a specific metric? Typical targets:
- Sales and lifetime value (LTV)
- Order volume
- Site activity
- Email engagement (opens, click-throughs, unsubscribes)
- Subscribers or sign-ups
For inspiration, browse client stories on lexer.io.
Audience splits
Once you know what you want to measure, structure your audience so you can measure it cleanly. Audience splits help you test creative and isolate what works.
A/B splits (50:50)
Pick your target audience, then split it evenly 50/50 when activating it. Each half receives a different creative. Whichever half performs better wins.
Control group splits (90:10)
The 90:10 split uses the same principle as A/B, but reserves 10% as a control group that receives no creative or message. The 90% receives the campaign as normal. The control group gives you a clean comparison, so you can attribute any lift directly to the campaign rather than to background activity.
Which audience attribute should you use?
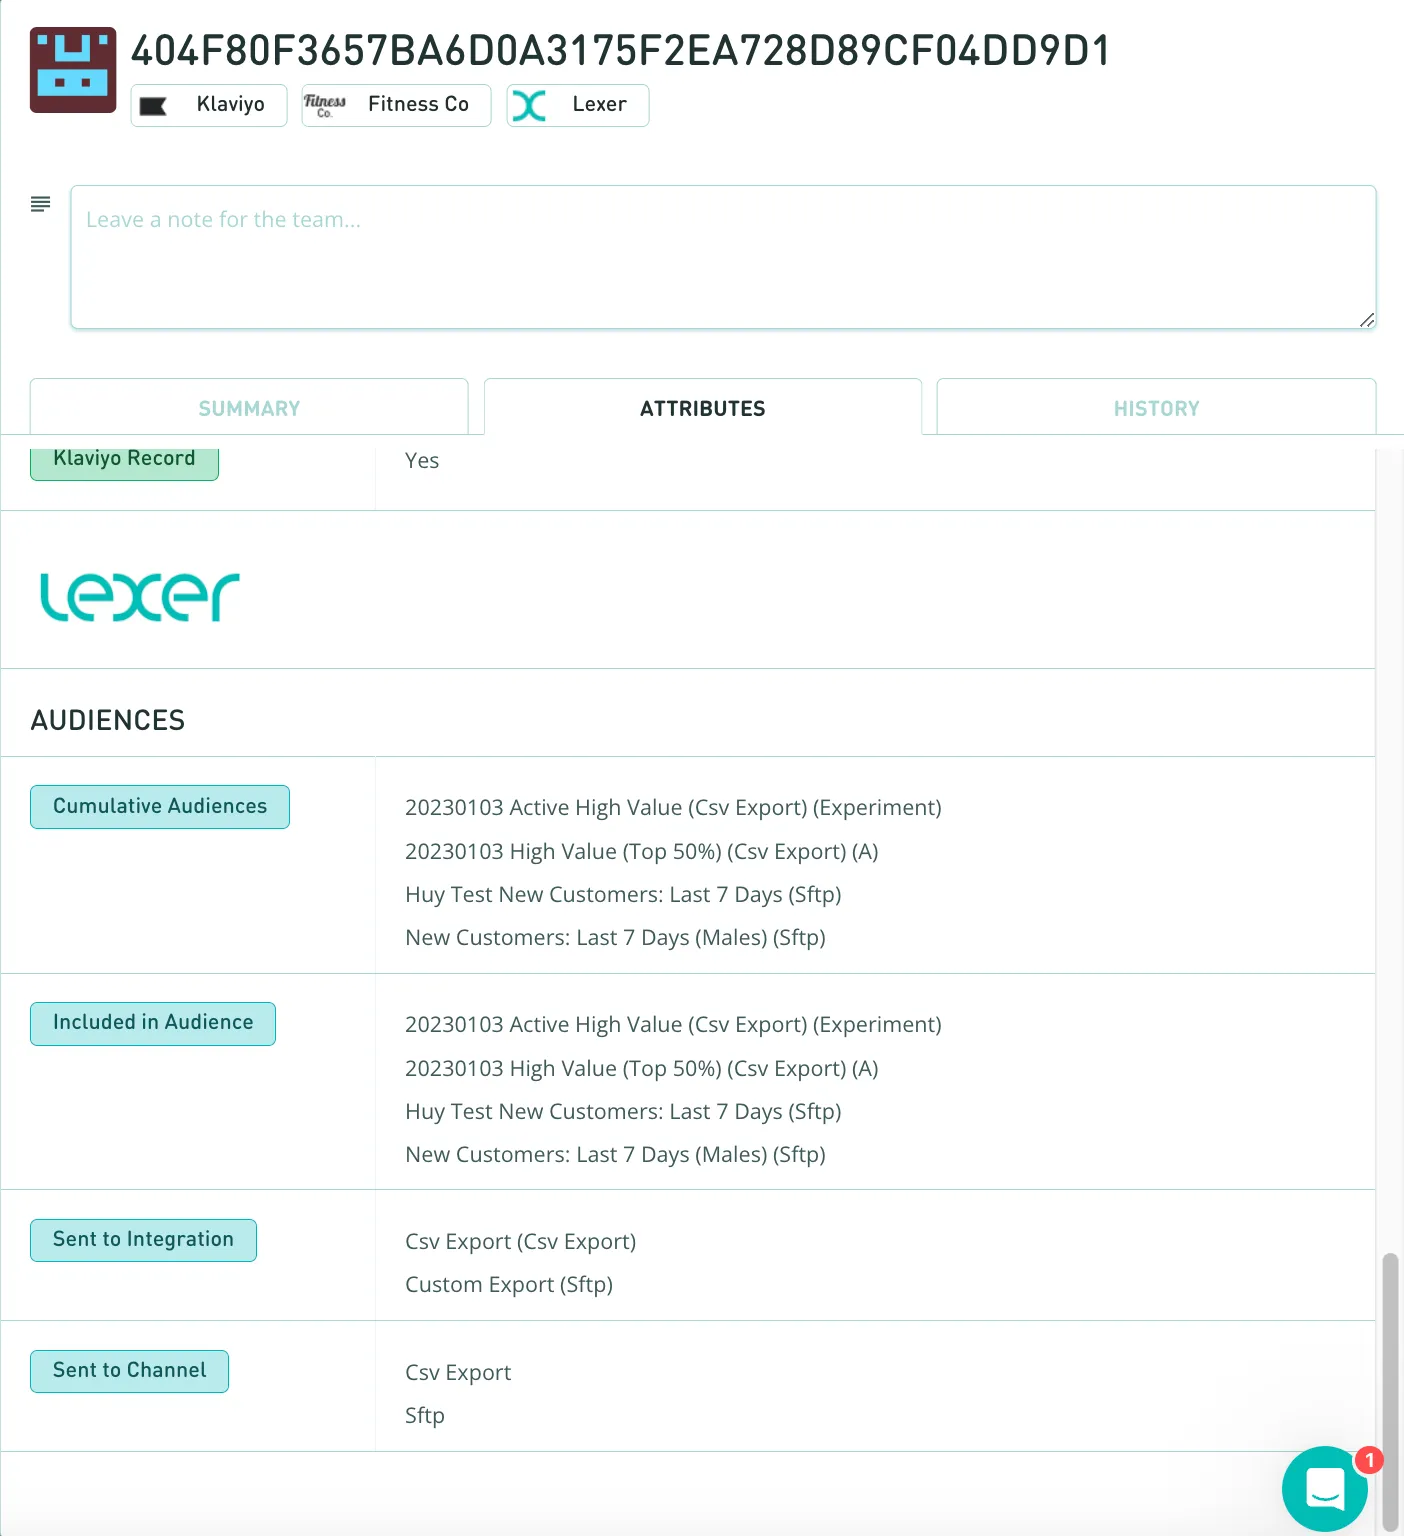
When you activate a campaign, Lexer stamps two attributes onto every profile. Included in Audience and Cumulative Audiences.
They look similar but do different jobs. Pick the right one for the right scenario.
For the rest of this article, we'll use Cumulative Audiences examples for measurement segments, and Included in Audience for the A/B exclusion logic example below.
Lexer tip: exclude the B group from future activations
To stop your A/B test from being polluted by follow-up sends, exclude the B group from any related activation using Included in Audience.
If your campaign targets High Value (Top 50%) customers and runs as an A/B split, Lexer tags each profile with the activation name plus an "(A)" or "(B)" suffix, as shown below.
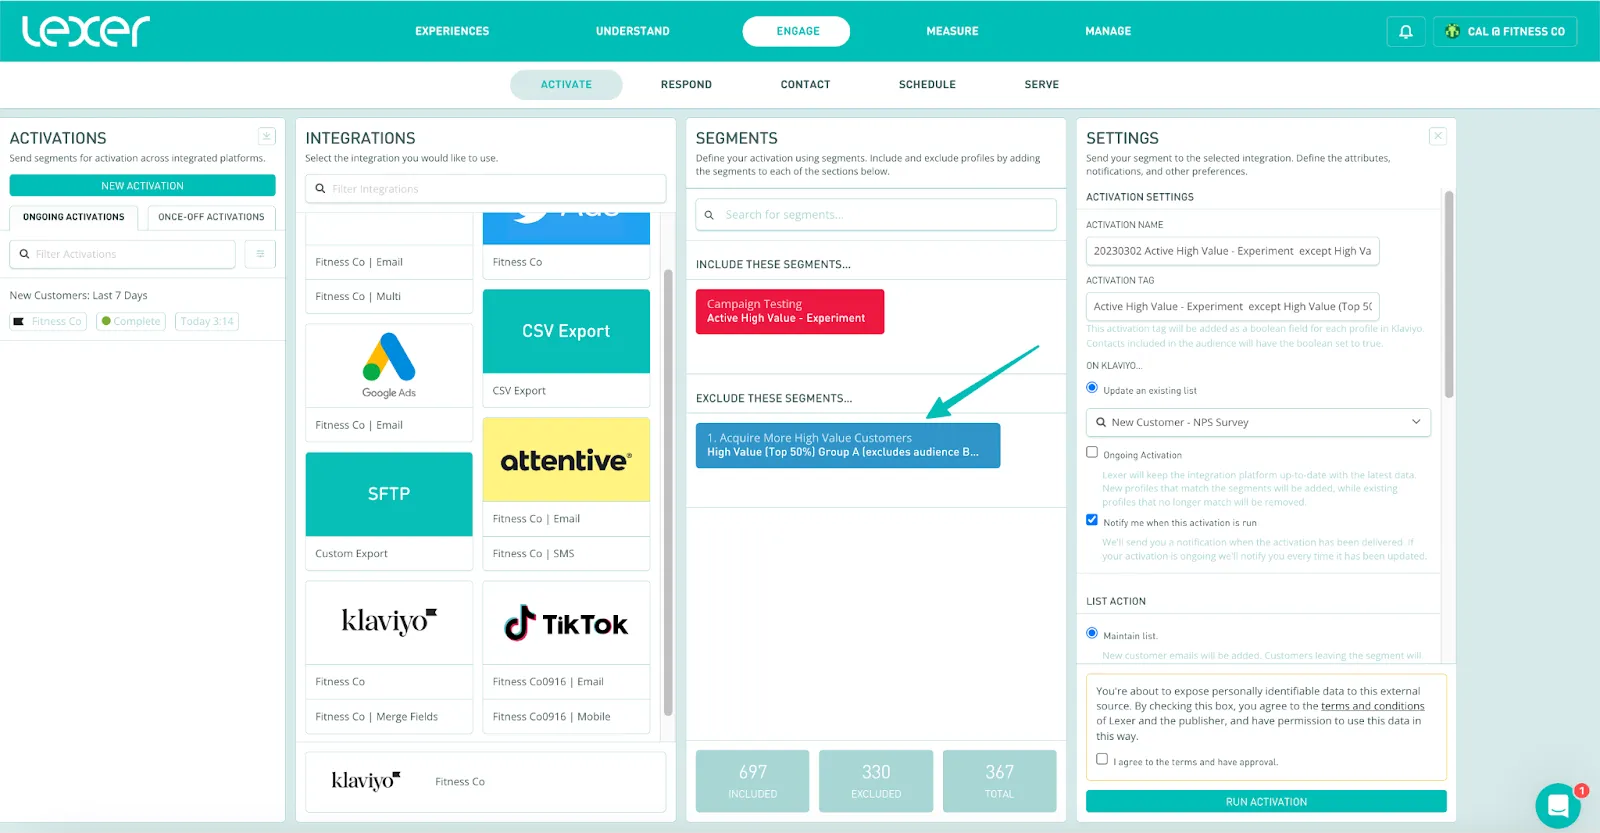
Build a segment that includes the (A) audience and excludes the (B) audience:
- Go to Segment.
- Add Included in Audience and select the (A) audience, e.g. "20230103 High Value (Top 50%) Csv Export) (A)".
- Add Included in Audience again, this time selecting the (B) audience, and drag it to BUT NOT HAVE ANY OF THESE.
- Click SAVE AS NEW SEGMENT and name it clearly, e.g. "High Value (Top 50%) Group A (excludes audience B) - 20230103".

Use this segment to easily exclude group B from related future activations. For an Activate refresher, see the Activate overview.
Set up your Track metrics
With the audience split done, the next job is to build a measurement segment you'll point your Track metrics at. This is where Cumulative Audiences comes in, because it keeps returning the same cohort no matter how the underlying audience changes.
Build the measurement segment:
- Go to Segment
- Add the Cumulative Audiences attribute and select your campaign audience, e.g. "20230103 High Value (Top 50%) Csv Export) (A)".
- If you ran an A/B test and only want Group A, add Cumulative Audiences again with the (B) audience and drag it to BUT NOT HAVE ANY OF THESE.
- Save the segment.
Create the metrics:
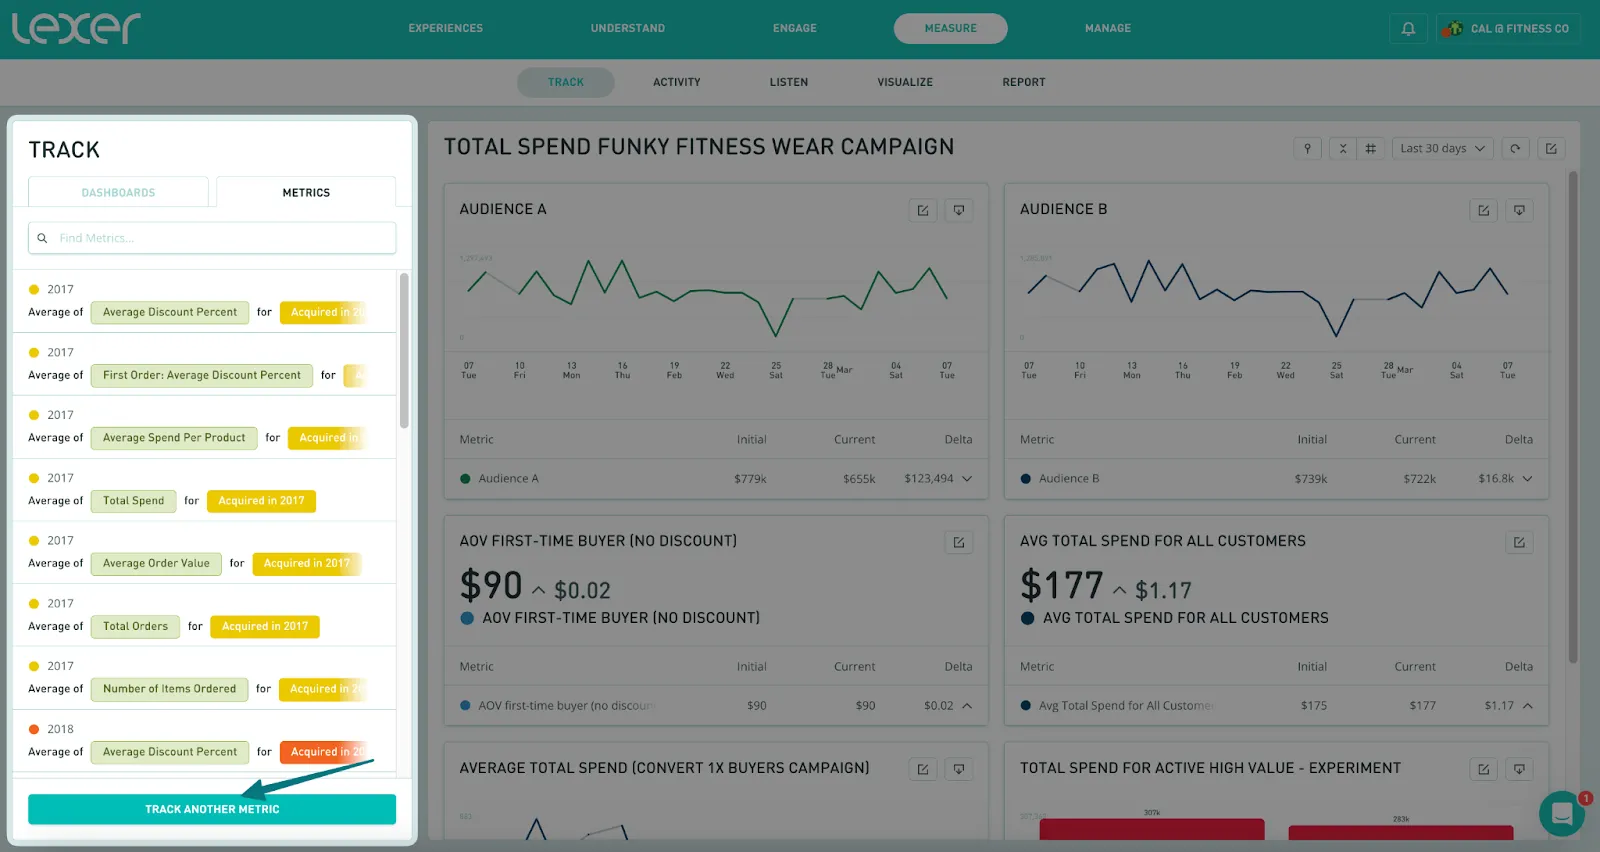
- Go to Track.
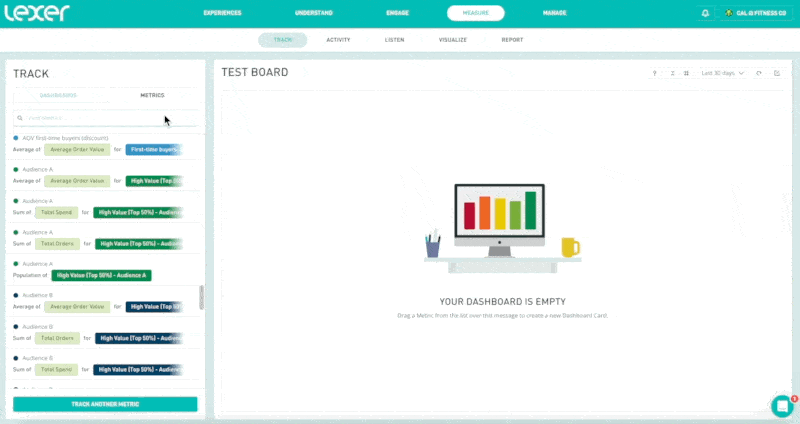
- Open the Metrics tab on the left, then click TRACK ANOTHER METRIC at the bottom.
- In METRICS SETTINGS, search for your saved segment.
- Pick the attribute you want to measure, fill out the remaining fields, and save.
- In the Segment search at the top of the METRICS SETTINGS, search for the segment you have created.
- Identify the attribute you would like to measure with this audience, then fill out the other required fields in the settings.
In our example here we're going to track the Total Spend for campaign segment X. To set this up, add the segment, “High Value (Top 50%) Group A (excludes audience B) - 20230103”, track the Total Spend attribute, in this case we have chosen to track this as a Sum. Once this is complete, finish filling out the details required for the Metric, give it a name, category, and Save.

You now have one Metric set up ready for your dashboard. Follow this process for the rest of the metrics you'd like to set up for each of your campaign segments.
Once this is done, you are ready to create a dashboard to track your KPIs before the campaign launches.
Build the Track Dashboard
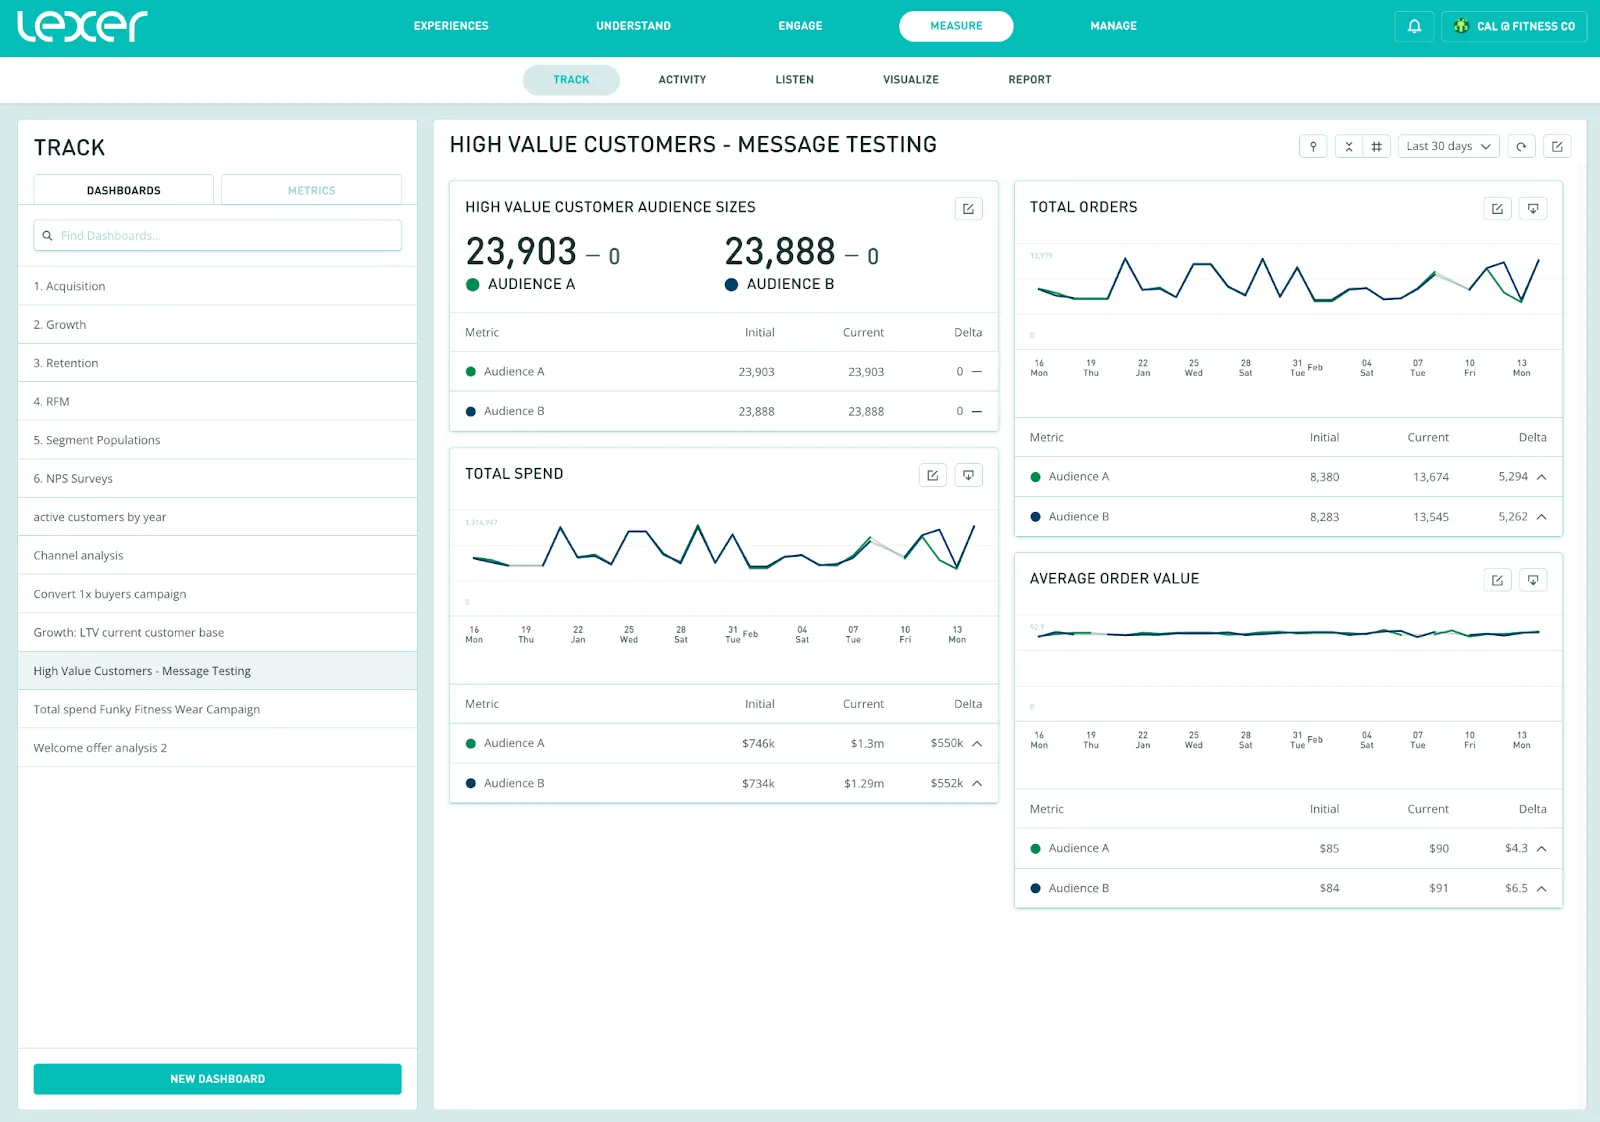
Keep dashboards simple. Metrics like Total Spend and Total Orders filtered by your campaign date range are usually enough to answer "did this work?". Compare your active audience against the control group and look at the delta.
- To add a new dashboard, click on NEW DASHBOARD on the bottom left of the Track home page.
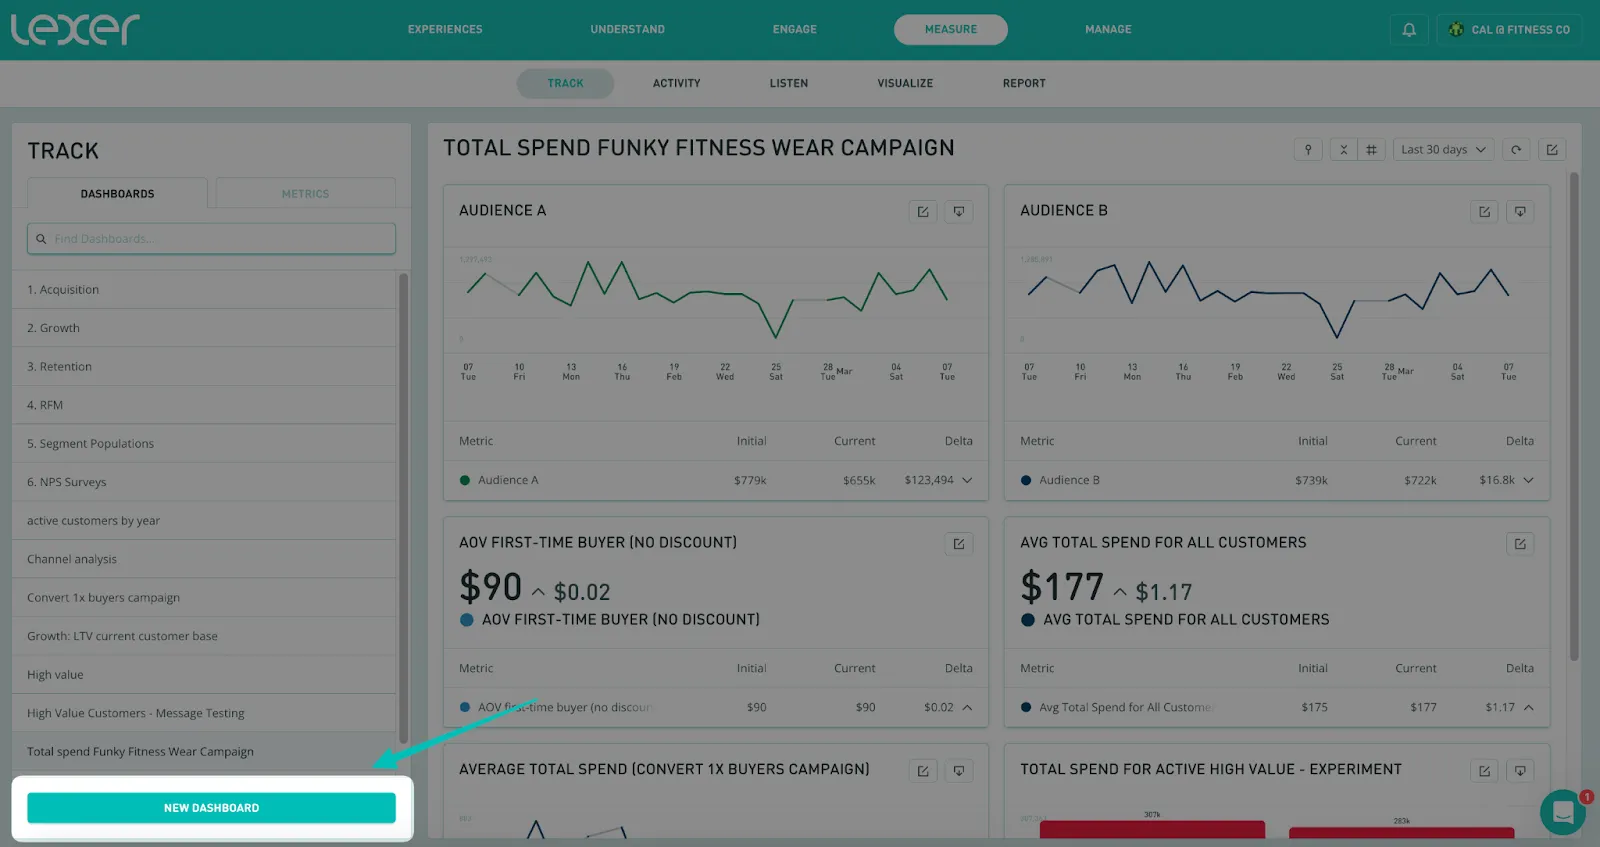
- The NEW DASHBOARD settings will then open up. Fill out these details with a name, category, and description.
- Once you have your new dashboard set up, you can drag and drop metrics into the dashboard.
As you review your Track dashboards, looking at the column titled delta, between the campaign start / end date, will help you determine the difference between the control group and your active audience.
Remember, a control group is used to provide a comparison, they will receive no new creative or messaging. This way you can compare the group that has received a new campaign with the control group. If there is a significant increase in the Total Spend delta of your active audience compared to that of your control, great news, your campaign is a success! If there isn't much difference between the audiences, your next similar campaign might need some careful consideration. You can see an example of this in the dashboard below.
How can this help me make business decisions?
Campaign attribution: How effective was the campaign? The track dashboards can help you understand, during the activation window (the period after sending the campaign in which customers are most likely to purchase eg. 5 days), how many customers have made a transaction.
You’ll need to choose an appropriate activation window, remembering the longer the window, the greater the opportunity for your metrics to be ‘tainted’ by other campaigns or activities running at the same time.
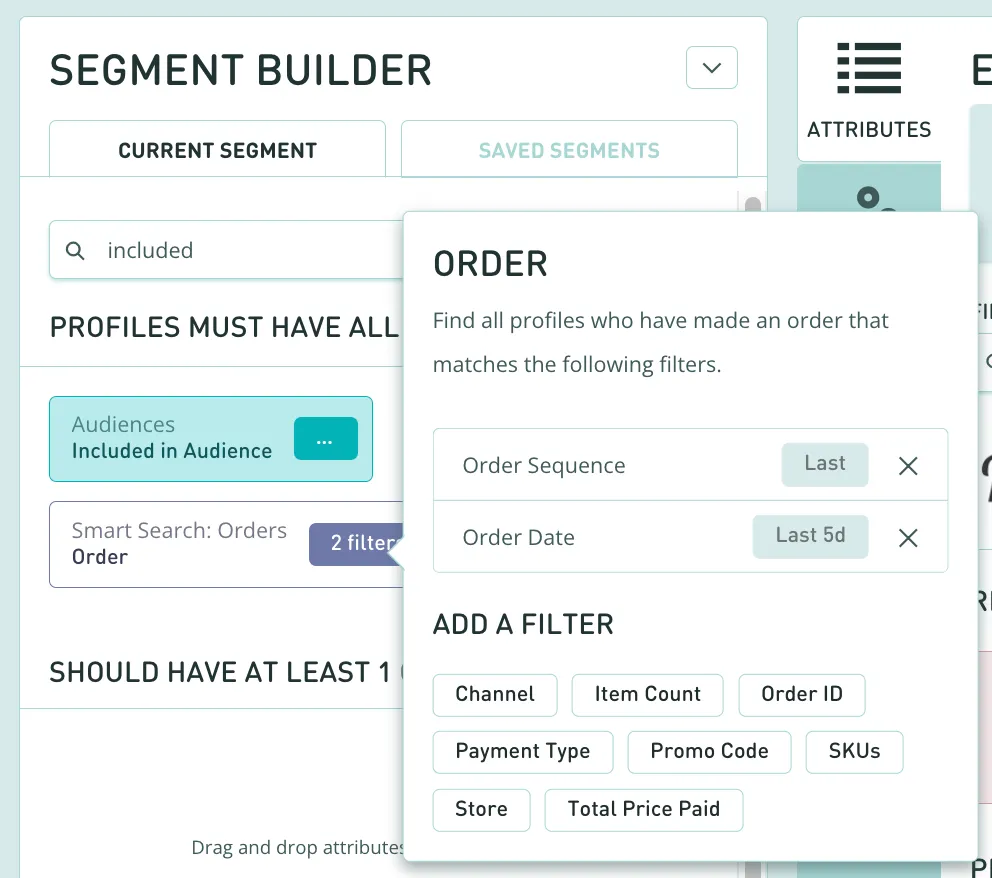
For example, you might want to see how many customers made a transaction in a 5 day period following the date that your email was sent. You can do this by creating a segment that includes two attributes in the PROFILES MUST HAVE ALL OF THESE section of the builder: the Included in Audience attribute, selecting the appropriate audience from the drop down, and the Order attribute with Order sequence - Last and Order Date - Last 5d.
From here you can create your metrics and add them to a dashboard to track changes after the campaign has been sent. This process was explained in the “Audiences are ready, let’s get your Track metrics set up” section of this article.
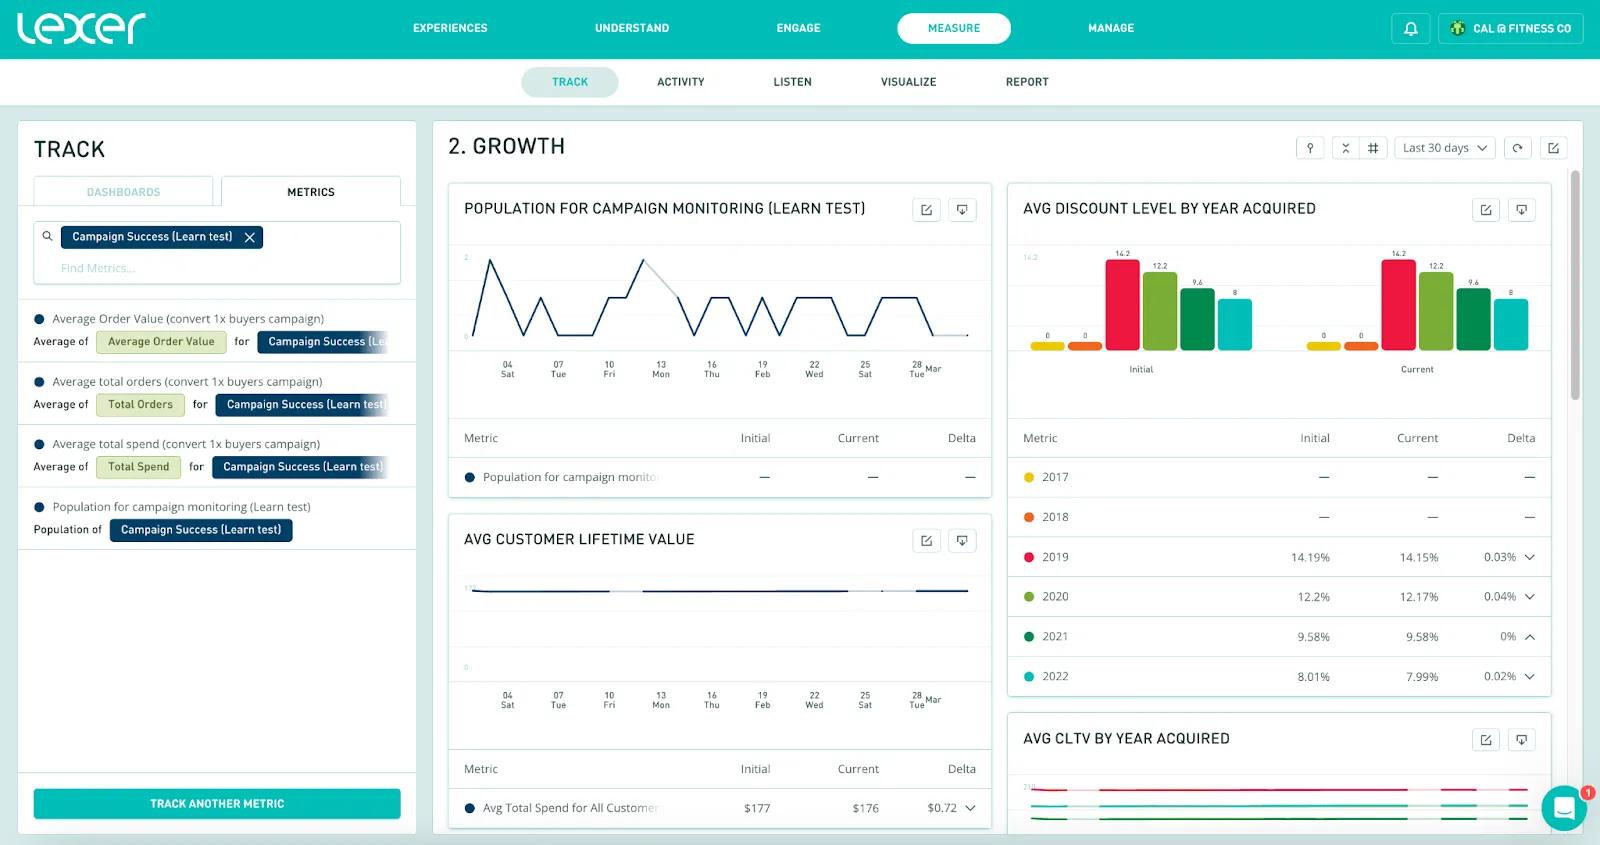
Audience insight: Once you have activated your audience, you can measure the impact in the CDP and use metrics like average order value, total orders, number of items per order, Experian Group, product category etc. to determine whether your campaign was effective for specific customer groups. This information can help guide the audiences for your future campaigns.
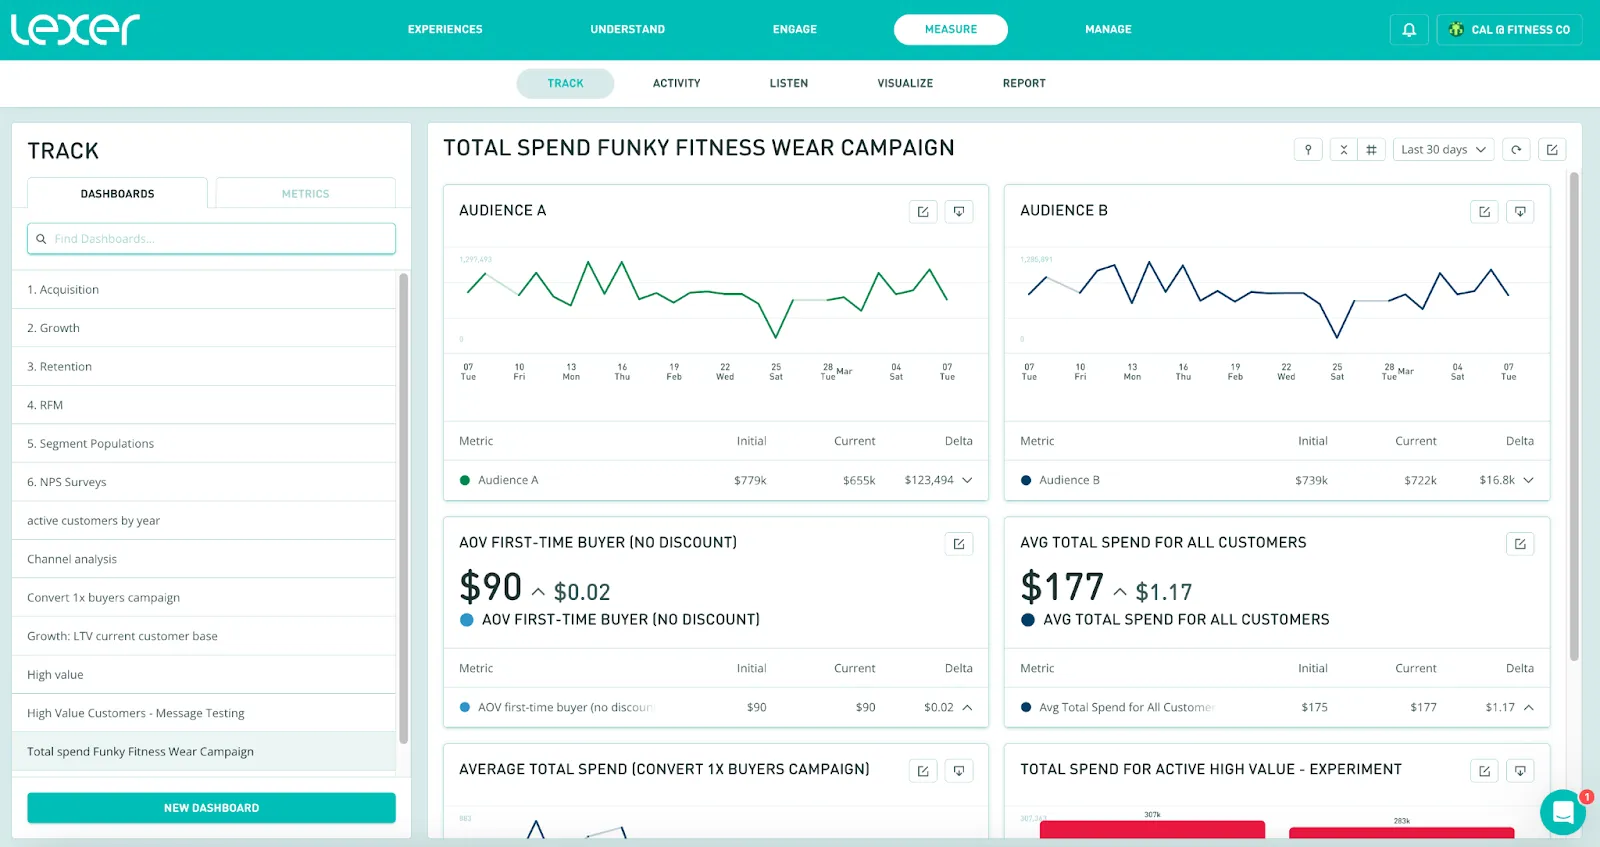
For example, if we look at the Total Spend Funky Fitness Wear Campaign in our testing Hub we can see a great representation of some of these key metrics for our A and B audiences. You can use the date picker to look at the impact of this campaign over time on the two audiences.
Combine insights from multiple sources: if you send transactional data to your Email Service Provider (ESP), the ESP will provide you with revenue per email. If you haven’t set up your ESP integration yet, you can search for your ESP on our integrations page. The Track dashboards in Lexer will then help you understand the customers who have transacted, and their total value to your business (vs just the email itself).
What next?
For deeper reading on Track, head to the Track docs. For more on the two audience attributes and when to use each, see Cumulative Audiences and Included in Audience.
