
Automation rules
Automate your inbox workflows with Rules
Rules allow you to automate inbox workflows so your team can spend less time manually adding classifications and closing irrelevant interactions and more time engaging with your customers. Rules can be setup to:
- Classify messages based on key words, source types, and authors
- Close messages that do not require engagement
- Assign messages to available team mates based on capacity and groups
Rules are setup on your Queues, so let's take a look at creating a Queue for your team.
How to create a Queue
Queues capture your inbound Posts, Comments, and Messages from one or more Saved Dives. Once you've created a Queue and started populating it with content, you can create Rules for automation. To create a Queue, navigate to Manage > Settings > Queues and click 'New Queue'.
How to create a Rule
With a Queue you can start adding Rules to automatically classify, close, and assign messages. Rules are run against all new inbound messages and apply their outcomes immediately when matched. Rules are run in order of priority (top to bottom) and can be rearranged in your list by drag and drop. Open your Queue, go to the Rules tab, and click 'Add New Rule'.
Conditions for a Rule are specified in the 'When' section at the top, where you can use either the Matching Terms, Source Types, or Authors filters. A new message must match all criteria specified in these fields for the outcomes to be applied. Outcomes for a Rule are chosen in the 'Then' section below, where you can choose to add classifications, update workflow state, or directly assign the message to a team member.
Rules can be created but set to a 'disabled' state to prevent them from running, which can be useful for setting up your Queue without making any changes to messages. Simply click the toggle in the top left corner of each Rule to set its state, and commit those changes by clicking 'Save Rules' at the bottom when you're done.

How to enable Auto-Assignment
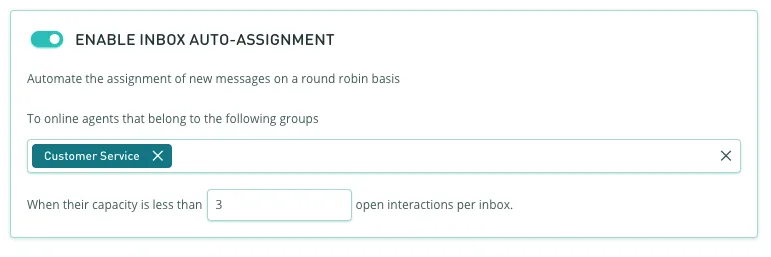
Queues allow you to enable auto-assignment for incoming interactions to team mates who are online and have capacity. Navigate to your Queue, go to the Rules tab, and scroll to the bottom of the list. Here you can enable inbox auto-assignment, specify the Group of users that are eligible for assignment, and their max capacity.
Capacity is defined as the total number of interactions currently sitting in your Mine tab of the inbox. For example, if your rule capacity is set to 3, and a team mate has 2 assigned interactions, the Queue will consider them eligible for assignment and give them the oldest waiting message.
Customer replies for an open case will be treated slightly differently, in that they are not limited by capacity if the case agent is online. We've created a flow diagram to help explain the logic for auto-assignment:

- Messages will sit in the assignment queue until agents are online.
- Agents must belong to Groups specified in auto-assignment Rule.
- Auto-assignment is only applied to messages from time it is enabled.
- Capacity can be exceeded by auto-assignment for customer replies to an open case.
FAQ
What permissions are required to create Queues and Rules?
Users need to have the 'Edit Team' permission that typically belongs to Admin or Manager groups.
When do Rules start applying changes to messages in my Queue?
Rules will start actioning messages in your Queue from the moment you create and enable those Rules. In some cases, when the Queue has just been created, the Rules may run over a small set of historic messages. Rules are run at the moment we process a new message.
Can we see who has updated our Queues or Rules?
Yes, the audit log in Measure > Activity > Security will capture creates, updates, and deletes.
How do I test my Rules?
We suggest testing your searches in Listen so you can see which messages match the filters you've built. Run the Saved Dive that is powering your Queue, turn on Closed Messages, and open the date range to last 30 days. Now you can see which historic messages would have matched your new Rule.
How do I create a filter for Name Tag Comments?
Add "word_count:<3" to your Matching Terms filter and specify Source Types of Facebook Comment and Instagram Comment. Here you will find all comments that have fewer than 3 words, including emoji comments, in your Rule.
How do I create a filter for Retweets?
Add "RT" to your Matching Terms filter and specify Source Type of Tweet. Here you will find all Tweets that contain the phrase "RT", which is the prefix of all Retweets in Lexer.
What happens if I release an auto-assigned message?
It will go back into the New queue and will not be auto-assigned again. Someone in your team will need to manually claim ownership of this message.
Do scheduled replies count towards my capacity?
No, messages in the 'assigned', 'in progress', and 'awaiting approval' states will count towards your capacity.
How does this work with the Reroute Replies feature?
Enabling auto-assignments for your Queue will supersede the need for message rerouting, as customer replies will be assigned to case agents if they are online. We suggest disabling the reroute feature in Manage > Settings > Workflow.
Can someone help me setup our Rules?
Yes! Get in touch with Lexer Support and we'll walk you through it.
