
Dataset management
Lexer’s Datasets gives you the ability to explore data and high-level statistics from each of your data sources including integrated accounts, directly in the Hub.
Each of your datasets contain record types specific to each integrated account that has data flowing into the Hub. These have been transformed and organised into datasets that follow Lexer’s standard schema.
For example, Shopify datasets will contain record types related to Shopify online transactions, including customer records, products, orders, and returns. Whereas Klaviyo datasets will contain record types relating to email events, including customer, emails sent, emails clicked, subscribed, etc.
Organizing data into a dataset
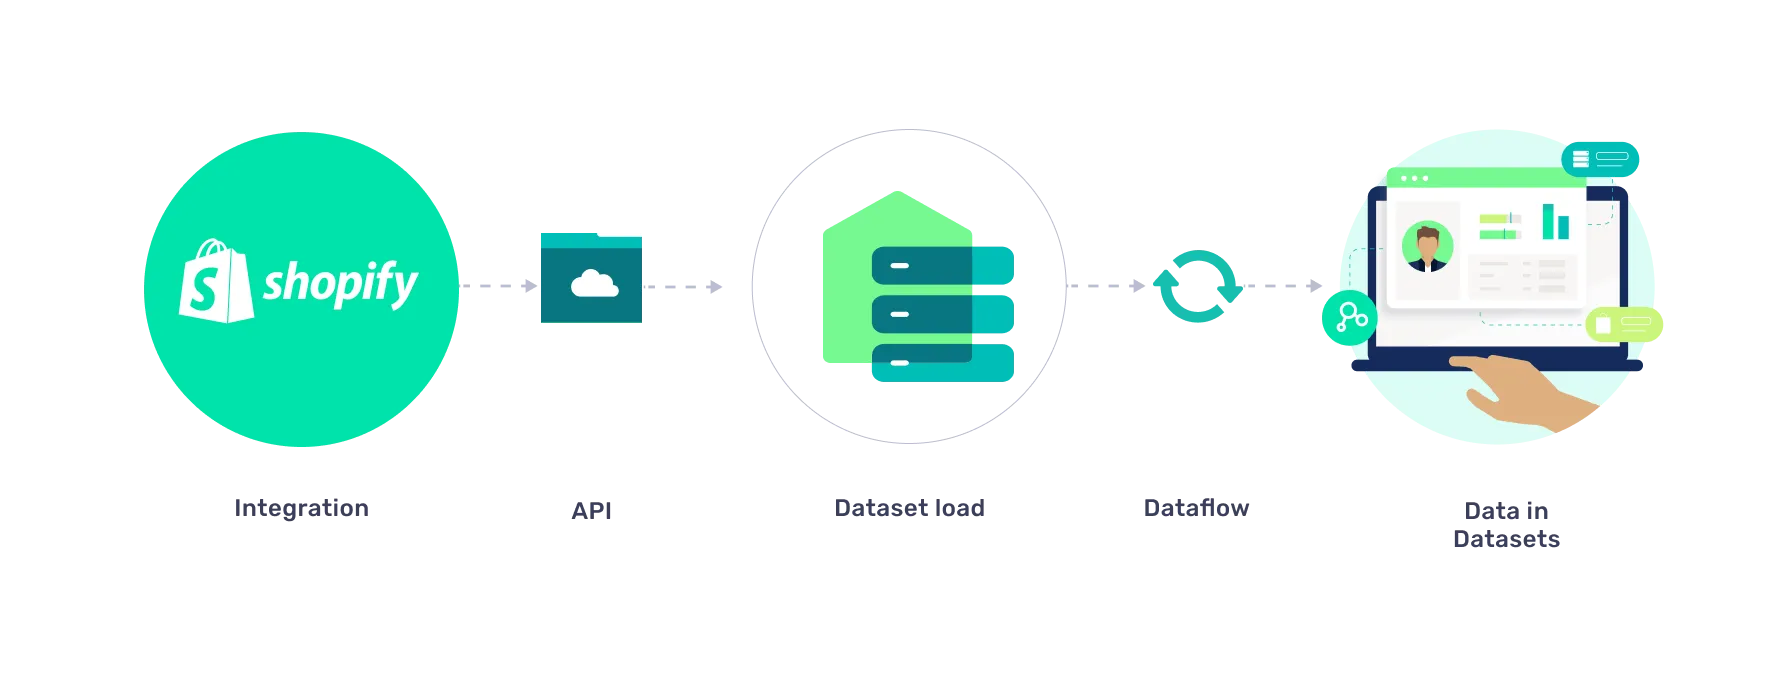
In the diagram below, we have used Shopify as an example to illustrate how data makes its way into a dataset from the original Shopify source. You are then able to view this dataset within the Lexer Hub.
- Shopify connects with Lexer via an API.
- The raw data from Shopify is loaded into an Amazon S3 bucket via a Dataset load.
- The data is then transformed into Lexer's data schema via a Dataflow.
- It’s then arranged into a dataset that can be accessed in Datasets.
Datasets and Logs
Logs is another awesome tool that works hand in hand with Datasets. Its really helpful to check out logs for progress if you have uploaded data to the Hub as jobs in the Hub will run in a specific order that you can see in Logs. This order can be a great help in identifying if and where something has gone wrong. To learn more about Logs, check out the article here.
So, how can I use datasets?
Having your datasets easily accessible within the Hub has a number of benefits and uses. We've outlined some common use cases below.
Data QA and validation
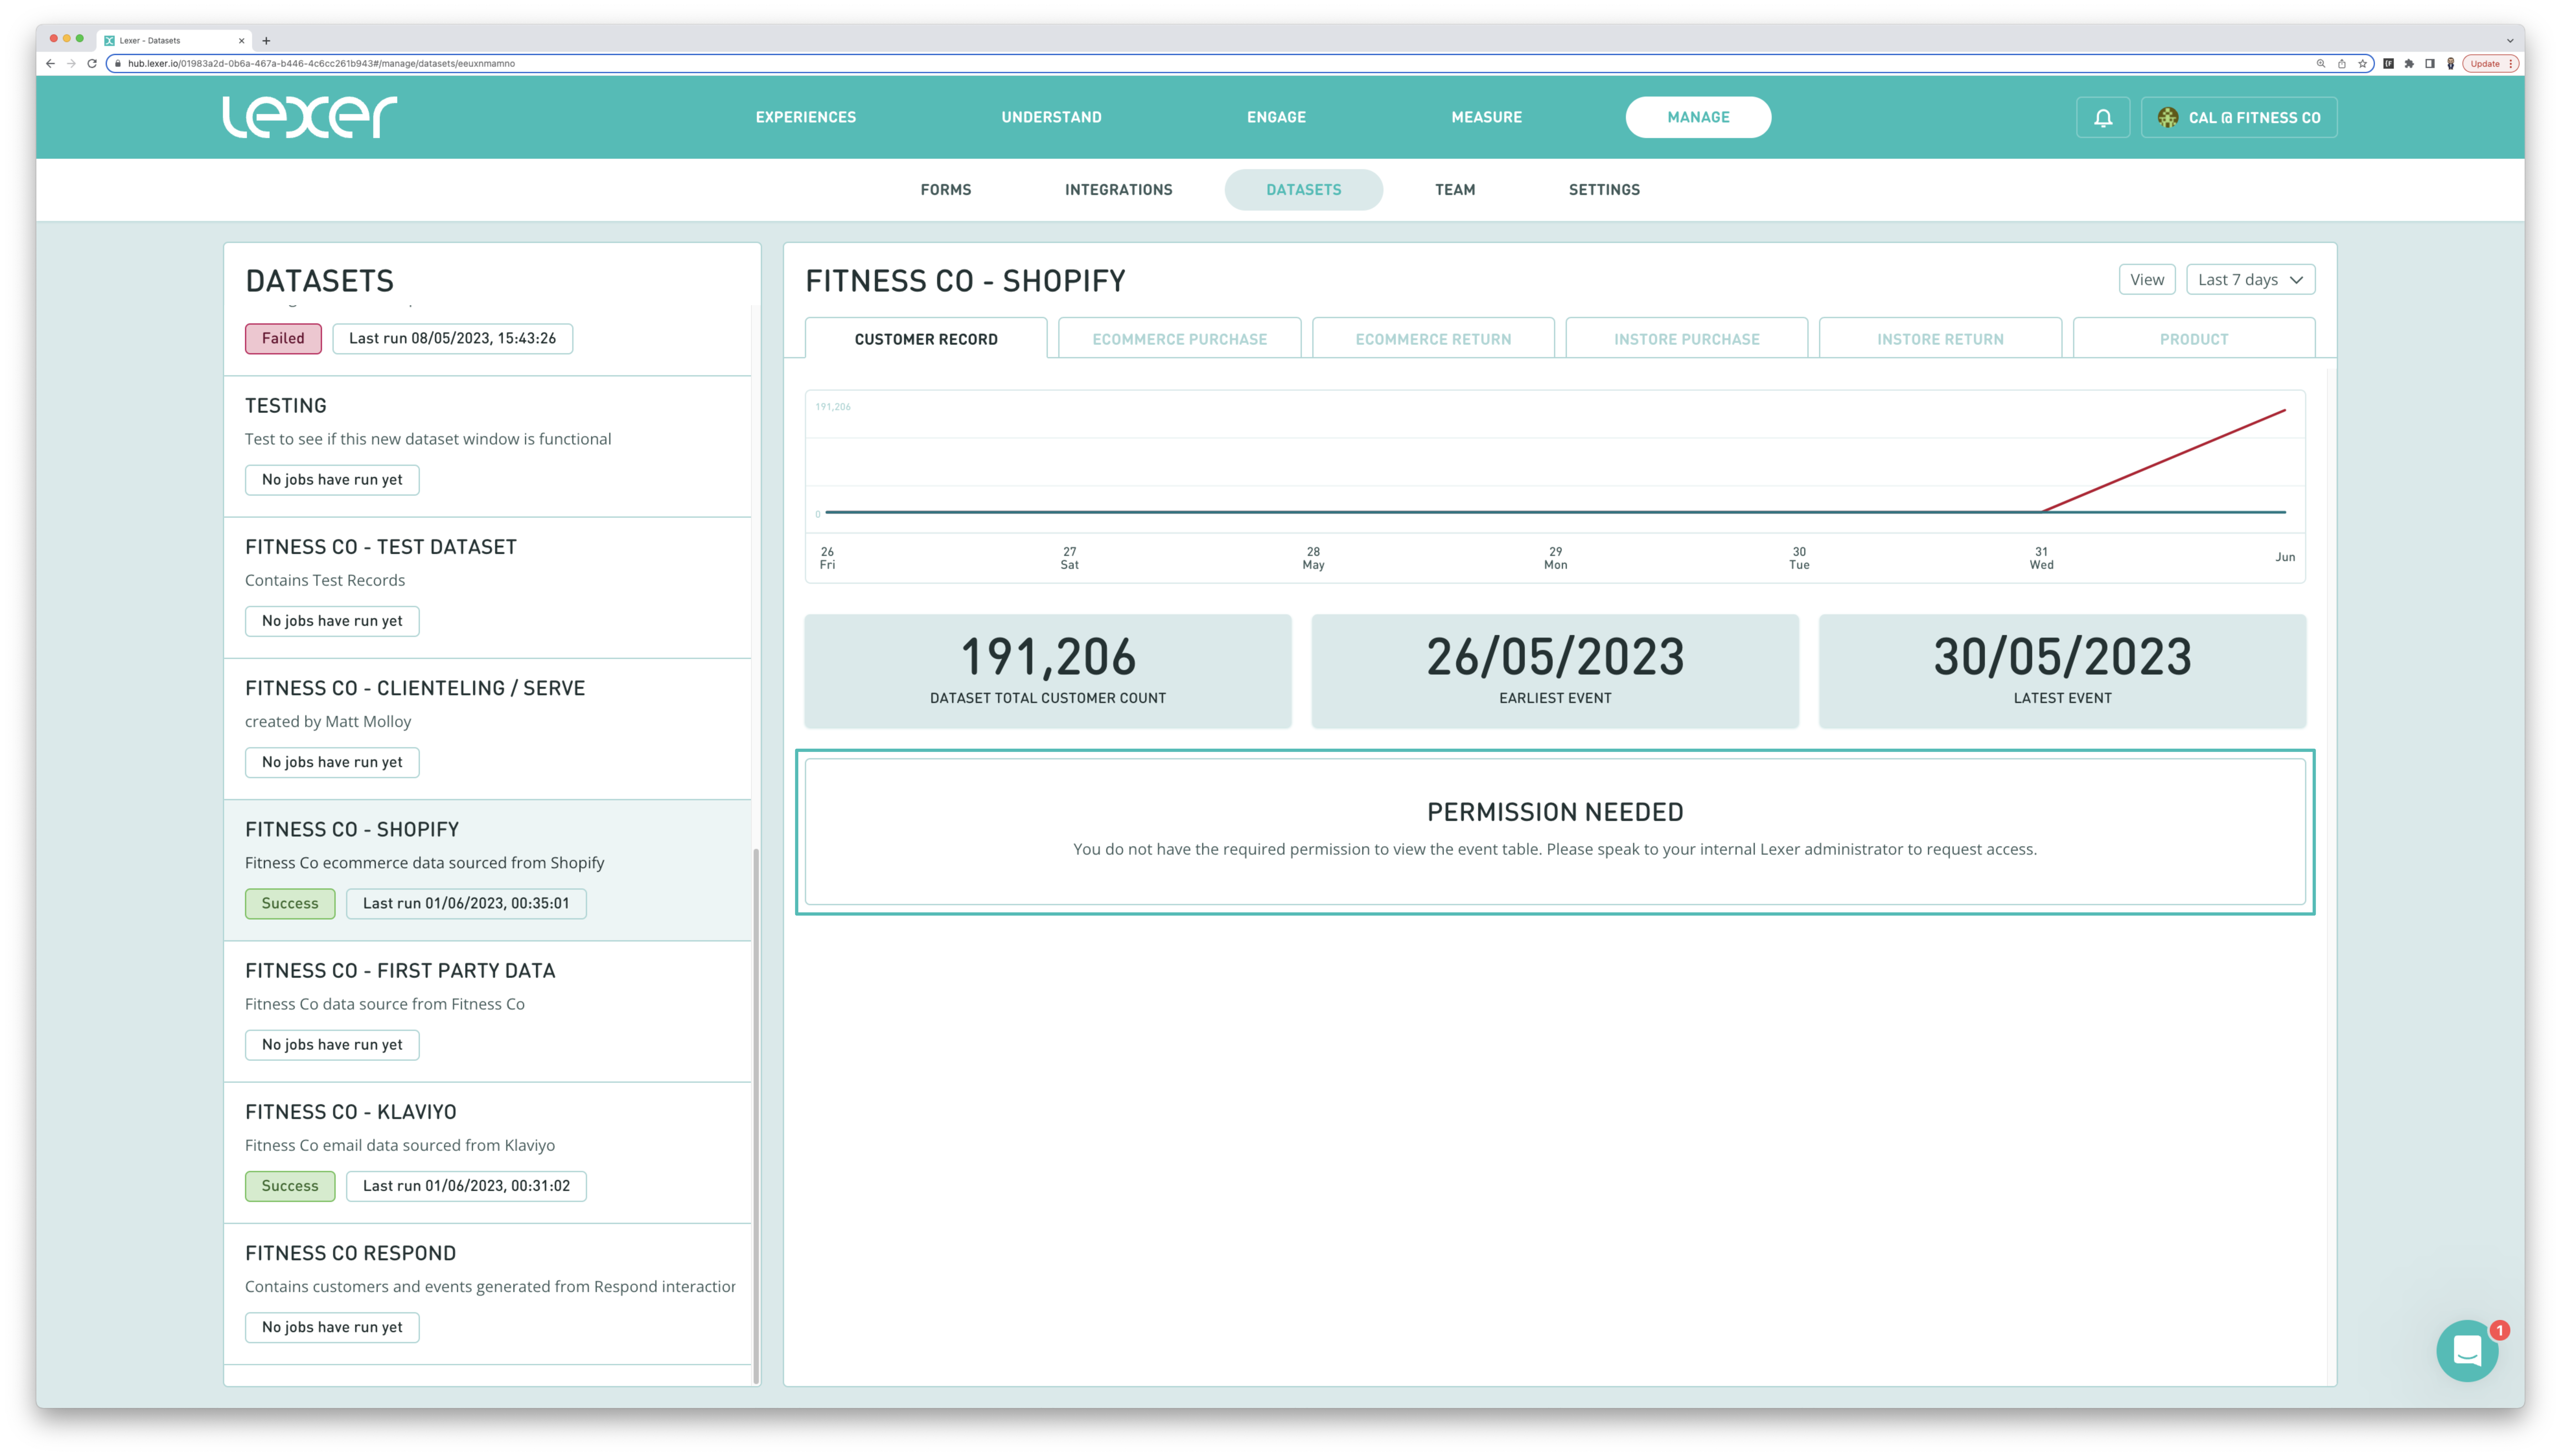
Lexer’s Datasets lets you quickly view and validate the health of your integration feed, including data continuity, volume, and freshness of data flowing into your datasets. Drilling down even further, you can click into each record to view the payload for individual customer records.
Dataset statistics
Within Datasets you can also access high-level statistics and charts separated into convenient tabs, which allow you to quickly visualize important metrics for each dataset. These will vary depending on the type of records contained within the dataset.
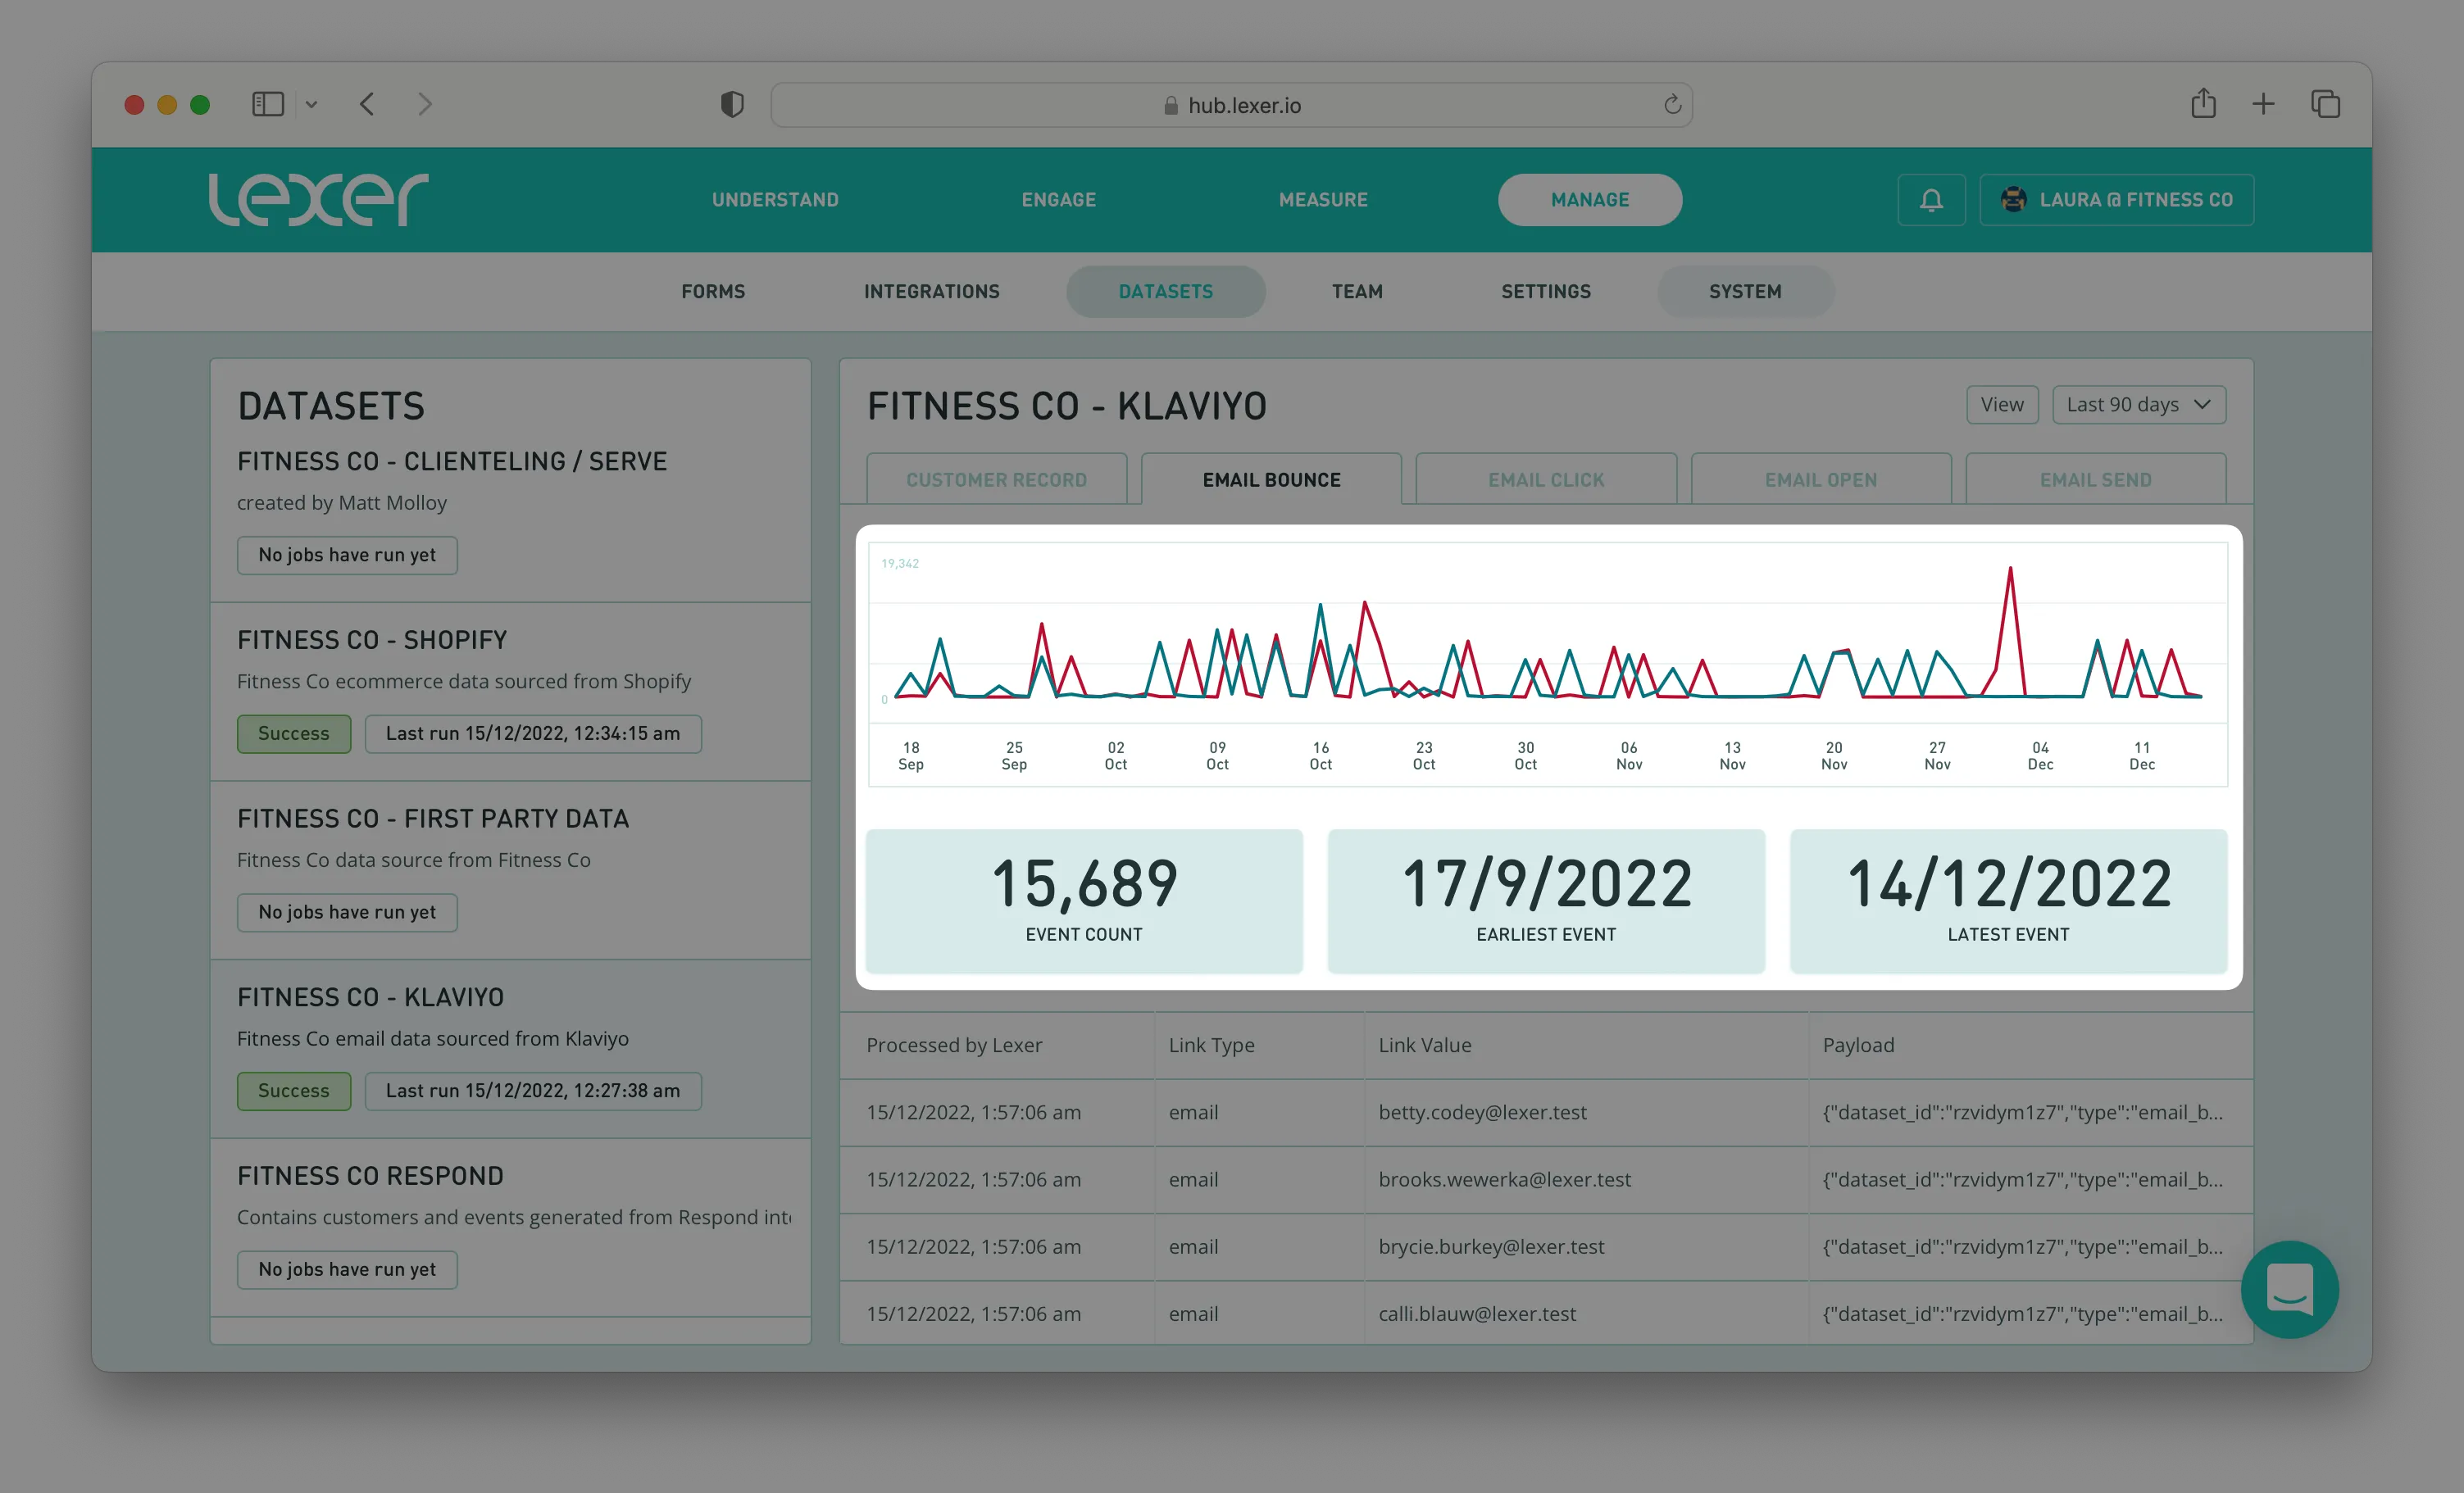
In the examples below we can see two different datasets with different types of event data:
- Transactional event data: A Shopify dataset that contains ecommerce transactional data with the Ecommerce Purchase tab open.
- Campaign event data: A Klaviyo dataset that contains campaign event data with the Email Bounce tab open.

As we continue to build out our API capabilities, Datasets will also give you the ability to create your own datasets, which can be written into directly using JSON and CSV uploads!
Need Personal Identifiable Information (PII) to be hidden for some users?
Not to worry, we've got you covered. Users can be provided access to the high level statistics in Datasets without gaining access to any PII. We have added an "Access: Datasets" group to your Hub that provides access to the high level view of Datasets. Users can be added to this group and gain access to datasets, while being unable to see PII. If you want a user to have access you can add them to another group in your hub that has PII access.
Finding your datasets in the Hub
All Hubs will be given access to Datasets! Navigating this tool and understanding each different section is easy!
- You can view your datasets in the Hub by navigating to Manage > Datasets in the top navigation bar.
- All of your datasets will be listed in the left-side panel. You’ll be able to see the name and a brief description of the dataset, the status and time of the last job load.
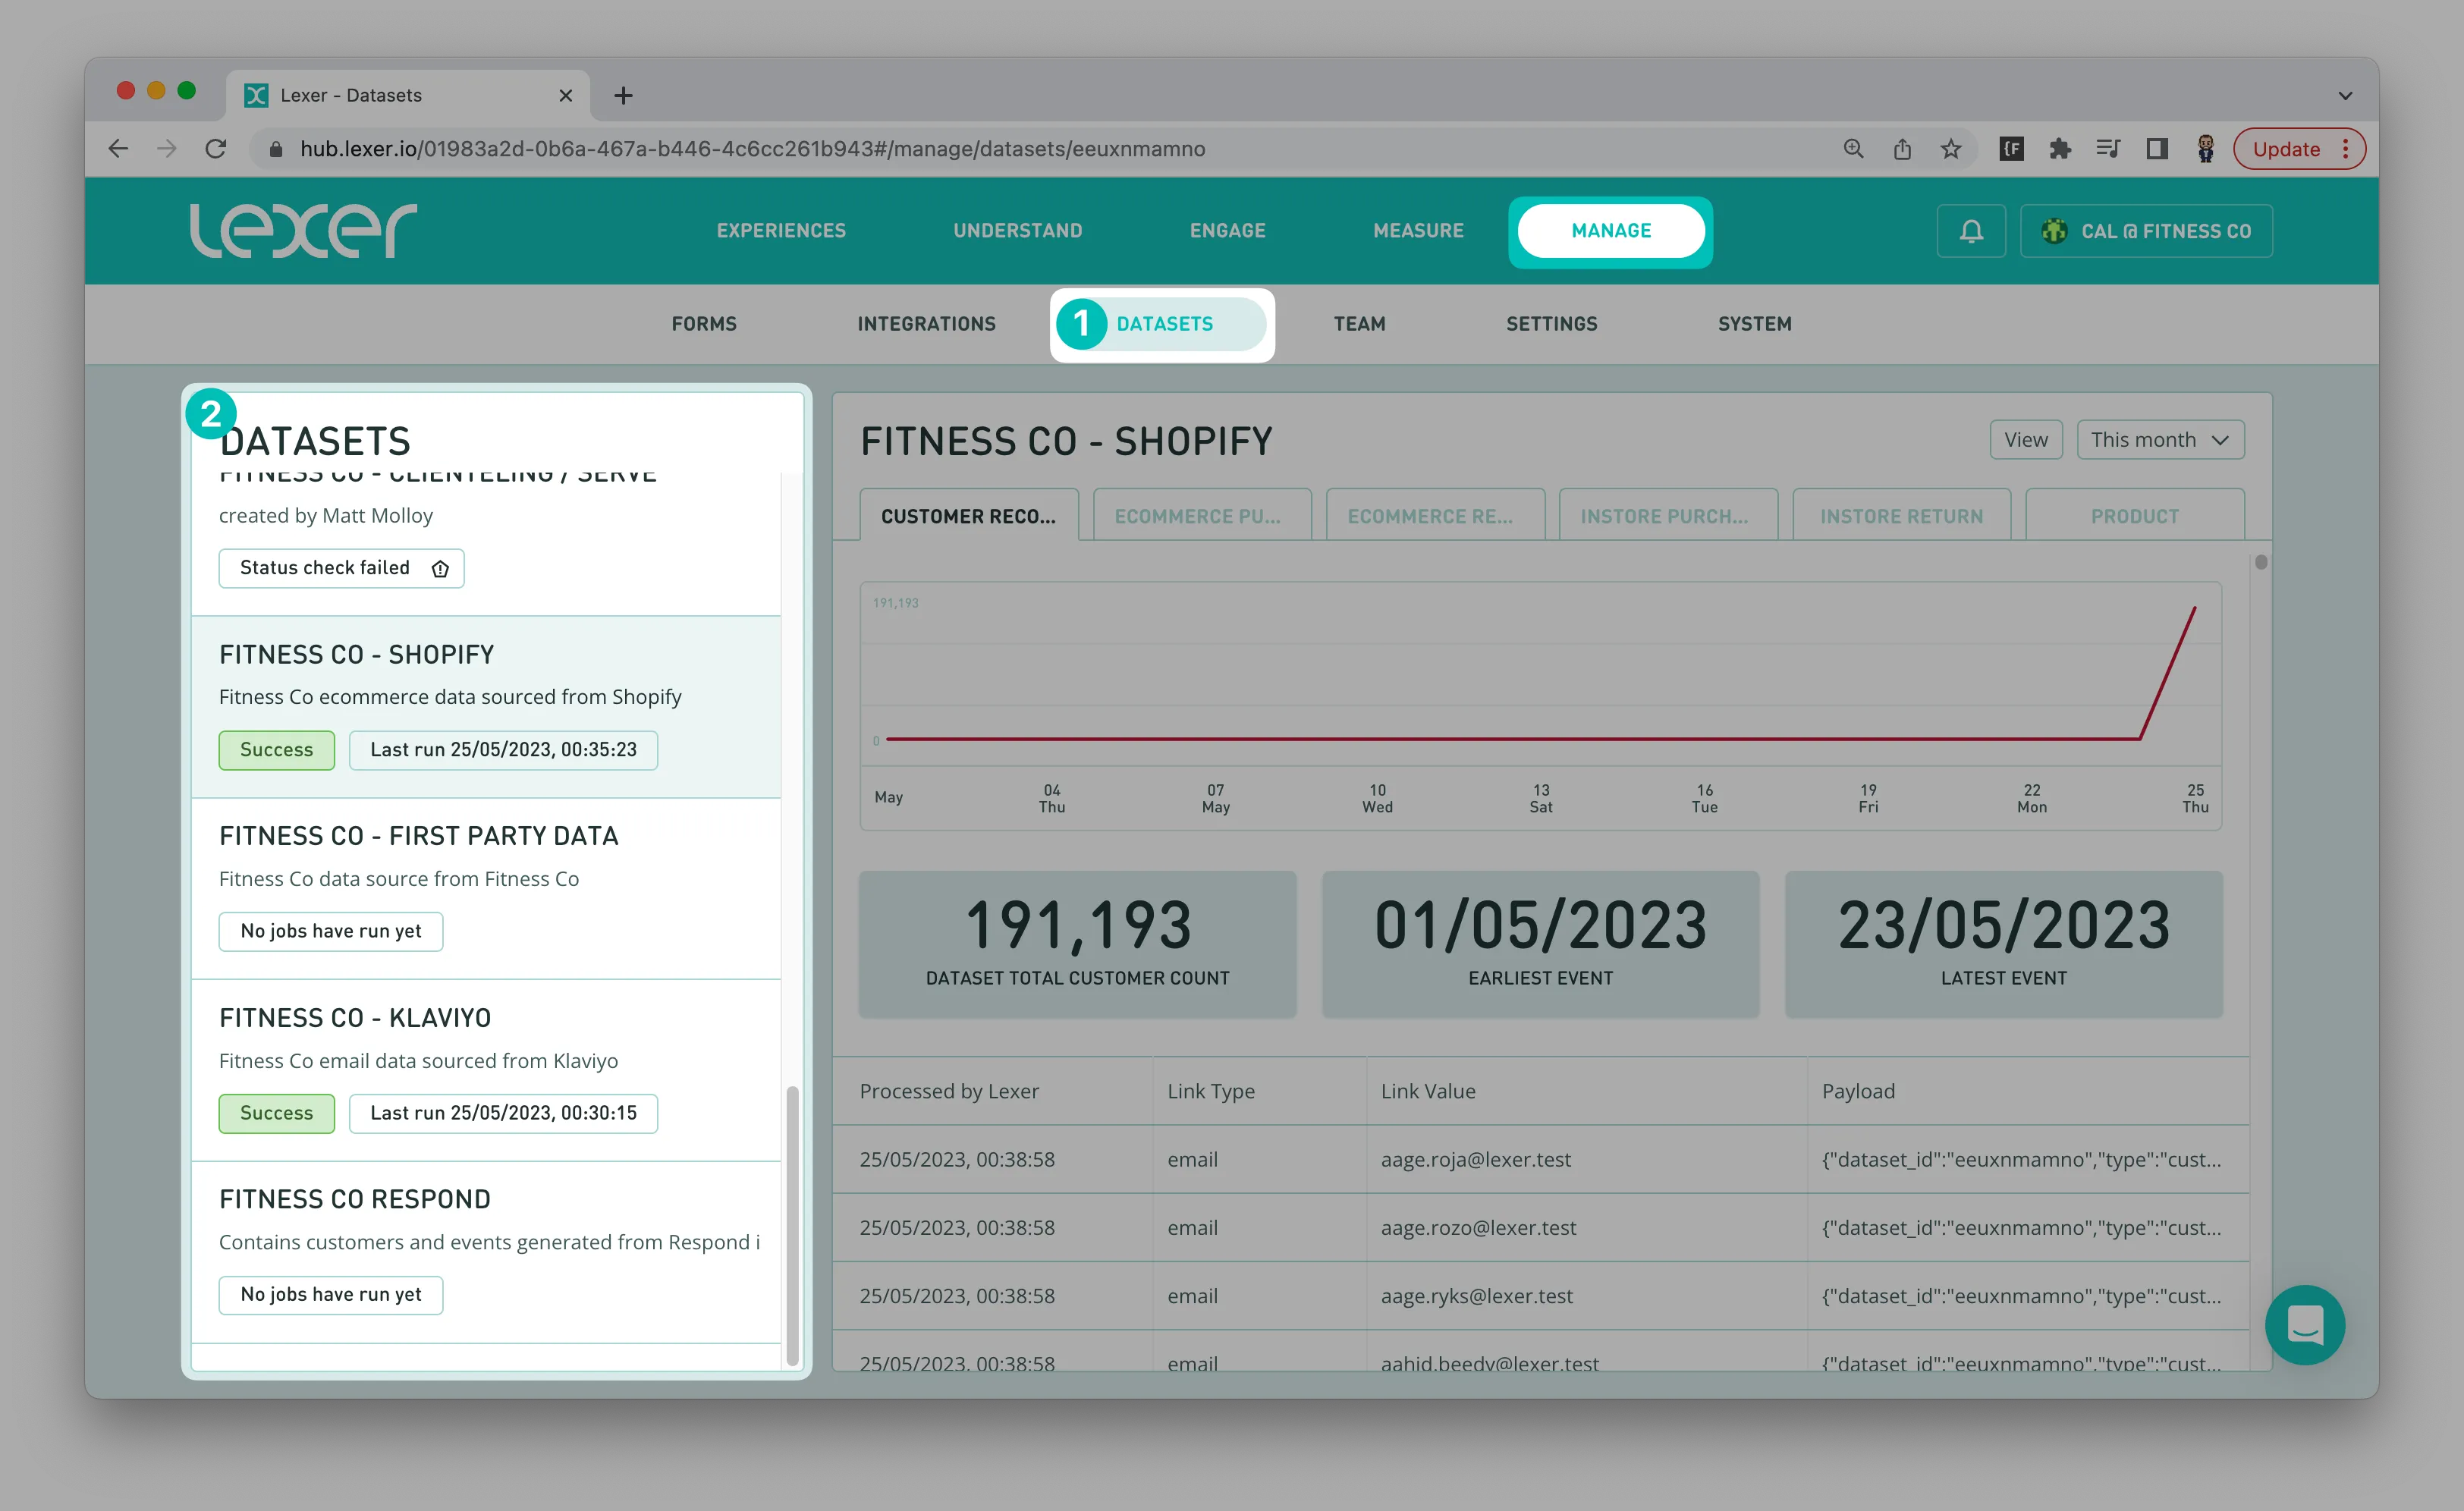
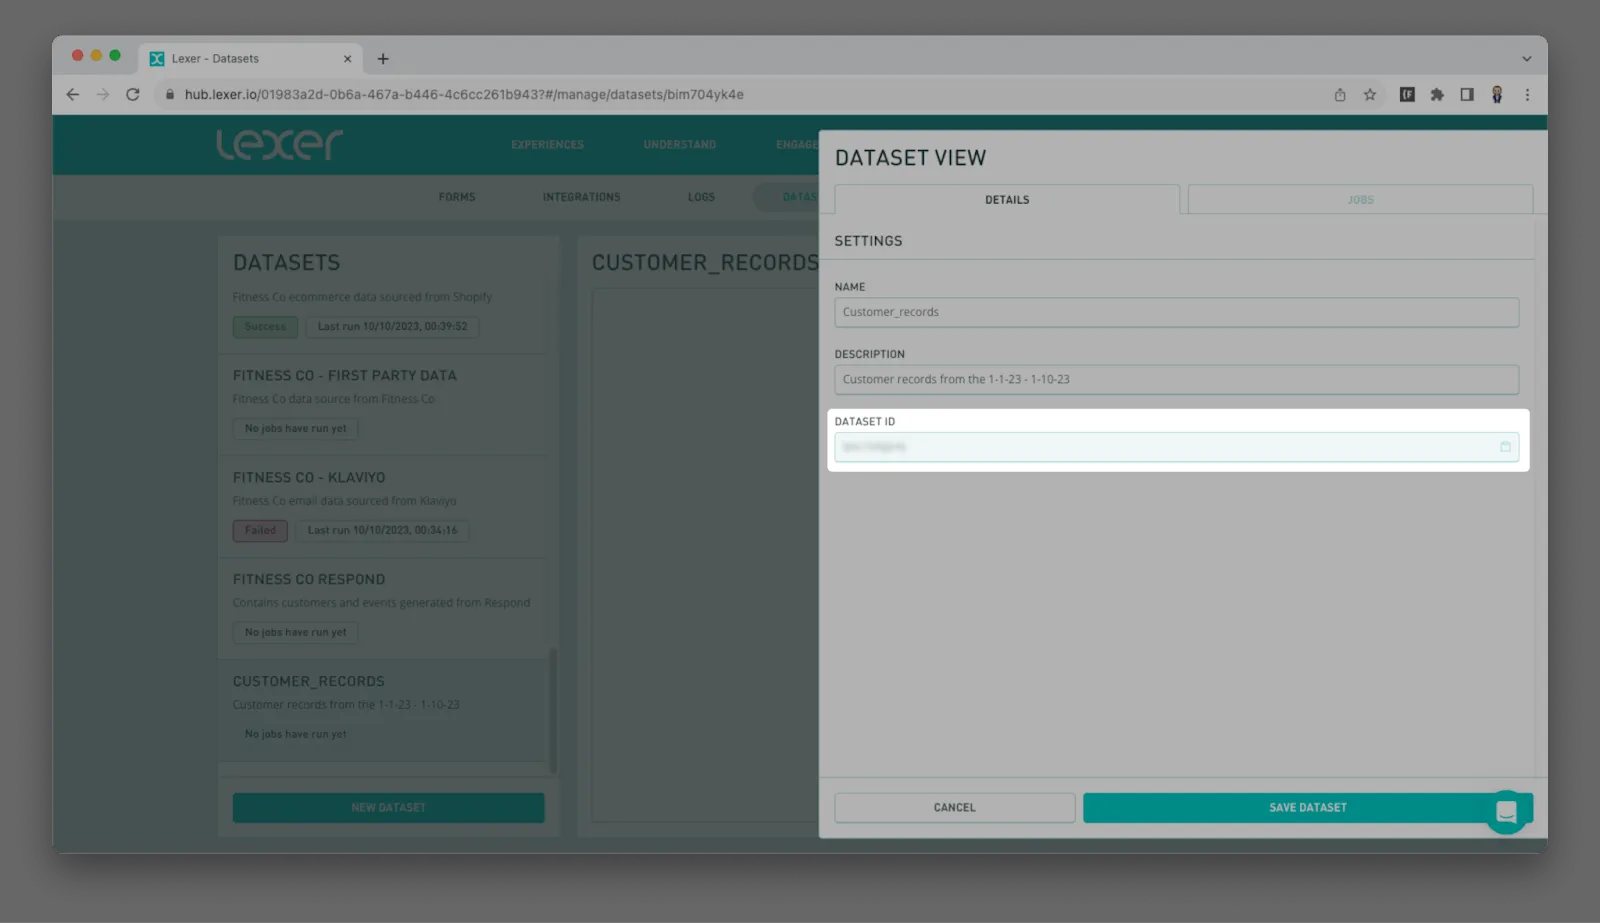
Click on a dataset in this panel to open the detailed dataset view in the main window. You can also click on the View button in the top right-hand corner of the screen to see more details about your dataset and the jobs that have run.

The Details tab contains the dataset Name, Description, Dataset ID and the Dataset Type. The dataset ID can be an important requirement when using some of our APIs.

The Jobs tab is especially useful because you’ll be able to see a history of your dataset. This includes:
- Status: The status of the last job load. Did it run successfully, did it fail, or is it still pending?
- Started at: When the run job started (dates and times are displayed in your local timezone).
- Time taken: How long the job took to run.
- Record types: Which record types were updated.

Adding new datasets
Adding new datasets can be a critical first step when using some of our APIs. This process will create a blank dataset, a perfect spot for the data you intend to send via an API!
To add a new dataset:
- Navigate to Manage > Datasets.
- Click on New Dataset.

- Fill in the Name and Description.
- Click Save Dataset.

- Now that you have created the dataset, open it up by clicking View.
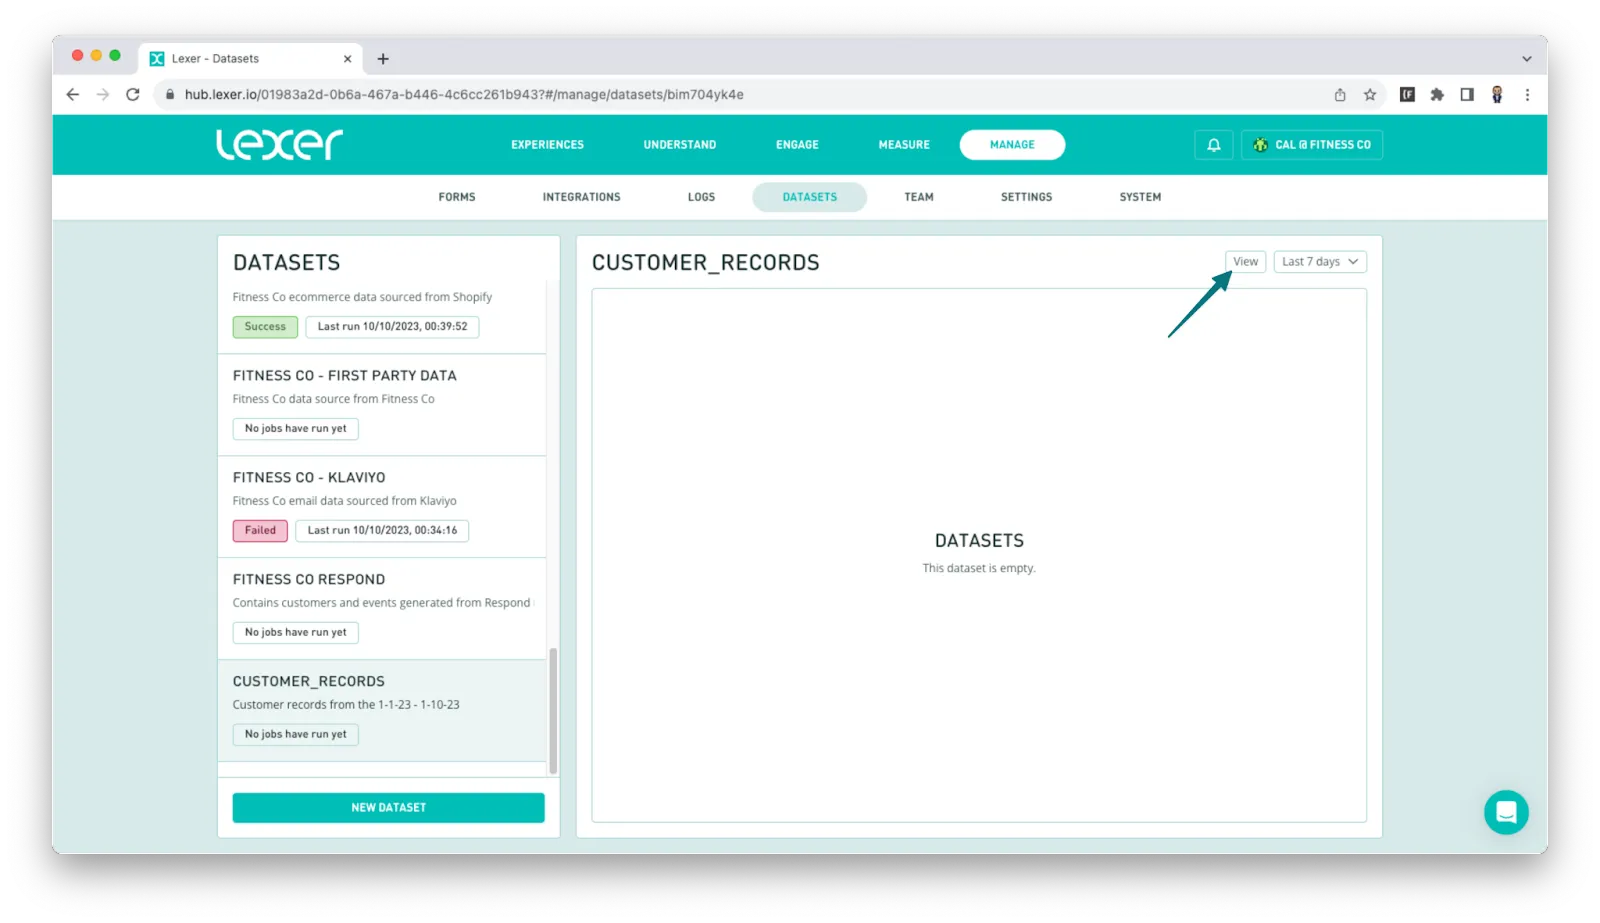
- Record the Dataset ID.
You now have an empty dataset, ready to go!
Clear and Load data
Within the dataset view there are two important buttons in the top right of the page, Clear Data and Load Data.
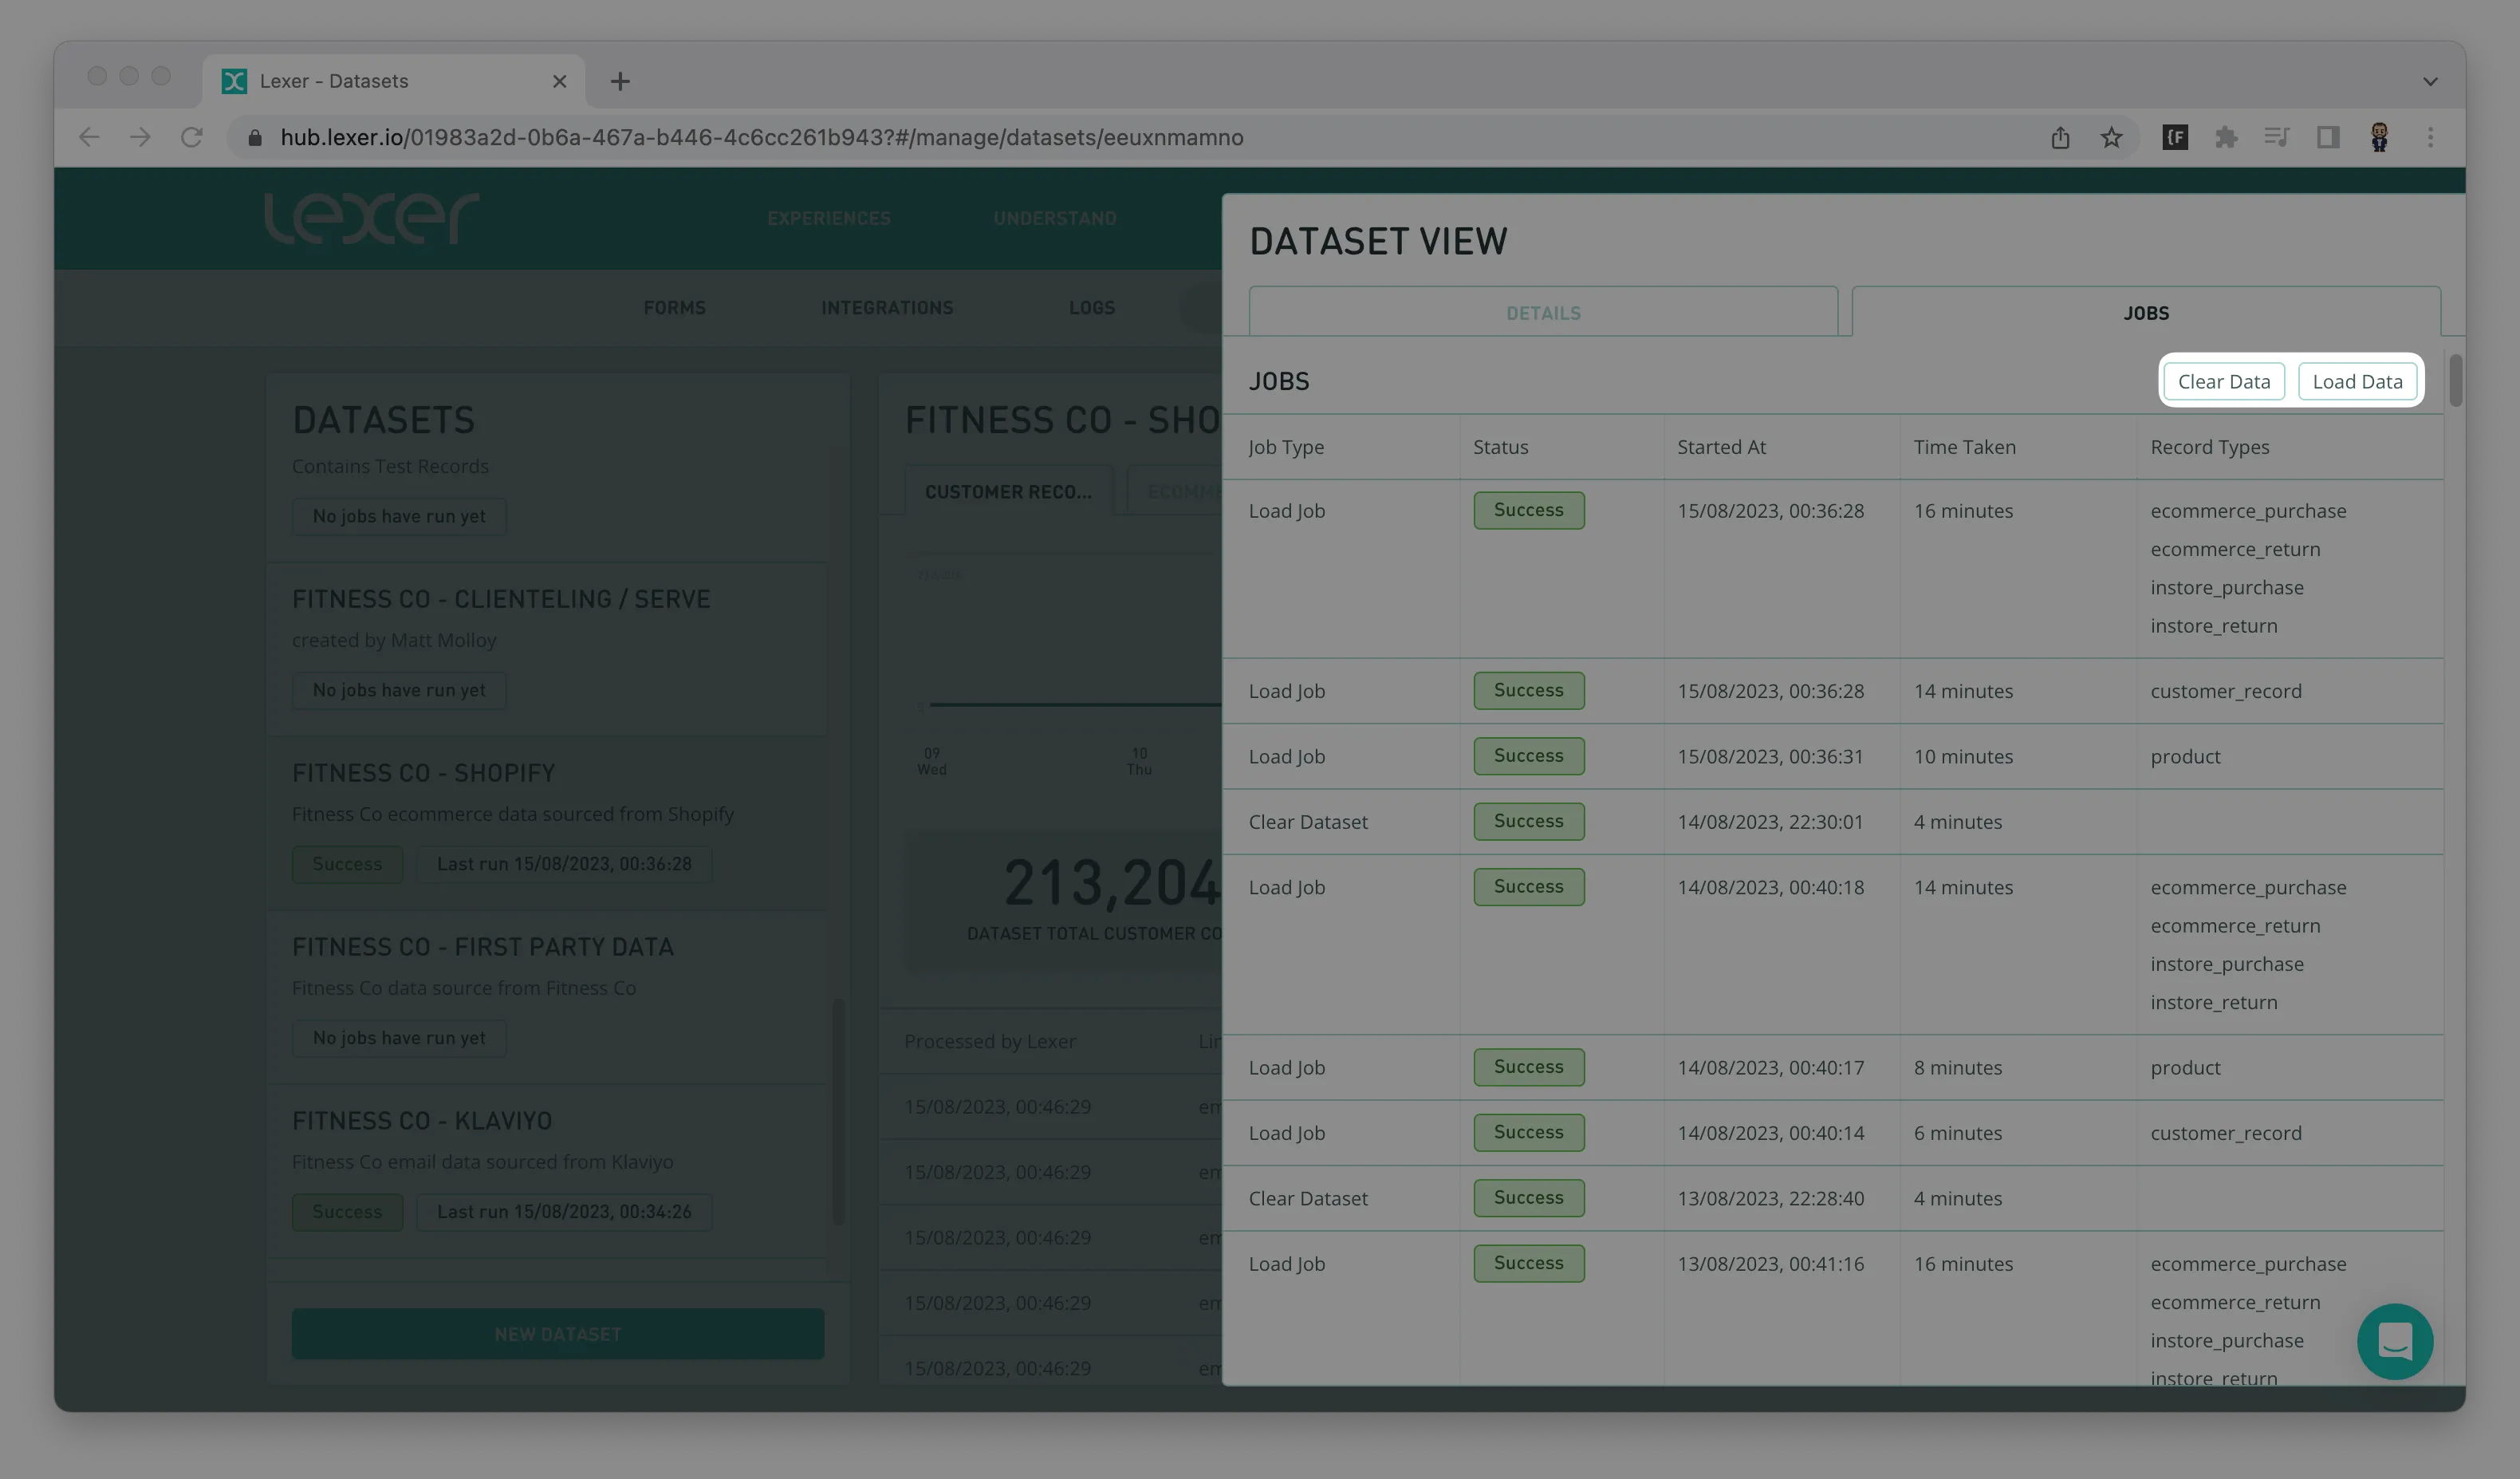
- Clear Data: Starts a job that will remove data from the dataset, the dataset itself wont be deleted. This may take up an hour and can't be undone.
- Load Data: Begins a job that will load new profile data to your dataset. This may take up an hour. Once you start you can't re-run it until finished.
The job view
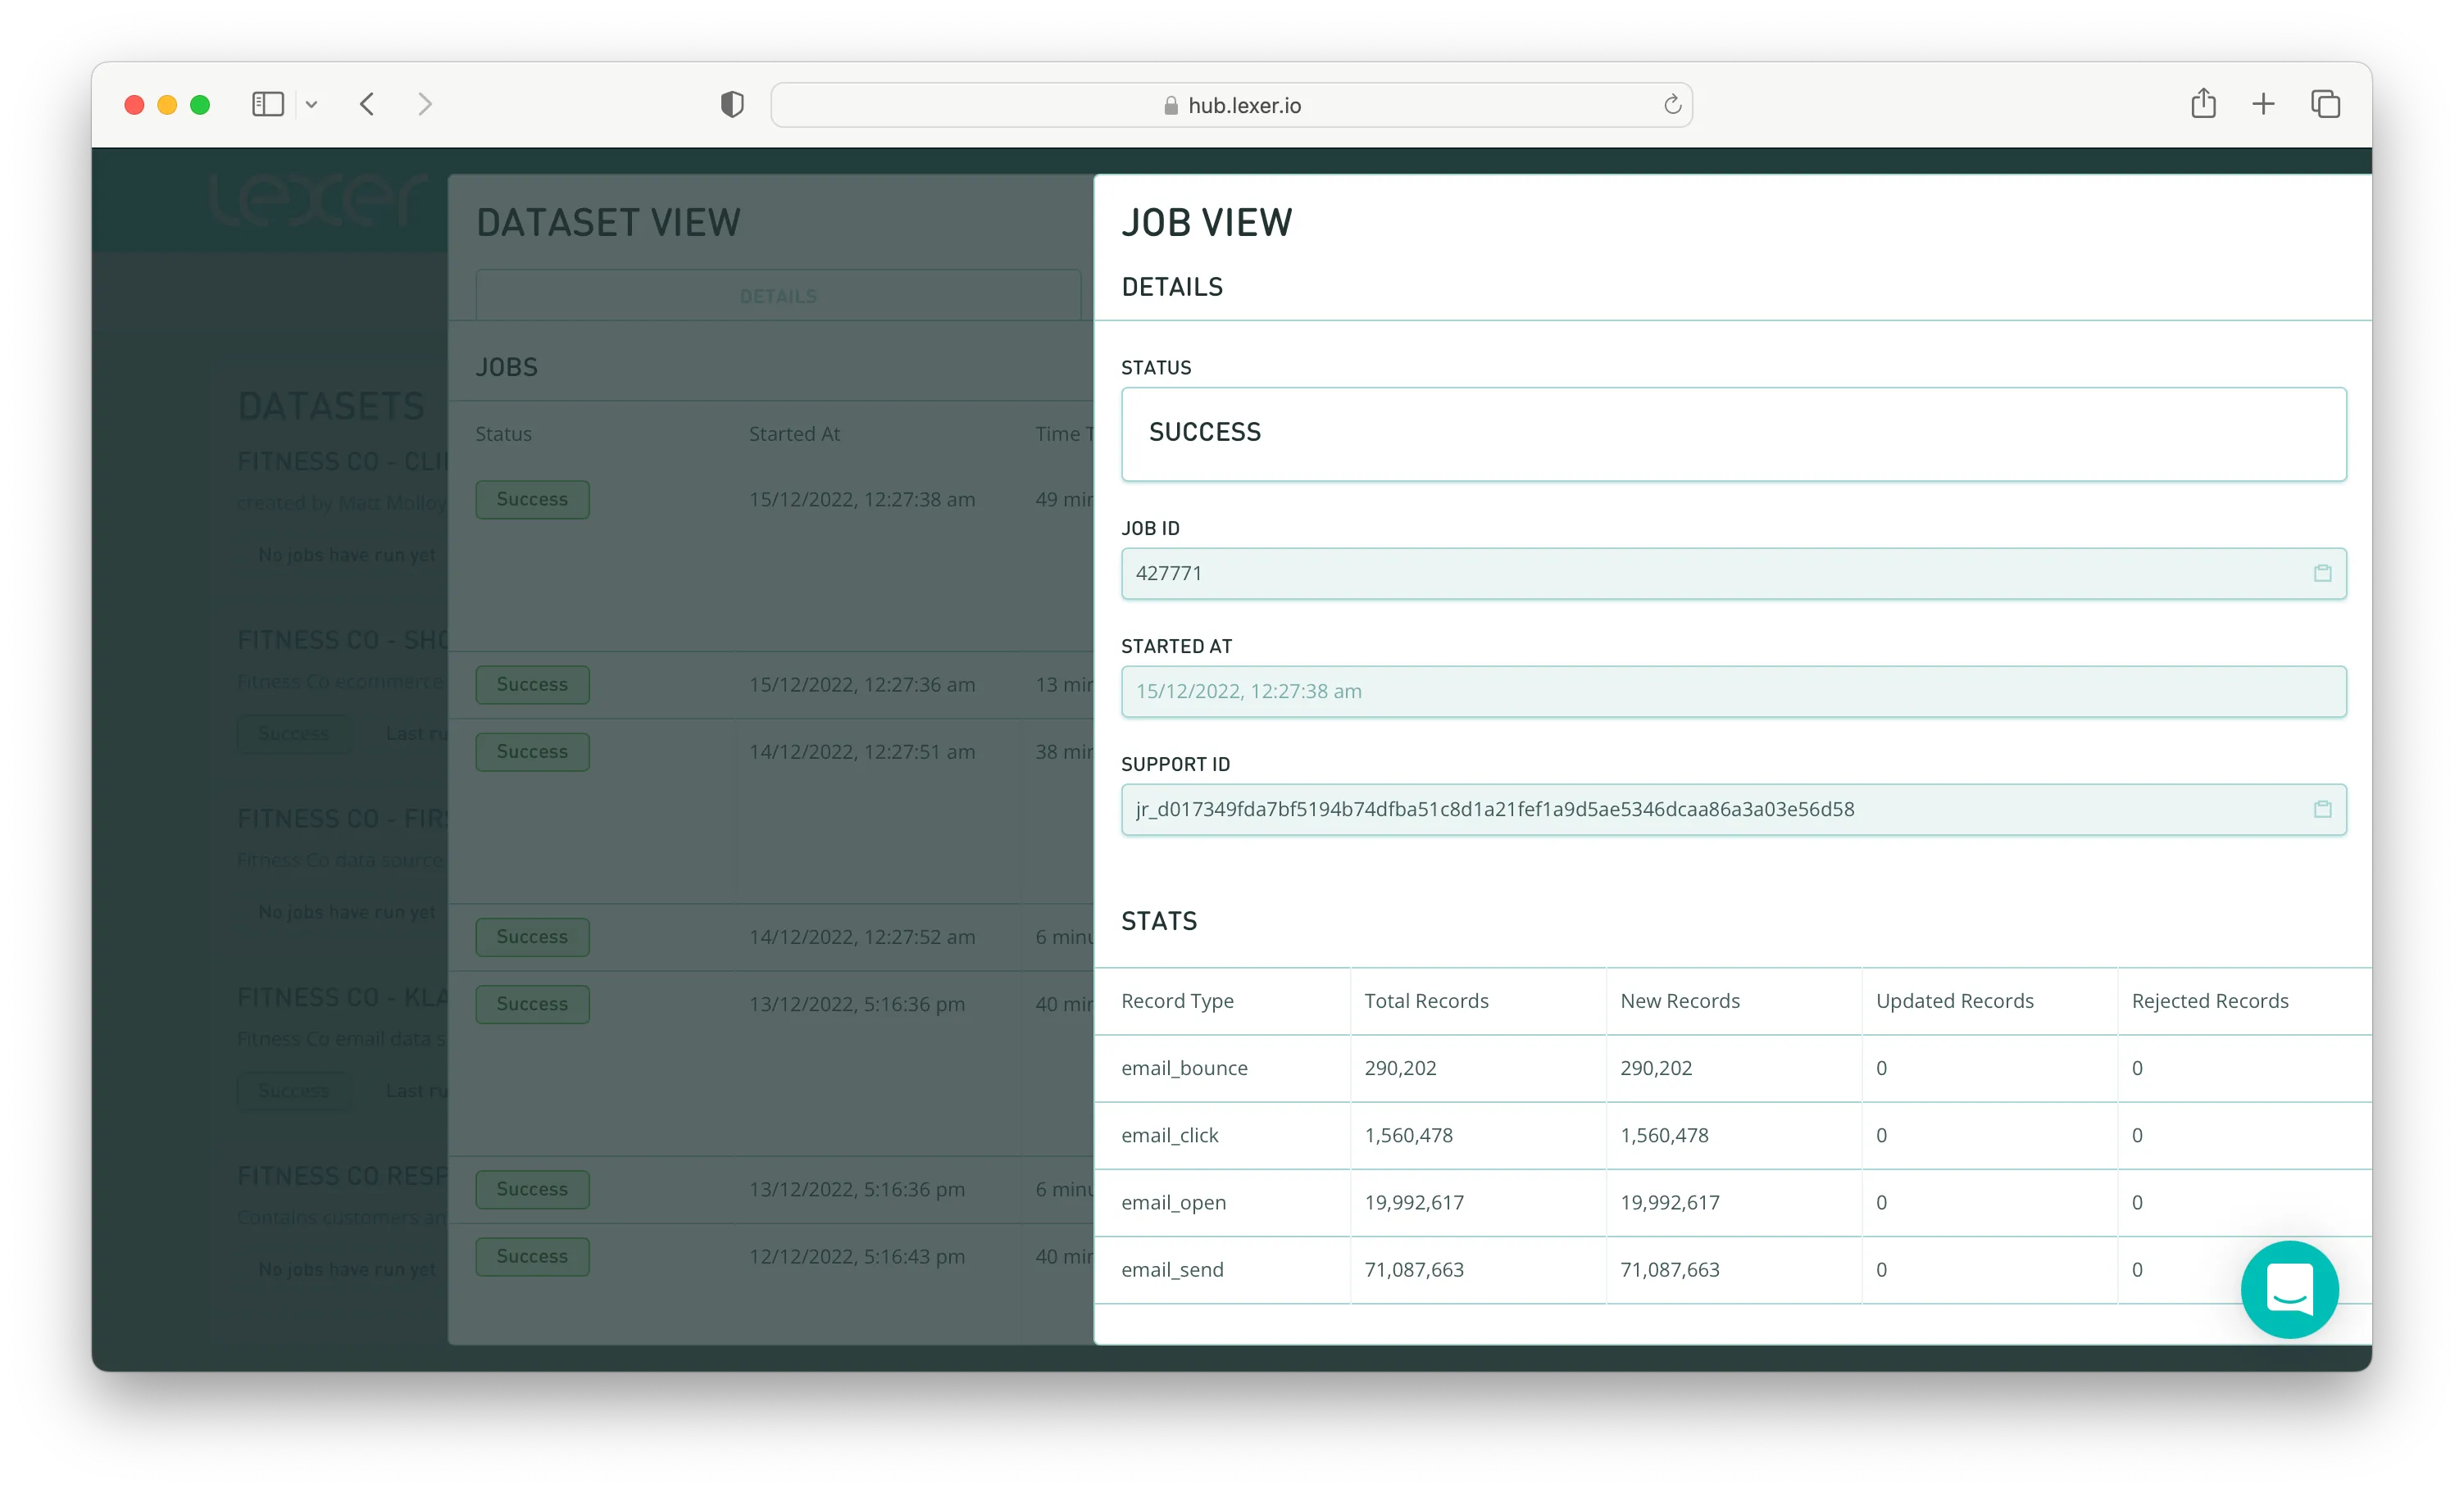
To find out more information about each individual job, you can click on the row it belongs to, which will bring up the Job View panel.
Towards the bottom of the panel you’ll see a section called Stats. The table in this section displays a list of the record types that were updated, including:
- Record type: The type of data received.
- Total Records: The sum of New Records + Updated Records.
- New Records: All new records that will be loaded to the CDE.
- Updated Records: All existing records that have been updated.
- Rejected Records: All records that have been rejected and are not a part of the Total Records count.
Record tabs
We can then collapse these panels and move back to the main view where you will see a list of record types for the selected dataset. These form the basis of the dataset you are viewing.
The example below shows a list of Customer records in a Shopify dataset. You can view other record types within the dataset by selecting a different dataset record type from the tabs along the top.

Click on a record to view detailed payload information.
Use the date picker at the top of the page to change the timelines on the data you wish to view.
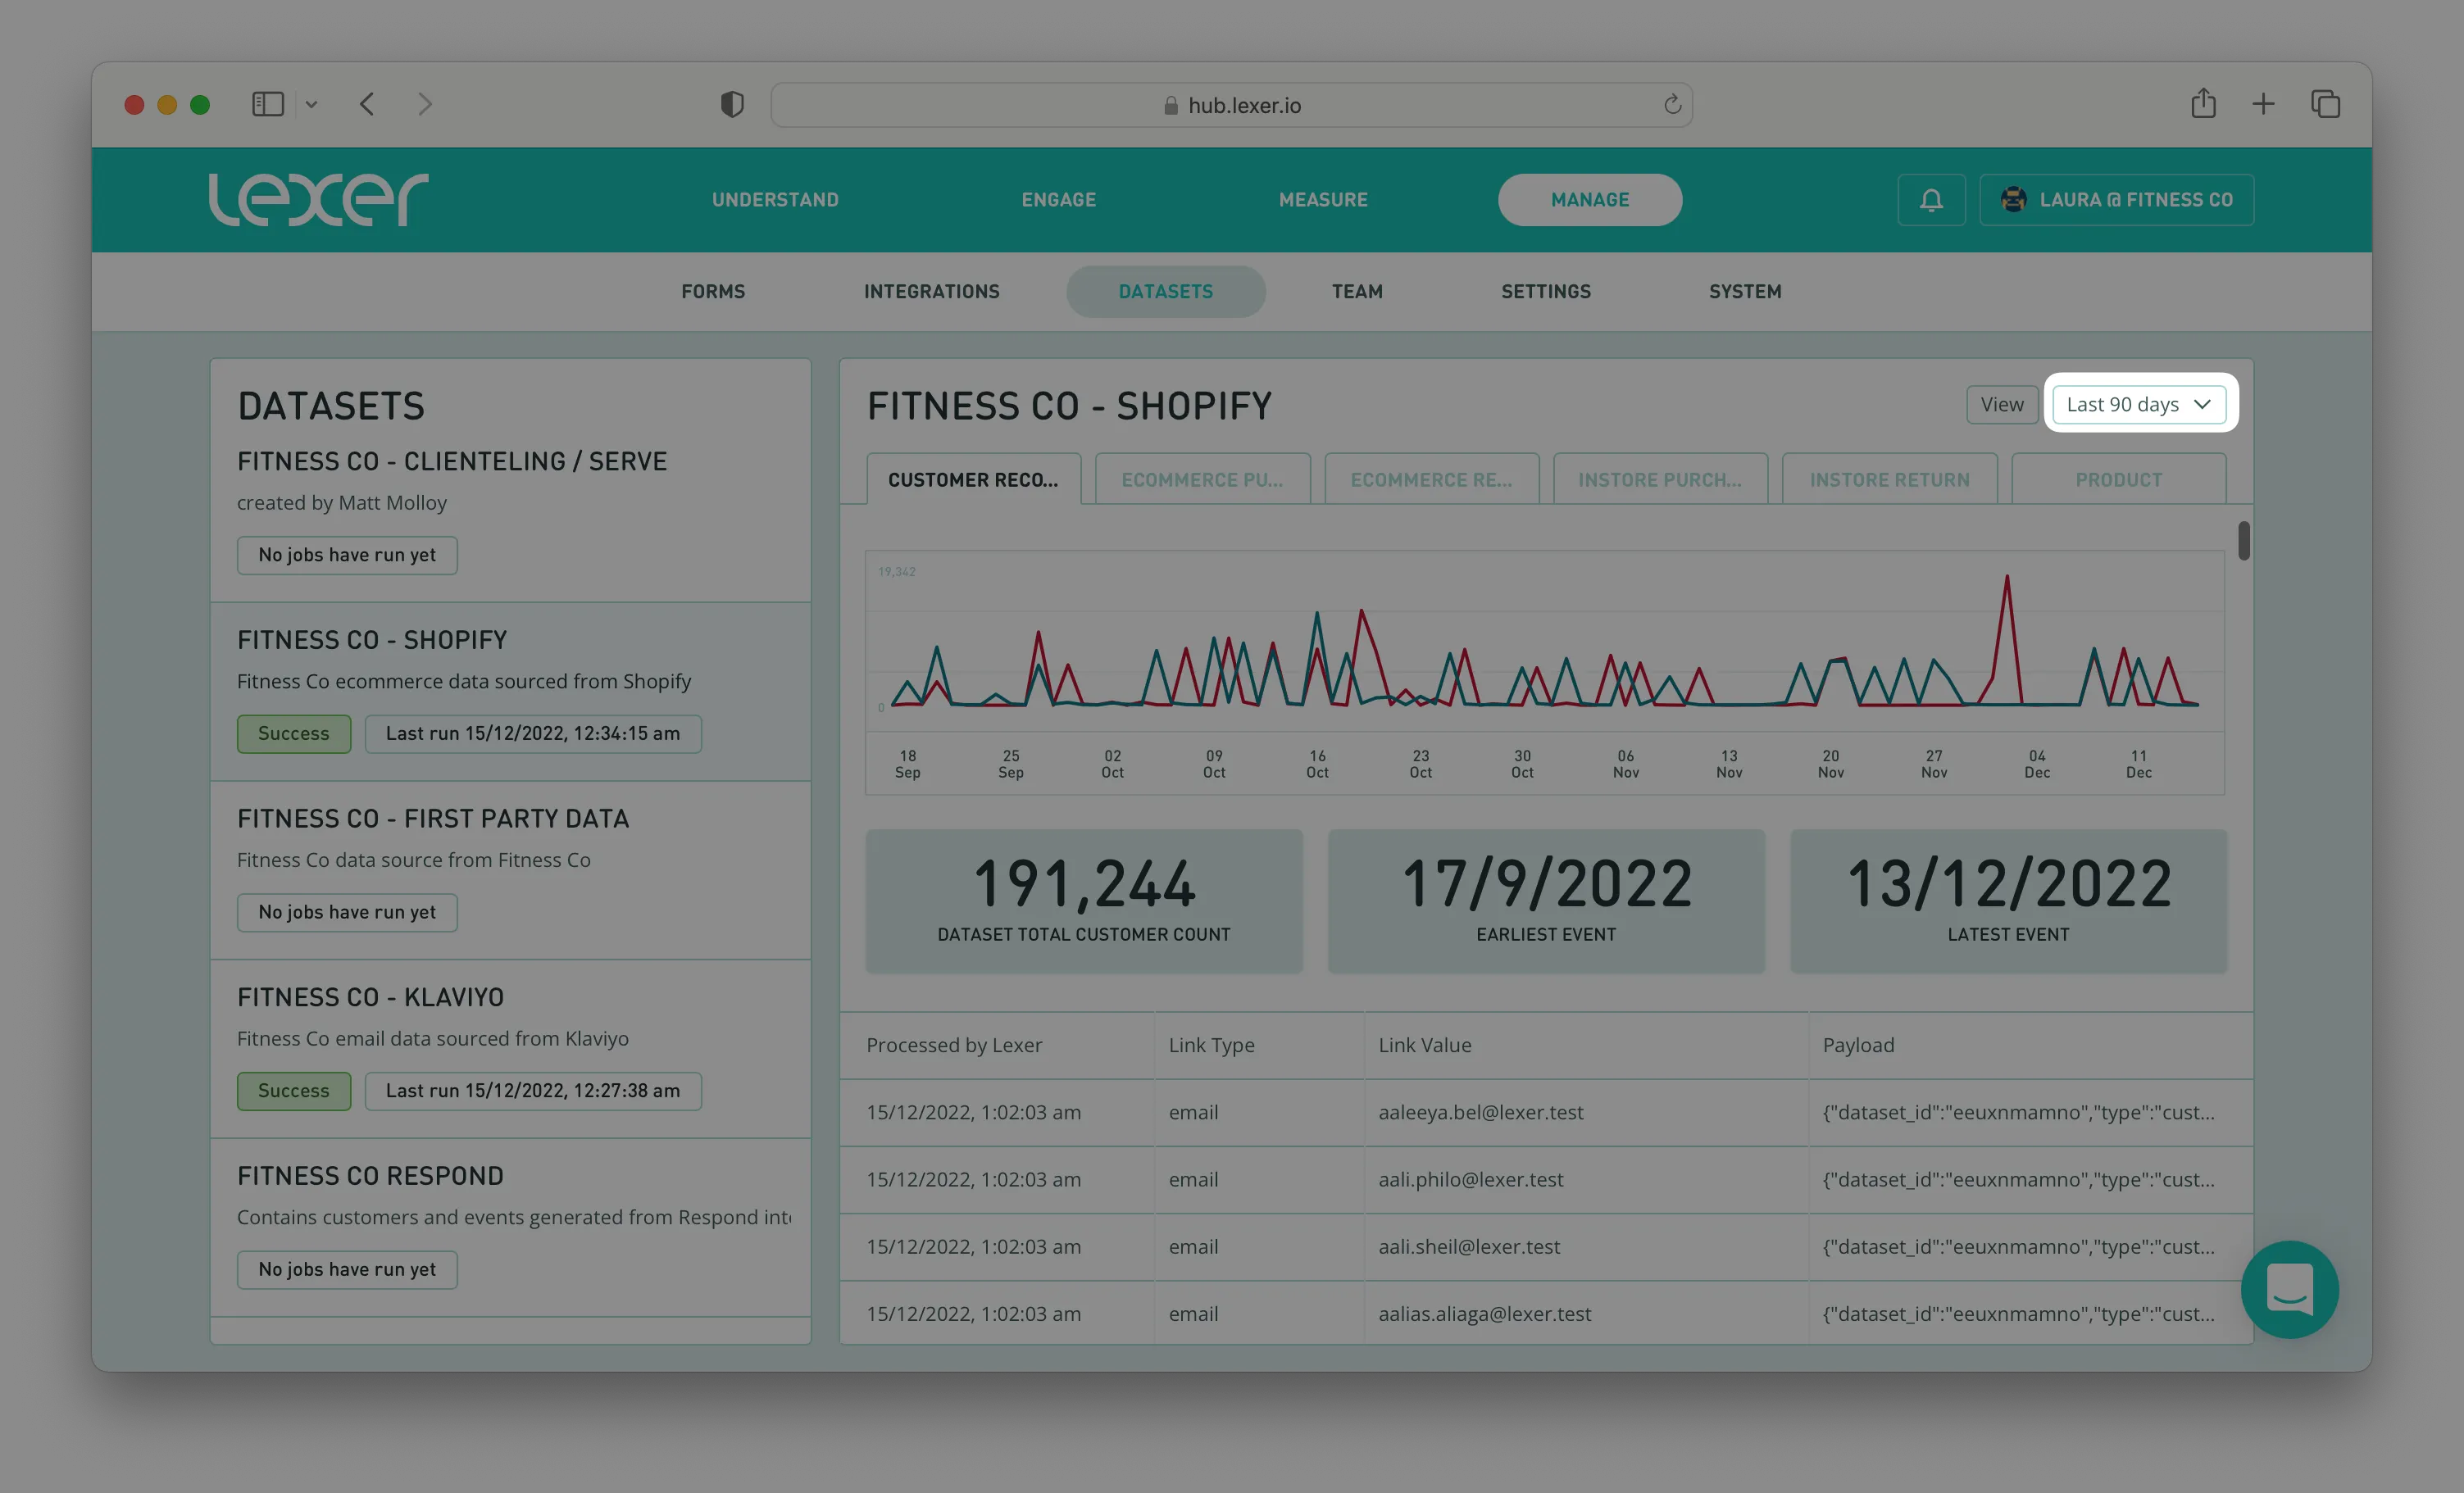
Dataset metrics and statistics
Relevant, top-line metrics for the selected record type are presented at the top of the main window, along with a chart that presents a view of high-level metrics relevant to the record type within the dataset across the date range selected.
That's a wrap!
In this article we ran through what Lexer's datasets product is and how to use it for data validation or statistical analysis of your datasets. Datasets has some cool new updates in store so watch this space!
