Tier filters

Understanding your search structure

Tier Filters are the foundation of any search in Lexer Listen and Lexer Respond. In this article, we’re going to walk you through their setup.

We believe that a search hierarchy is the most efficient way to find what you’re looking for, so we created an easy to use search engine (the Deep Dive) that allows you to choose pre-made filters that gradually hone in on content, layer by layer.

Why Tiers?

Lexer consumes millions of pieces of content every day, and trawling through these to find your topics of interest could prove challenging, if there wasn’t a structured way to do so.

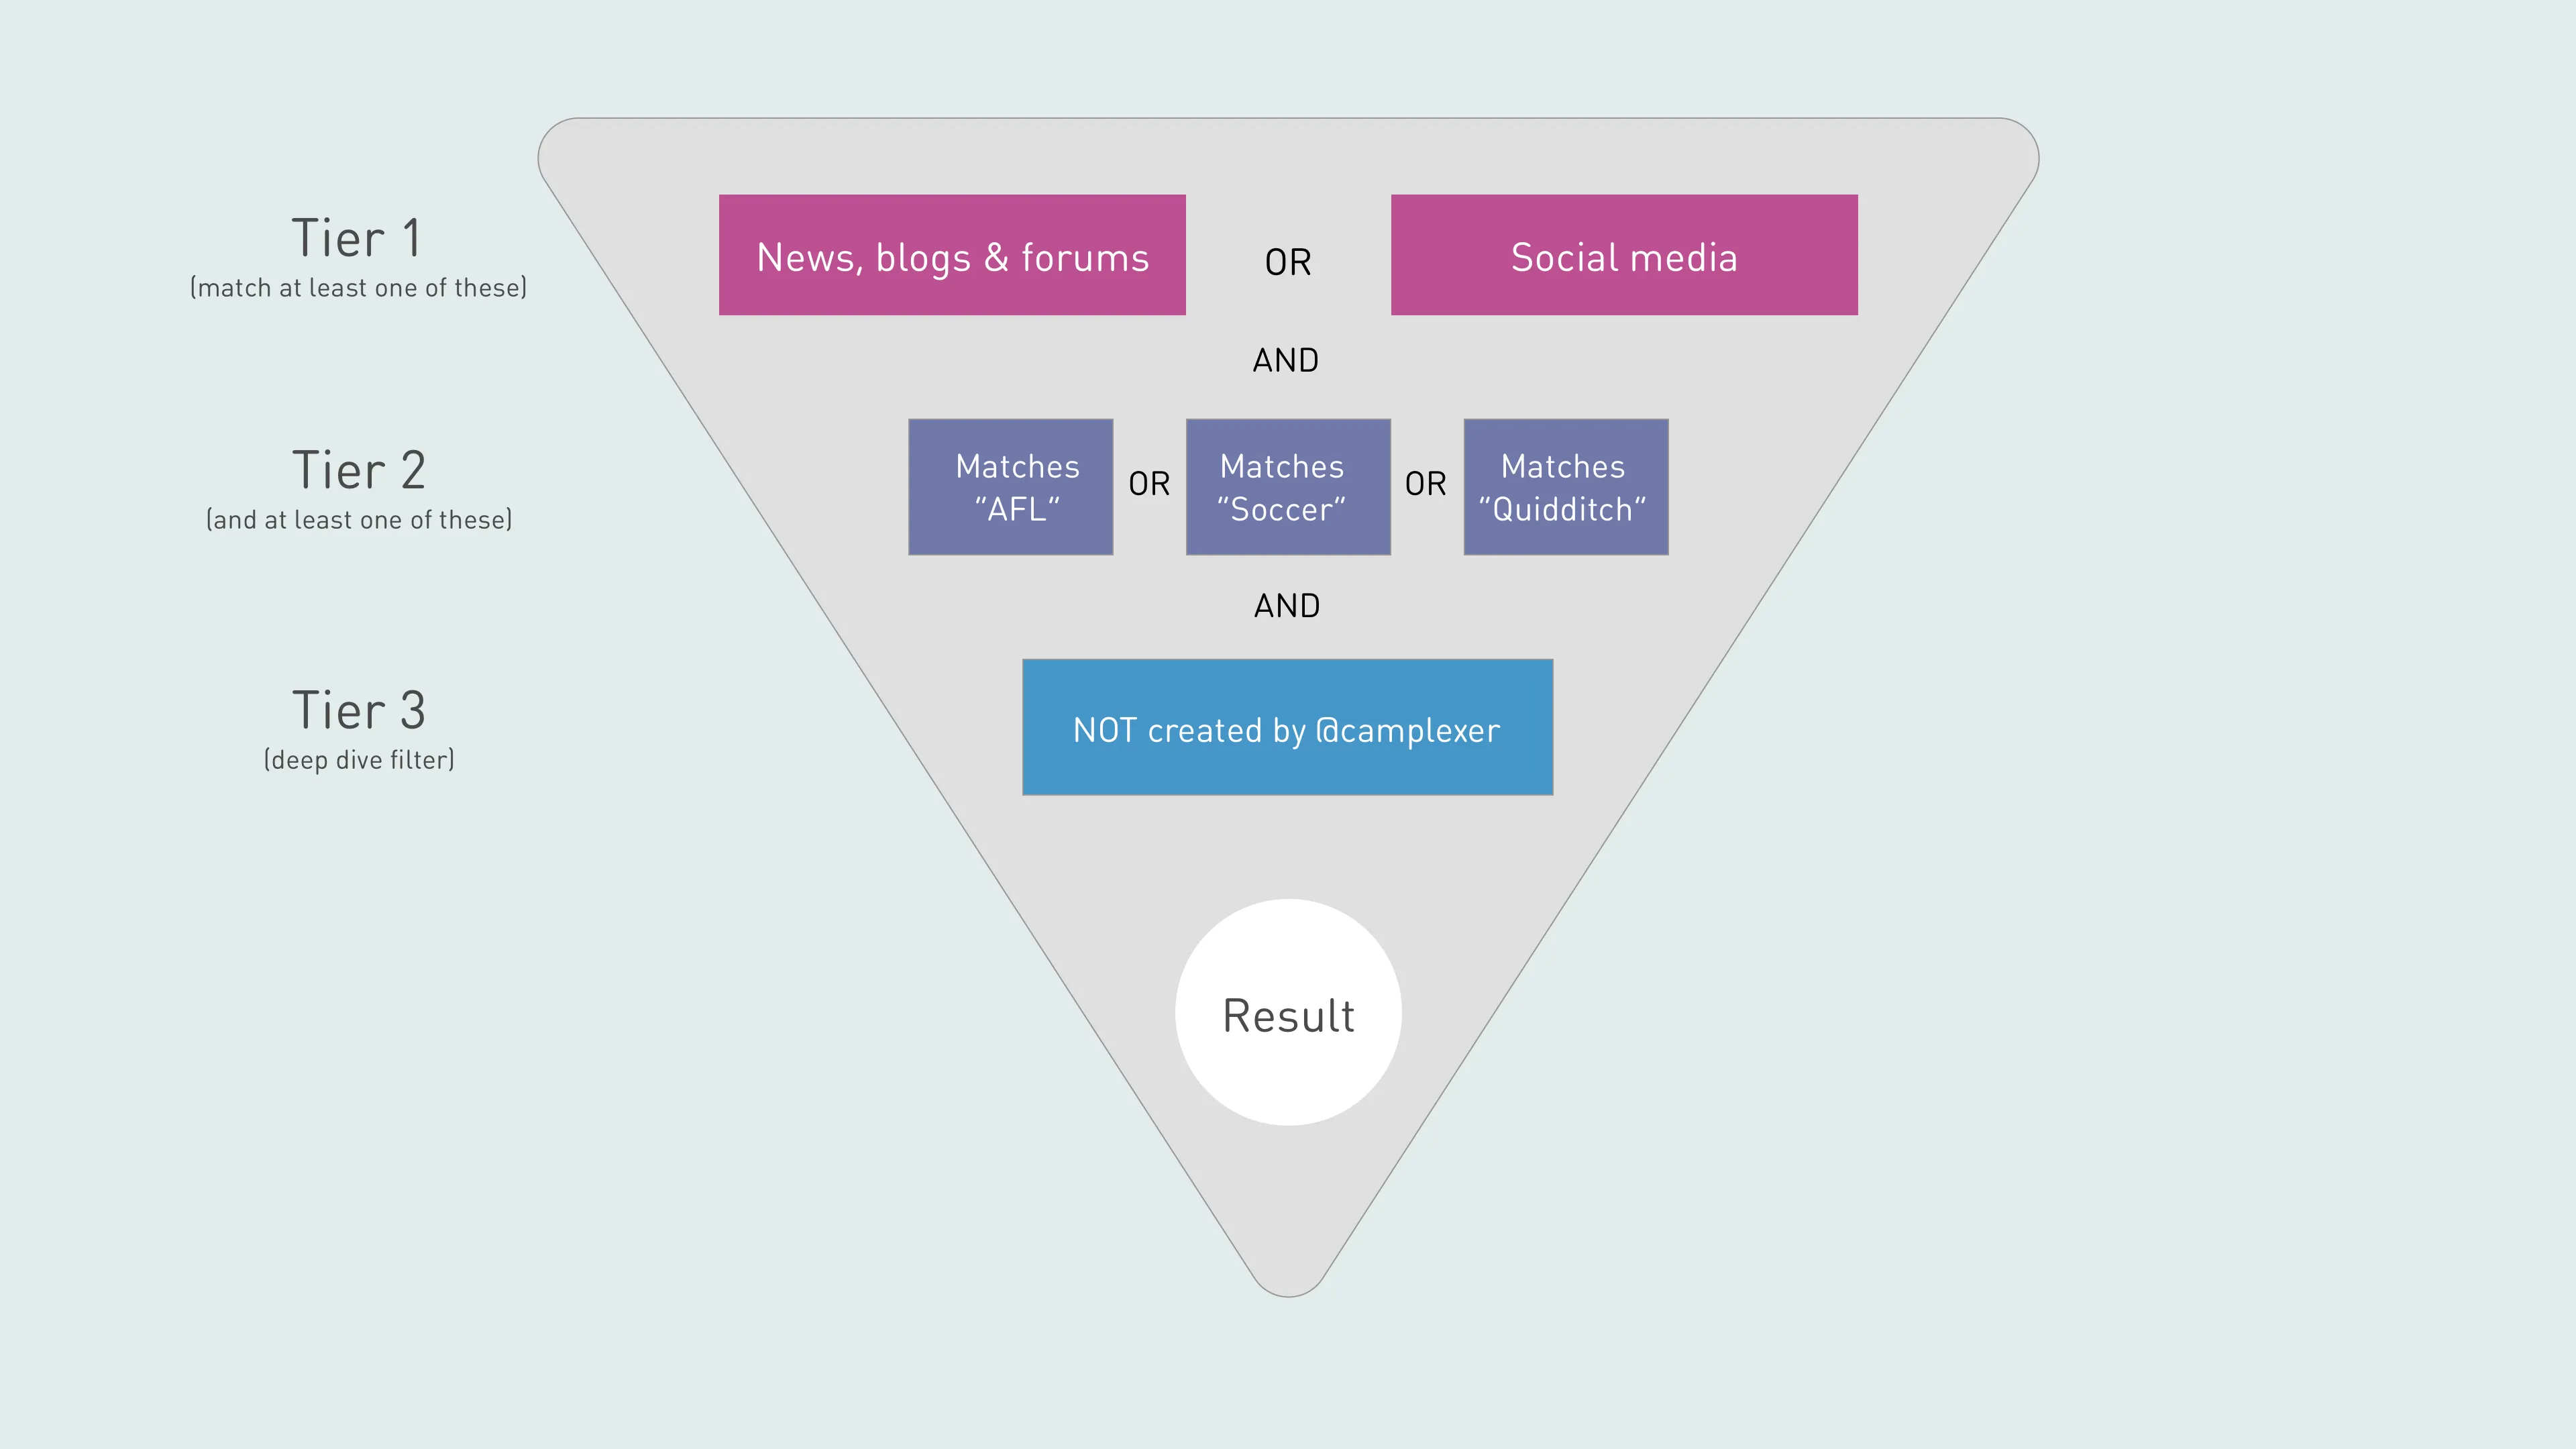
We separate out searches into 3 distinct tiers:

  • Tier 1: This is the first step in your search, and helps you manage your searches in later tiers. You are defining the sandbox in which you’re playing. This is where you filter by source, industry, geography, or key terms.
  • Tier 2: This is where you put the results from your Tier 1 search into manageable filter sets that produce dives on particular topics, brand, campaigns, events, etc.
  • Tier 3: Generated by you on the fly from within the interface.

The hierarchy of their use is important, because in the the background they generate a boolean search. If you’re not familiar with boolean, this is basically asking the search to look for ‘one thing AND another’, or ‘this thing OR that thing’.

3840

Tier 1 - where?

This is the first step in your search, so the first question you want to ask is “where?”. Are you looking for messages sent to your company’s Facebook page? Or perhaps you only want to view news articles? Some examples of best practice Tier 1 filters our clients use are:

  • All social: Content across Facebook, Instagram, and Twitter.
  • All published: Content across all news, blogs, and forums.
  • yourcompanyname Facebook content: All content posted to your company’s Facebook Page (generally excluding content posted by your Page).
  • yourcompanyname Twitter content: All content posted to your company’s Twitter account (generally excluding content posted by your account).
  • Survey responses: Pulls in all survey/form replies.
  • Email: yourcompanynameEmails sent to your integrated mailbox.

There are many more you could opt to use at Tier 1, depending on the type of content you’re looking for. Use the above as a guide, and reach out to Lexer Support (support@lexer.io) if you’d like some help with this.

Tier 2 - what?

Adding a Tier 2 filter is also a required step when building your search. With this, we’re asking the question “what?”. What is it you’re looking for from within your Tier 1 filter?

This will generally a person, campaign, topic of interest, or workflow State.

Some examples might be:

  • Open objects: Objects currently sitting in an open State - for customer service agents to to find new messages.
  • Everything: An open filter that allows you to look for everything within you Tier 1 filter
  • Melbourne and Sydney: Mentions of the terms “Melbourne” or “Sydney”.
  • Metallica: Mentions of the account @Metallica or hashtag #metallica.

Tier 3

These are added to your Deep Dive as you go, to help reduce noise, and narrow down your search to exactly what you’re looking for.

Tier 3 filters cannot be pre-configured, but can be added permanently to a Saved Dive. This differs to Tier 1 and 2 filters, in that you can save a Tier 3 to a particular Dive, and it doesn’t affect any other searches. When you save a Tier 1 or 2 filter, the settings in this reflect across all searches it’s used in.

How to make a Tier Filter

600
  1. Head to Manage > Settings > Tier Filters, then click on either New Tier 1 Filter or New Tier 2 Filter to get started.
  2. Give your filter a Name, Category (this could be things like “brand”, “sources”, “topics” etc.), and a Comment (optional, but helpful for the rest of your team - use this field to tell them a bit more about the purpose of the filter).
Lexer tip!
Here, you can also choose to have your Tier Filter appear by default each time you open Listen or Engage - just check the 'Select this filter by default' box.
  1. Next, confirm the Groups you'd like this filter to be visible to.
  2. Then select Filter, and add as many filters as required to your Tier Filter. Once you're done, click Save.

How to edit a Tier Filter

There are two ways to do this.The first is to head back into Manage > Settings > Tier Filters, and select the one you'd like to update from either the Tier 1 Filters or Tier 2 Filters tabs. Update the filters within the Tier Filter, the same way as you did in the initial setup, and click Save.

The second (recommended) method:

600

Click on the pencil icon of the Tier filter within your Deep Dive in Listen or Respond to open up a window on the right, then edit your filters and/or any other info on the Tier Filter, and click Save.

The benefit of this second method, is that there’s no need to divert to Settings, and interrupt your search process.

Types of Tier Filters

Now we'll show you how to refine the content you’re looking for, by gradually sifting through anything relevant, tier by tier - to hone in on exactly what you want.

Filter name Explanation How to use it
Matching terms This will search for specific words used in a piece of content, and can also be used to look for objects with a certain word count Check out our detailed article on boolean search logic. For word count, use either word_count:3, word_count:<10, or word_count:>10 (using your own numbers)
Matching title This will search for specific words used in titles of published articles. Works in the same way as a Matching Terms filter - can search for part, or all of a publication title, using boolean search logic. Can also be used to search for word count.
Mentioning links This will find exact mentions of a URL. Enter either all, or part of a url, without using http:// or https:// or www.

Also, cut the url before a ?, as this will not return any results.

For example: https://lexer.io/download/the-iconic-achieves-single-customer-view-with-cdp/?utm_content=91665366 would become: lexer.io/download/the-iconic-achieves-single-customer-view-with-cdp, or simply lexer.io/download to view all objects that contain a link that contains this.
From location This will allow you to position a square zone over an area on Earth, to filter content from. Zoom in on the area you wish to monitor, and click in the centre of the map view, zoom out and click again to cover a wider area. Note that this function will only pull in content from sources/authors that have provided their location details - if no location has been provided on a user’s account, their content will not be captured using this filter.
Mentioning authors This filter will look for mentions of a specific account within a piece of content. This filter only applies to Twitter content. For different sources, you’ll need to enter the author name slightly differently. Twitter: enter the Twitter handle, e.g. camplexer (drop the @). Entering part of the handle (i.e. lexer)will also give you results; Facebook: enter the profile name, e.g. Lexer; Instagram enter the Instagram handle e.g. (drop the @); News content enter all or part of the source name, e.g. news.com.au; Blogs and Forums Enter the username or profile name for the forum you’re searching in.
Source name This filter will allow you to filter content by the name of the source that is has come from. (eg. Twitter, Facebook) Enter facebook.com, twitter.com etc.
Source group This allows you to look for public content appearing on a Facebook page or a public Instagram profile - either to or by the owner of the account. For Facebook, enter the handle displayed under the Page’s name, or the url extension, e.g. facebook.com/camplexer (this will sometimes be a number). For Instagram, use the Page’s handle. For LinkedIn, this is the page username.
Author name Search for content by a specific author. Used the same way as the Mentioning Authors filter, see above.
Author reach Search for content by authors within a specific social reach (This only applies to Twitter content). You’re presented with two fields - the top is for the minimum reach, the bottom is for the maximum. Enter your range in these fields to see content that has the potential to have been viewed the specified number of times you’ve selected.
Source type This filter allows you to search content if it matches one or more types. Types refer to the mode in which that content was published (eg. a comment, a direct message). Select the source types you’d like to view from the menu provided.
Content formats This filter allows you to filter in/out videos, images, text and links. Select the content formats you’d like to view from the menu provided.
In language Search for content by the language the customer has provided in their profile details. Note: This won’t necessarily show content only in the language you’ve searched. Select one language from the dropdown menu.
Current state Filter by whether or not content has been handled by your team, and by specific States within your team’s workflow. Select the States you’d like to view from the menu provided.
Classifications Filter by whether or not content has been provided with a specific Classification within your team’s workflow. Click inside the Contains and Excludes fields to add Classifications from your library. The Contains field acts as an AND query (looking for all Classifications appearing together on an object), and the Excludes field acts as an OR query (looking for any single Classification at a time on an object). For example, say you add three Classifications to the Contains field, this will look for objects that contain all three of those Classifications on a single object. Classifications added to the Excludes field will show all objects for your search, except those that contain any one of the Classifications listed in that field.
Survey responses Filter through content to see survey responses from specific and multiple surveys. Select from the list of available Surveys you’d like to view responses from.

Auto-add filters to your Deep Dive

When you’ve run a search, and have been presented with results, you’ll notice a set of tiles on each object that give you information on things like the time it was created, where it came from, who the author was etc.

By clicking on these, you’ll instantly add new pre-filled filters to your Deep Dive.

4058

Under each object you'll find:

  • Time content was published
  • Source the content was published on
  • Page (Source Group) it was published to
  • Author of object
  • Source Type
  • Status of object (what stage of your workflow it’s reached)
  • Number of likes this object has received (note: not interactive)

Once you’ve added these filters to your Deep Dive, rerun the search, and you’ll be presented with results the same as those on the current object.

Using one at a time will give you objects that match each of those criteria. Using them together will require that the objects match all of the criteria you’ve selected per individual object.

You’ll also see two other tiles:

  • Arrow: Clicking this button will take you directly to the native post. Note that you’ll have access to all public content, but objects such as Private Messages will require you to have login access to the account it lives in.
  • Plus (+): This adds the object itself to your Deep Dive, to look for any “related objects”. What this means, is that you search for the thread of comments on a parent post, which is handy for tracking mentions on a campaign, for example.

From almost all charts and tables in Listen and Respond, you can also add filters to your Deep Dive, and the same logic applies as above - this will add that exact criteria to your search.

For example, by clicking on an entry in the Terms table, you’ll add a new Matching Terms filter to your Deep Dive with that word or phrase. You can continue to click through entries on the table to create an “OR” query that looks for all of those terms.

Updated:
April 26, 2025
Did this page help you?
Thank you! Your feedback has been received!
Oops! Something went wrong while submitting the form, for assistance please contact support@lexer.io
Welcome to Lexer!
Fundamentals
Getting started
Javascript Tag basics
Data Platform
Javascript Tag
Data in the CDXP
Fundamentals
Getting started
Our glossary
Fundamentals
Getting started
Integrations overview
Fundamentals
Integrations
Onboarding data with Lexer
Data Platform
Data Onboarding
Data onboarding process
Data Platform
Data Onboarding
Importing CSV data
Data Platform
Data Onboarding
Importing JSON data
Data Platform
Data Onboarding
Secure file uploads
Data Platform
Data Onboarding
SFTP uploads and exports
Data Platform
Data Onboarding
AWS S3 uploads and exports
Data Platform
Data Onboarding
Lexer's attributes
Data Platform
Data Types
Predictive attributes
Data Platform
Data Types
Lexer API overview
Data Platform
Developer APIs
Understanding APIs
Data Platform
Developer APIs
API authentication
Data Platform
Developer APIs
API rate limits
Data Platform
Developer APIs
Bulk write API
Data Platform
Developer APIs
Profile read API
Data Platform
Developer APIs
Activity overview
Insights
Activity
Team report
Insights
Activity
Cases report
Insights
Activity
NPS report
Insights
Activity
Listen overview
Insights
Listen
Searching in Listen
Insights
Listen
Tier filters
Insights
Listen
Saved dives
Insights
Listen
Boolean search
Insights
Listen
Listen CSV exports
Insights
Listen
Visualize overview
Insights
Visualize
Curate image feed
Insights
Visualize
Respond overview
Engagement
Respond
Identity Resolution
Fundamentals
Getting started
My account
Fundamentals
Setup
Manage team
Fundamentals
Setup
Group permissions
Fundamentals
Setup
Classifications
Fundamentals
Setup
Out of the box segments
Fundamentals
Setup
Lexi AI
Fundamentals
Getting started
Browser guide
Fundamentals
Security
Corporate networks
Fundamentals
Security
Multi-factor authentication
Fundamentals
Security
Single sign-on
Fundamentals
Security
Lexer's ultimate troubleshooting guide
Fundamentals
Troubleshooting
Troubleshooting tech issues
Fundamentals
Troubleshooting
Troubleshooting integrations
Fundamentals
Troubleshooting
Troubleshooting Activate
Fundamentals
Troubleshooting
Troubleshooting Respond
Fundamentals
Troubleshooting
Help! My data is missing from the Hub
Fundamentals
Troubleshooting
Lexer data specification
Data Platform
Data Specification
Customer data specification
Data Platform
Data Specification
Commerce data specification
Data Platform
Data Specification
Marketing data specification
Data Platform
Data Specification
Compliance data specification
Data Platform
Data Specification
Data formatting and validation
Data Platform
Data Specification
Product imagery
Data Platform
Data Specification
Currency conversion
Data Platform
Data Specification
Dataset management
Data Platform
Data Management
Getting started with Logs
Data Platform
Data Management
Respond chatbot API
Data Platform
Developer APIs
Activity API
Data Platform
Developer APIs
Lexer Forms overview
Data Platform
Forms
Form builder workflow
Data Platform
Forms
Form conditional logic
Data Platform
Forms
Form settings
Data Platform
Forms
Form segmentation
Data Platform
Forms
Form response analysis
Data Platform
Forms
Form hidden fields
Data Platform
Forms
Form attribute mapping
Data Platform
Forms
Javascript Tag technical guide
Data Platform
Javascript Tag
Javascript Tag use cases
Data Platform
Javascript Tag
Javascript Tag: Shopify Custom Pixel
Data Platform
Javascript Tag
CRM data
Data Platform
Data Types
Transaction data
Data Platform
Data Types
Email engagement data
Data Platform
Data Types
Experian data enrichment
Data Platform
Data Types
Customer Service data
Data Platform
Data Specification
GDPR and CCPA requests
Fundamentals
Compliance
File upload API
Data Platform
Developer APIs
Segment overview
Insights
Segment
Creating segments
Insights
Segment
Smart Search
Insights
Segment
Profile tab
Insights
Segment
Event Explorer
Insights
Segment
Attribute value types
Data Platform
Data Types
Compare segments
Insights
Compare
Compare attributes
Insights
Compare
Activate overview
Engagement
Activate
Segment activations
Engagement
Activate
Event activations
Engagement
Activate
Activation field mapping
Engagement
Activate
Audience splits
Engagement
Activate
A/B splits
Engagement
Activate
Control group splits
Engagement
Activate
Inbox filtering
Engagement
Respond
Ignored Senders
Engagement
Respond
Forms in Respond
Engagement
Respond
Workflow states
Engagement
Respond
Bulk changes
Engagement
Respond
Scheduled replies
Engagement
Respond
Message templates
Engagement
Respond
Finding conversations
Engagement
Respond
Customer profiles
Engagement
Respond
Grouped messages
Engagement
Respond
Automation rules
Engagement
Respond
Redact messages
Engagement
Respond
Routing customer replies
Engagement
Respond
Interact with comments
Engagement
Respond
Respond workflow tips
Engagement
Respond
Contact Reporting
Engagement
Contact
Contact Queue Filters
Engagement
Contact
Contact WhatsApp Queues
Engagement
Contact
Schedule overview
Engagement
Schedule
Serve overview
Engagement
Serve
Installing Serve
Engagement
Serve
Serve user management
Engagement
Serve
Forms in Serve
Engagement
Serve
Configuring Serve
Engagement
Serve
Serve reports
Engagement
Serve
Serve Currency
Engagement
Serve
Serve POS QR Code
Engagement
Serve
Activate CSV export
Engagement
Activate
Track overview
Insights
Track
Track Tables
Insights
Track
Lexer Product Recommender → Klaviyo Integration
Grow
Lexer Product Recommender → Klaviyo Integration
Where do your best customers live? Use geographic insights to maximize media spend and conversion
Grow
Where do your best customers live? Use geographic insights to maximize media spend and conversion
Suppression audiences: How to use them and maximize your media effectiveness
Enrich
Suppression audiences: How to use them and maximize your media effectiveness
Measure campaign effectiveness: Track your KPIs and report on campaign performance
Enrich
Measure campaign effectiveness: Track your KPIs and report on campaign performance
Converting prospects: Acquire customers from your current, engaged prospect base (and save your ad spend!)
Acquire
Converting prospects: Acquire customers from your current, engaged prospect base (and save your ad spend!)
Understanding customer intent: Effective message personalization for buyers who shop outside their gender
Grow
Understanding customer intent: Effective message personalization for buyers who shop outside their gender
Deepen customer understanding: Use third-party data to identify insights for personalized messaging and increased engagement
Grow
Deepen customer understanding: Use third-party data to identify insights for personalized messaging and increased engagement
Basket analysis: Increasing customer lifetime value through targeted product bundling
Grow
Basket analysis: Increasing customer lifetime value through targeted product bundling
Persona building: Personalize your messaging for maximum return on your campaign investments
Grow
Persona building: Personalize your messaging for maximum return on your campaign investments
Driving customer loyalty: Identify, keep, and grow your most loyal customers
Retain
Driving customer loyalty: Identify, keep, and grow your most loyal customers
Increasing customer lifetime value: Upselling strategies
Grow
Increasing customer lifetime value: Upselling strategies
Reactivating lapsed customers: Retention and growth
Retain
Reactivating lapsed customers: Retention and growth
Welcome offer strategies: Using the Hub for analysis
Acquire
Welcome offer strategies: Using the Hub for analysis
Creating customer forms: Best practices
Enrich
Creating customer forms: Best practices
Connecting your MarTech stack with Lexer!
Enrich
Connecting your MarTech stack with Lexer!
Identifying win-back customers using the Second Last Order: Date attribute
Retain
Identifying win-back customers using the Second Last Order: Date attribute
Understanding customers' purchasing habits: Order Sequence filter
Grow
Understanding customers' purchasing habits: Order Sequence filter
Maximizing customer communications in Respond
Retain
Maximizing customer communications in Respond
Using Product Recommendation in the Hub to encourage repeat purchases
Grow
Using Product Recommendation in the Hub to encourage repeat purchases
Encouraging customer loyalty using birthday campaigns
Retain
Encouraging customer loyalty using birthday campaigns
Increasing customer lifetime value: Converting your one-time buyers into two-time buyers
Grow
Increasing customer lifetime value: Converting your one-time buyers into two-time buyers
Collecting zero-party data using Lexer Forms
Enrich
Collecting zero-party data using Lexer Forms
Measuring your data over time with Track
Enrich
Measuring your data over time with Track
UTM Creation Guidelines
Brand Assets
Brand Assets
Brand Assets
GTM guide to creating marketing materials with Lexer
How to use the Lexer Form Builder
Explore our standard integrations
Operating a CDP Practice LP
LP Sales Enablement
LP Sales Enablement
LP Sales Enablement
Video Training Courses LP
Purpose and Mission
Purpose and Mission
Purpose and Mission
Brand & Marketing LP
Stage 3 - QBRs and Customer insights
Client Onboarding Journey
Start your CDP Practice
Lexer Messaging
Lexer Messaging
Lexer Messaging
Pain point conversations
Lexer Ideal Customer Profile & Positioning
Referral Partner Program Overview
Demo Hub Guide
Demo Hub Guide
Demo Hub Guide