Control group splits

Use control groups to measure your campaign

Finally, the power of “what if” is at your fingertips. Learn and witness the measurable impacts your campaigns are having on your audience by using 90/10 control group splits in Lexer Activate. This article will take you through use cases and how to create these splits.

This guide assumes you’ve read through the guide to using audience splits, which goes into detail on what splitting audiences is, and how you can prepare to use audience splits.

Why you would use control group splits?

A Control group split is the division of your audience into a 10% to 90% split. Meaning you’ve got 90% of an audience allocated as your ‘experiment’, and 10% allocated as your ‘control’. But why? Measuring impact. How? By removing 10% (‘control’) of your audience from the advertisement so you can study the natural response of your control group. You can then compare this with your 90% (‘experiment’) and see how many more people by percentage in the experiment (‘90%’) group responded positively when compared to the control (10%). One more time: that’s cutting a small group out from your campaign so you can see how much influence your activation actually had on the 90% when compared to that small 10% who didn’t see it.

Let’s begin.

Step 1: Picking the right Segment

Using your knowledge of Segment, your first task is to build the right Segment and ensure you’ve saved this Segment. Your Segment will require two things:

  1. Rationality: why is it you’re interested in this Segment?
  2. A channel: how is this Segment best reached?
    Answering these two questions prior will help you know the best way to deliver your campaign effectively prior to using audience splits.

Step 2: Splitting the audience

Now to split our audience and send it over to the appropriate channel. This can be done inside Activate. In Activate, simply configure an audience to be sent to your platform and select the control group split in the activation details.

  1. Create a new activation.
  2. Select your channel.
  3. Select the Tribe you saved in step 1.
  4. Configure the details of your split, and select “Generate Control Group Split”.

Your activation will run and notify you when it has reached your channel. Some channels will try and match your audiences to known users of that channel and sometimes wont show your audience until this process is complete. So if you don’t see your split segment arrive straight away, check again shortly.

Step 3: Comparing the results

When you send an audience with Lexer Activate, you can append an audience ID attribute to your customers so you can return to Identify and measure the impact. When splitting an audience we append two audience attributes, Audience (A) and Audience (B). This means you now have the ability to measure the results by audiences individually, or together. When you’ve launched your campaign, you can use other tools within Identify, like Compare, to measure the impact on these customer groups beyond the campaign. To do this, find the “Included in Audience” attribute, find your A and B audiences, and save each as an individual Tribe.

  1. Find “COMPARE” inside Identify.
  2. Select your control and experiment group audiences and generate a comparison.
  3. Use filters to look for most diversity or least diversity.
  4. Click on insights to see the depth of the comparison.
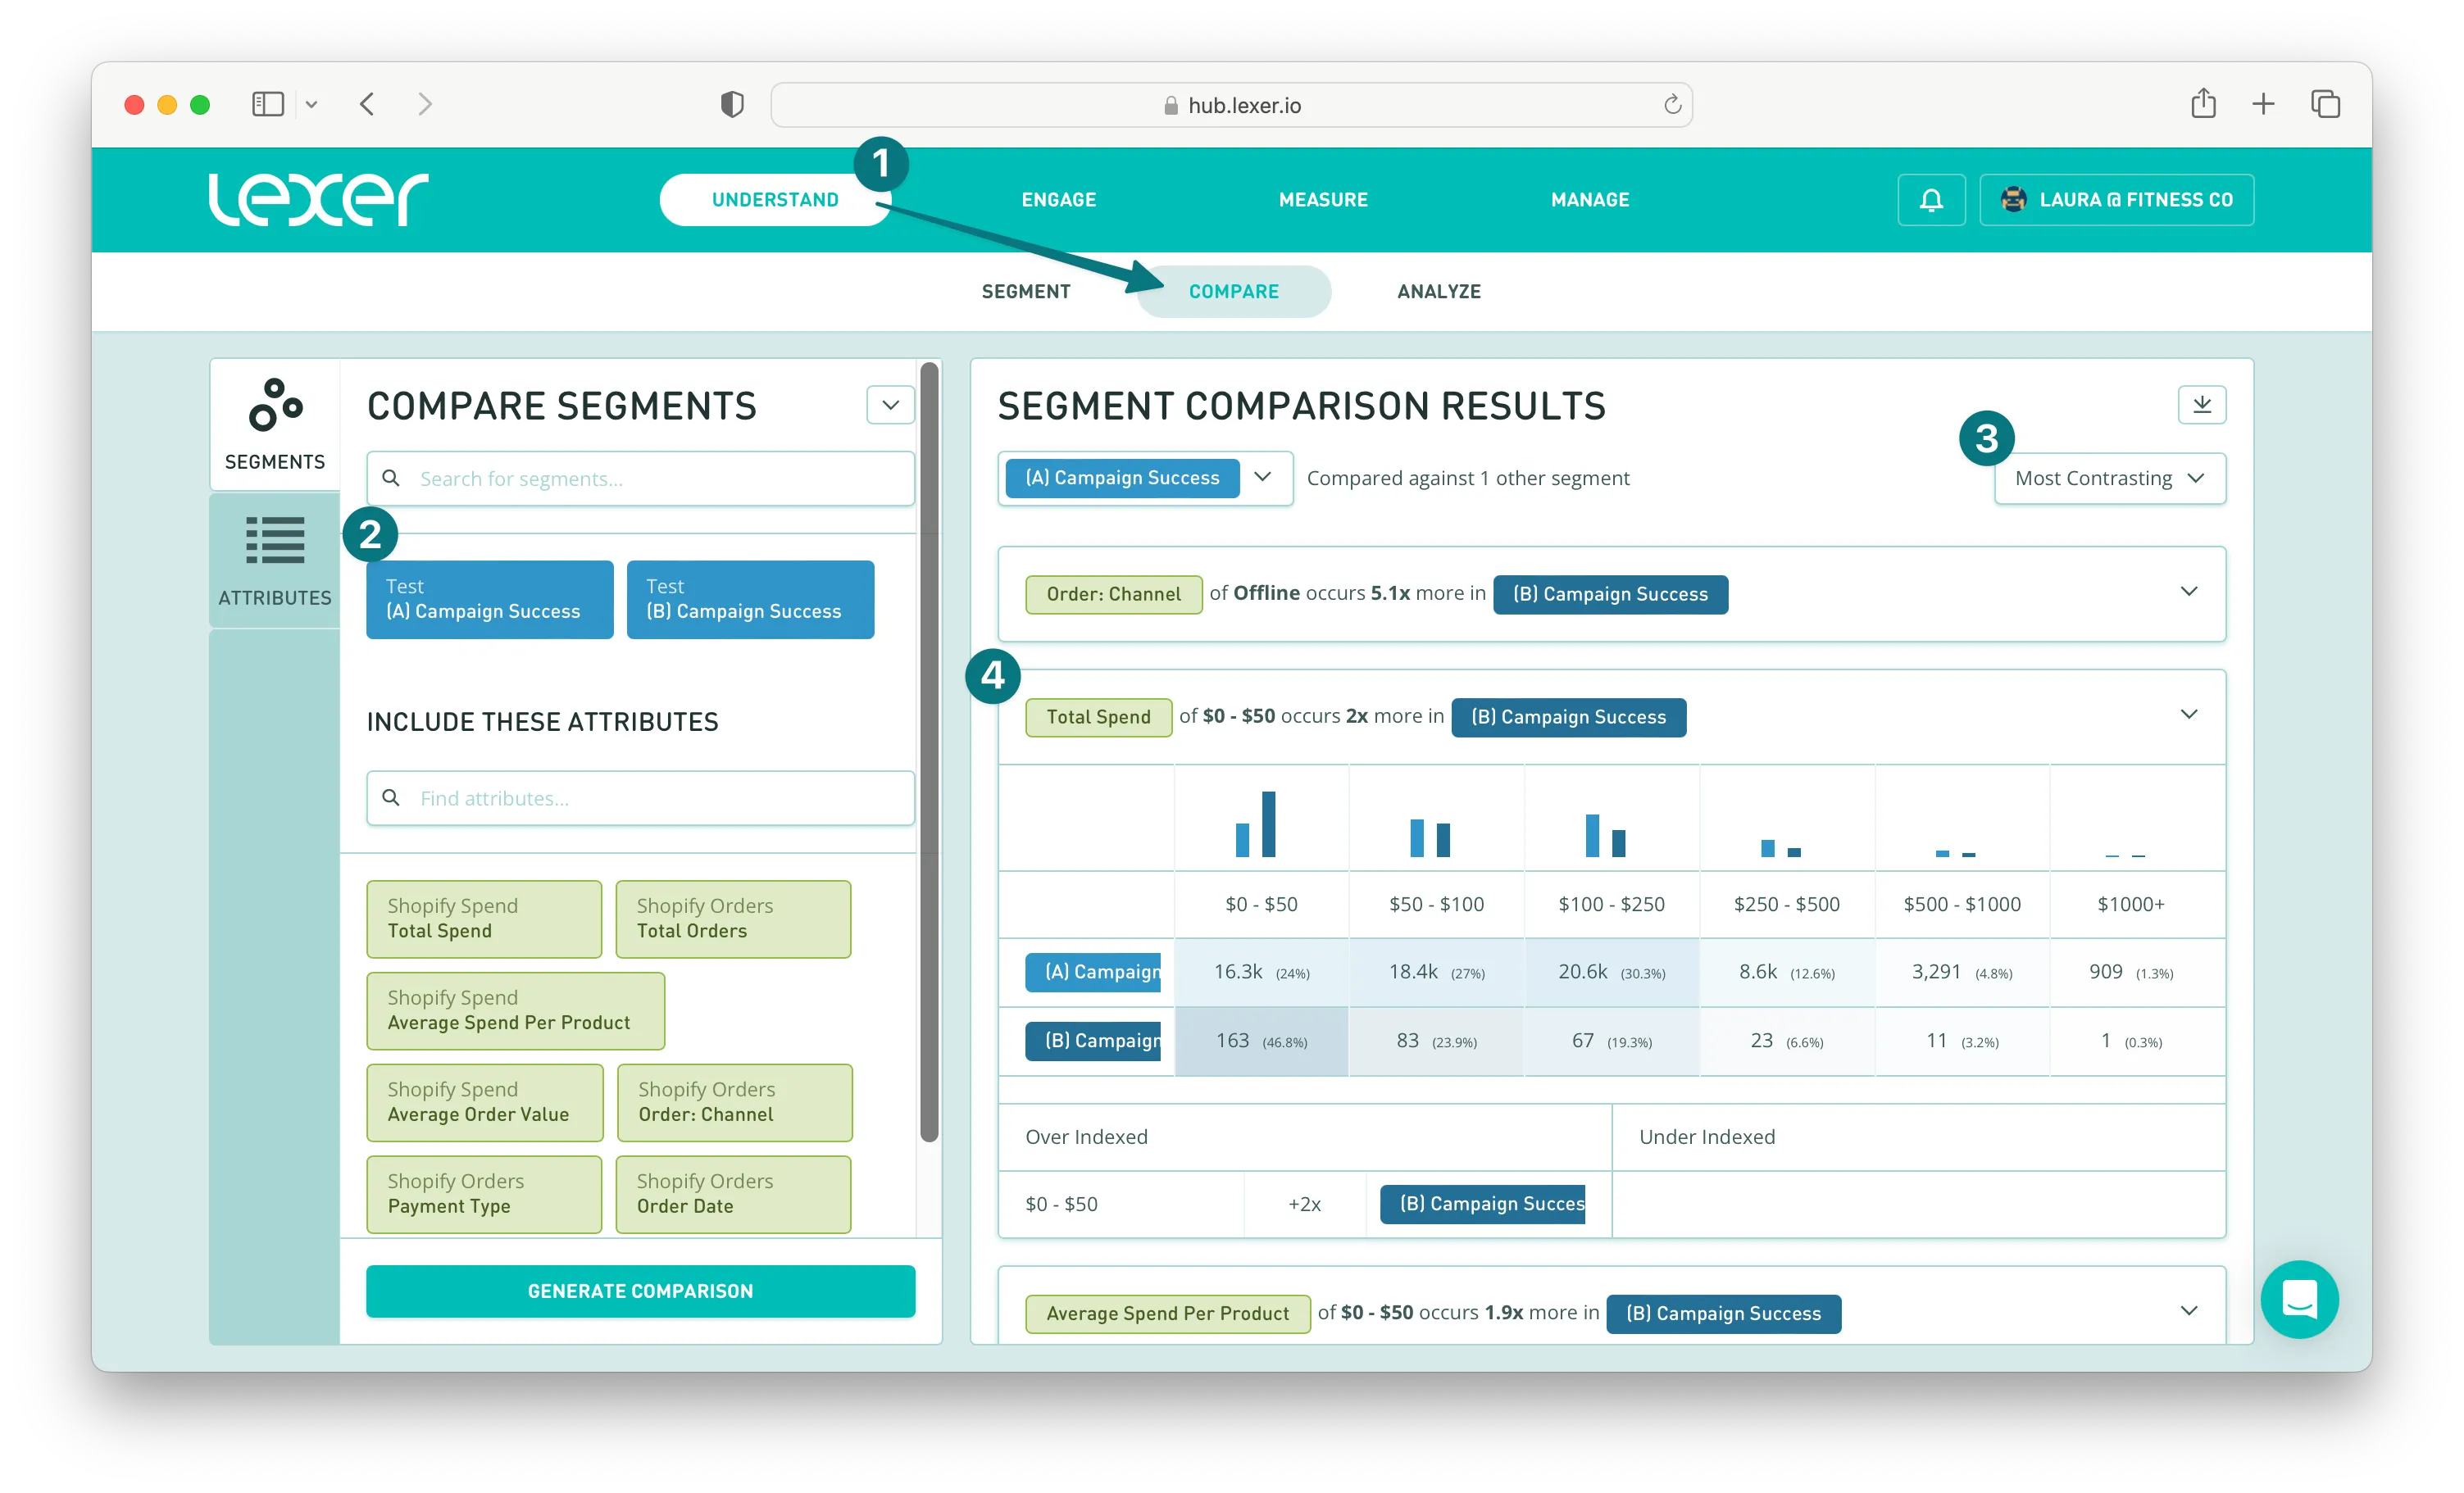
In the image above you can see that the control group has had an impact on total spend, increases the spend of higher value customers when compared to the control group.

Compare instantly shows you the variations of your campaign. Insights to check would be:

  • how do the order values vary between those who and did not receive the campaign?
  • what is the engagement rate of the campaign compared to those who didn’t see it? You can do this by including your attributes in your comparison to measure exactly what you want.

To further the insights deeper, you can note how the make up of the segment has evolved. Have any customers entered your high value segments? How do age groups respond to the message, if at all? All of these insights are instantly acquired through exploring your segments in Identify.

That's how you control your group splits! We've looked at why you would do it, the process, and how to compare the results. If you have any questions please reach out to Support at support@lexer.io.

Updated:
September 23, 2022
Did this page help you?
Thank you! Your feedback has been received!
Oops! Something went wrong while submitting the form, for assistance please contact support@lexer.io
Welcome to Lexer!
Fundamentals
Getting started
Our glossary
Fundamentals
Getting started
Integrations
Fundamentals
Setup
My account
Fundamentals
Setup
Manage team
Fundamentals
Setup
Group permissions
Fundamentals
Setup
Classifications
Fundamentals
Setup
Out of the box segments
Fundamentals
Setup
Browser guide
Fundamentals
Security
Corporate networks
Fundamentals
Security
Emergency contact
Fundamentals
Security
Multi-factor authentication
Fundamentals
Security
Single sign-on
Fundamentals
Security
Trust and compliance
Fundamentals
Security
Lexer's Identity Resolution
Fundamentals
Identity Resolution
Troubleshooting tech issues
Fundamentals
Troubleshooting
Error code: 503 Service Unavailable
Fundamentals
Troubleshooting
Error code: 401 Unauthorized
Fundamentals
Troubleshooting
Error code: 403 Forbidden
Fundamentals
Troubleshooting
Troubleshooting Activate
Fundamentals
Troubleshooting
Troubleshooting Respond
Fundamentals
Troubleshooting
Help! My data is missing from the Hub
Fundamentals
Troubleshooting
Understanding APIs at Lexer
Data
Data Onboarding
Providing JSON data to Lexer
Data
Data Onboarding
Providing CSV data to Lexer
Data
Data Onboarding
Upload using SFTP
Data
Data Onboarding
Upload using S3
Data
Data Onboarding
Lexer data specification
Data
Lexer Data Specification
Customer data specification
Data
Lexer Data Specification
Commerce data specification
Data
Lexer Data Specification
Marketing data specification
Data
Lexer Data Specification
Compliance data specification
Data
Lexer Data Specification
Data Formatting and Validation
Data
Getting Started with APIs
Authentication and API token creation
Data
Getting Started with APIs
Rate Limits
Data
Getting Started with APIs
Response codes and common errors
Data
Getting Started with APIs
Product imagery
Data
Getting Started with APIs
Currency conversion
Data
Getting Started with APIs
Lexer’s APIs overview
Data
Lexer’s APIs
Dataset management in the Hub
Data
Dataset management
Chatbox user API
Data
Lexer’s APIs
Activity API
Data
Lexer’s APIs
Visualize API
Hidden from nav
Profile Read API
Data
Lexer’s APIs
Lexer Javascript Tag basics
Data
Lexer Javascript Tag
Lexer Javascript Tag technical guide
Data
Lexer Javascript Tag
Lexer Javascript Tag use cases
Data
Lexer Javascript Tag
dataLayer configuration: Shopify
Data
Lexer Javascript Tag
Customer segment CSV export
Data
Data off-boarding
Export to CSV
Data
Data off-boarding
Data in Lexer's CDXP
Understand
Customer Data
Lexer's attributes
Understand
Customer Data
Attribute value types
Understand
Customer Data
Data source - CRM
Understand
Customer Data
Data source - Transactions
Understand
Customer Data
Data source - Email
Understand
Customer Data
Partner data - Experian
Understand
Customer Data
Partner data - Mastercard
Understand
Customer Data
Partner data - Roy Morgan
Understand
Customer Data
GDPR and CCPA requests
Understand
Customer Data
Upload data files
Understand
Customer Data
File upload API
Understand
Customer Data
Data provision and schemas
Understand
Customer Data
Segment overview
Understand
Segment
Creating segments
Understand
Segment
Smart Search
Understand
Segment
Export attribute results
Understand
Segment
Contact a customer
Understand
Segment
Fixing a disabled segment
Understand
Segment
Profile tab
Understand
Segment
Compare segments
Understand
Compare
Compare attributes
Understand
Compare
Activate overview
Engage
Activate
Ongoing activations
Engage
Activate
Audience splits
Engage
Activate
A/B splits
Engage
Activate
Control group splits
Engage
Activate
Inbox filtering
Engage
Respond
Ignored Senders
Engage
Respond
Forms for service
Engage
Respond
Workflow states
Engage
Respond
Bulk changes
Engage
Respond
Scheduled replies
Engage
Respond
Message templates
Engage
Respond
Customer profiles
Engage
Respond
Grouped messages
Engage
Respond
Automation rules
Engage
Respond
Redact messages
Engage
Respond
Track overview
Measure
Track
Activity overview
Measure
Activity
Team report
Measure
Activity
Cases report
Measure
Activity
Listen overview
Measure
Listen
Searching in Listen
Measure
Listen
Tier filters
Measure
Listen
Boolean search
Measure
Listen
Saved dives
Measure
Listen
Email notifications
Measure
Listen
Twitter data
Measure
Listen
Facebook data
Measure
Listen
Instagram data
Measure
Listen
Visualize overview
Measure
Visualize
Curate feed
Measure
Visualize
Report overview
Measure
Report