
Facebook Ads
This integration is in beta
As with all beta tests, not everything will be perfect. If you run into any issues, please submit a support ticket.
Connect your Facebook Ads account with Lexer
Within Lexer you can integrate your Facebook Ad account, which will permit Lexer to build direct activations with your Facebook and Instagram ad accounts.
In this article we will show you how to integrate your account for the first time, and how to reintegrate your account should it become disconnected. If you’d like to integrate your Facebook page for use with Listen, Outbox, or Engage see this article on integrating your Facebook account.
Benefits of a Facebook Ad integration
Integrating your Facebook Ad account with Lexer provides a number of benefits, such as:
- Send segments as custom audiences
Integration in a nutshell
Here's a summary of how Facebook Ads integrates with Lexer:
Direction
What direction does the data flow?
⬜️ Data in: N/A - Lexer does not take data in from Facebook.
✅ Data out: send customer segments as custom audiences in Facebook.
Type
Lexer loads these types of data
✅ Ad network
Source method
How Lexer loads data from this source.
N/A
Destination method
How Lexer sends data to this source.
✅ API
Status
What is the status of the integration?
Full Release
Lexer product compatibility
What Lexer products is the integration compatible with?
✅ Activate
⬜️ Compare
⬜️ Segment
⬜️ Track
⬜️ Listen
⬜️ Respond
⬜️ Serve
Attributes
No attributes will be created as part of this integration.
Attributes
This integration allows for some flexibility, the output of the integration depends on your available data and what you send through to Lexer. In addition, your attributes could be named in a different way to other clients. If you would like a list of attributes related to this integration, please email your Success Manager.
Attributes
What attributes are created when integrated with Lexer?
Attributes
These are the standard attributes that Lexer can create from the data received via this integration. The exact attributes will depend on what data is made available and sent into Lexer. Keep in mind, your attribute names may vary slightly. If you have any questions or would like to explore custom options, please contact your Success Manager.
Customer attributes
Email engagement attributes
SMS event attributes
Transactional attributes
Product attributes
How do I integrate my account?
When integrating your Facebook Ads account you will be need to have your personal account linked to the necessary Facebook Business Manager account. Please also ensure you have Administrator permissions in the relevant Facebook Business Manager account.
- Click the Facebook Ads integration.
- Click Integrate Facebook Ads.
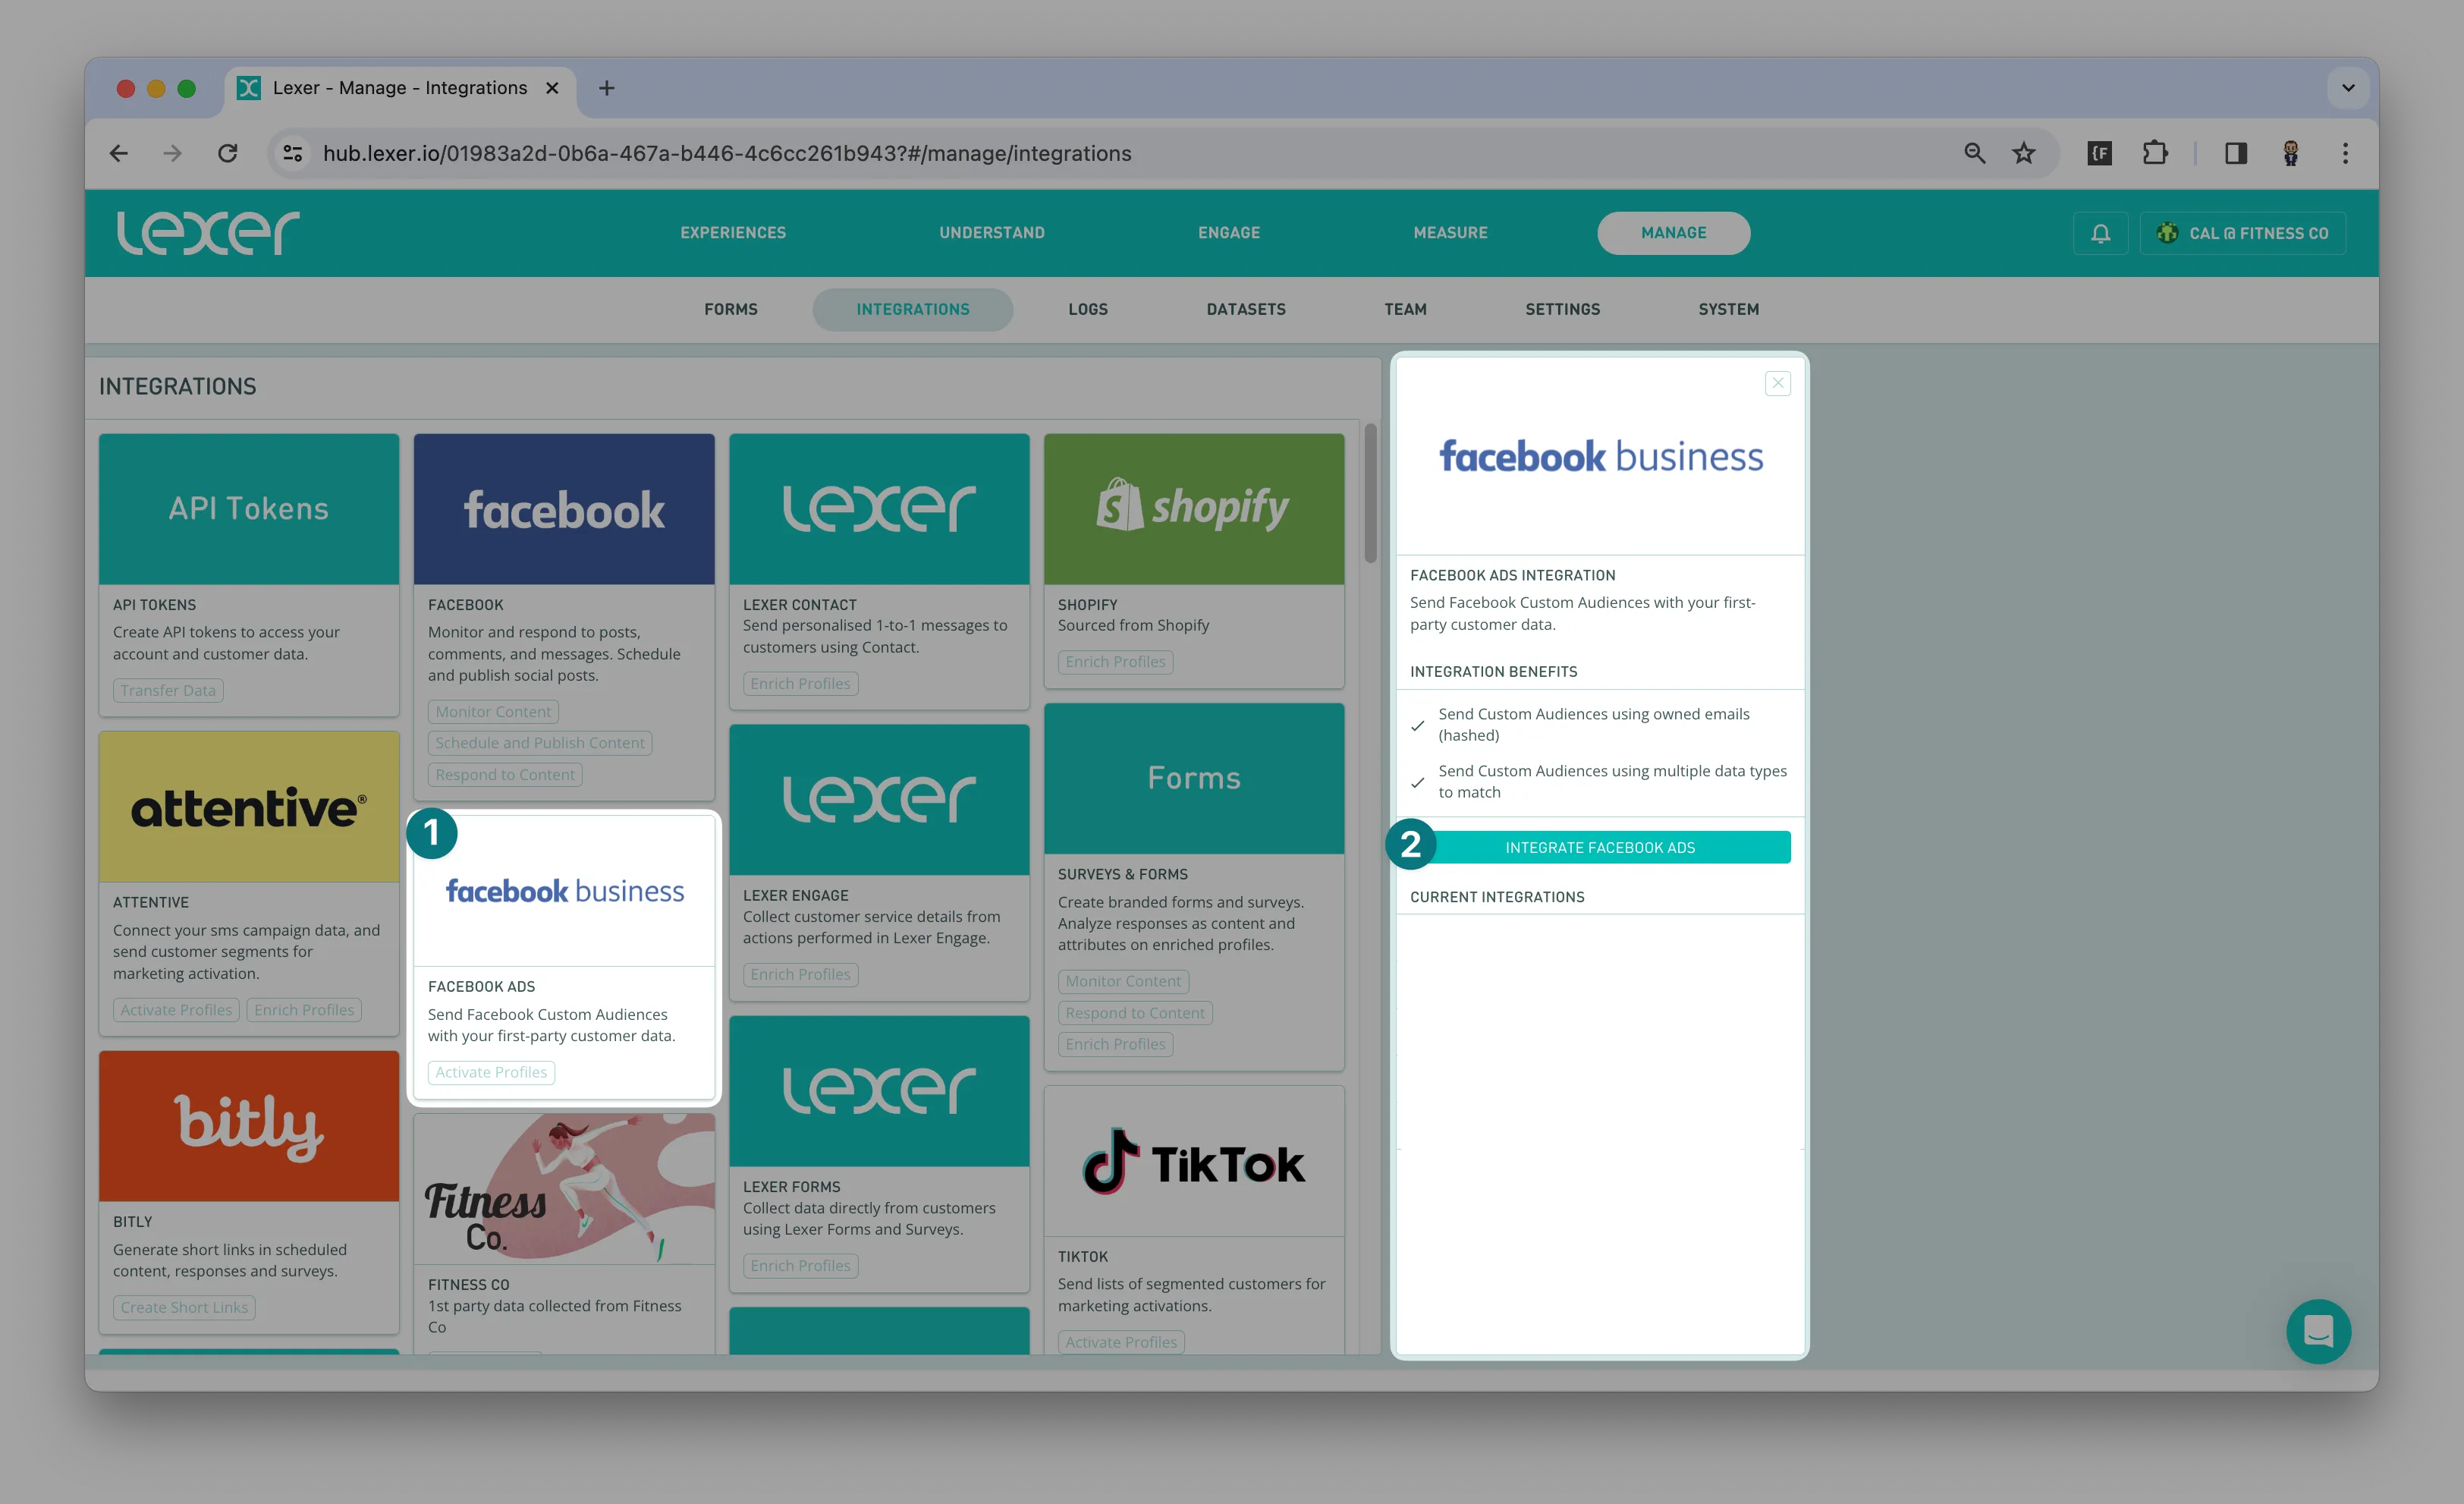
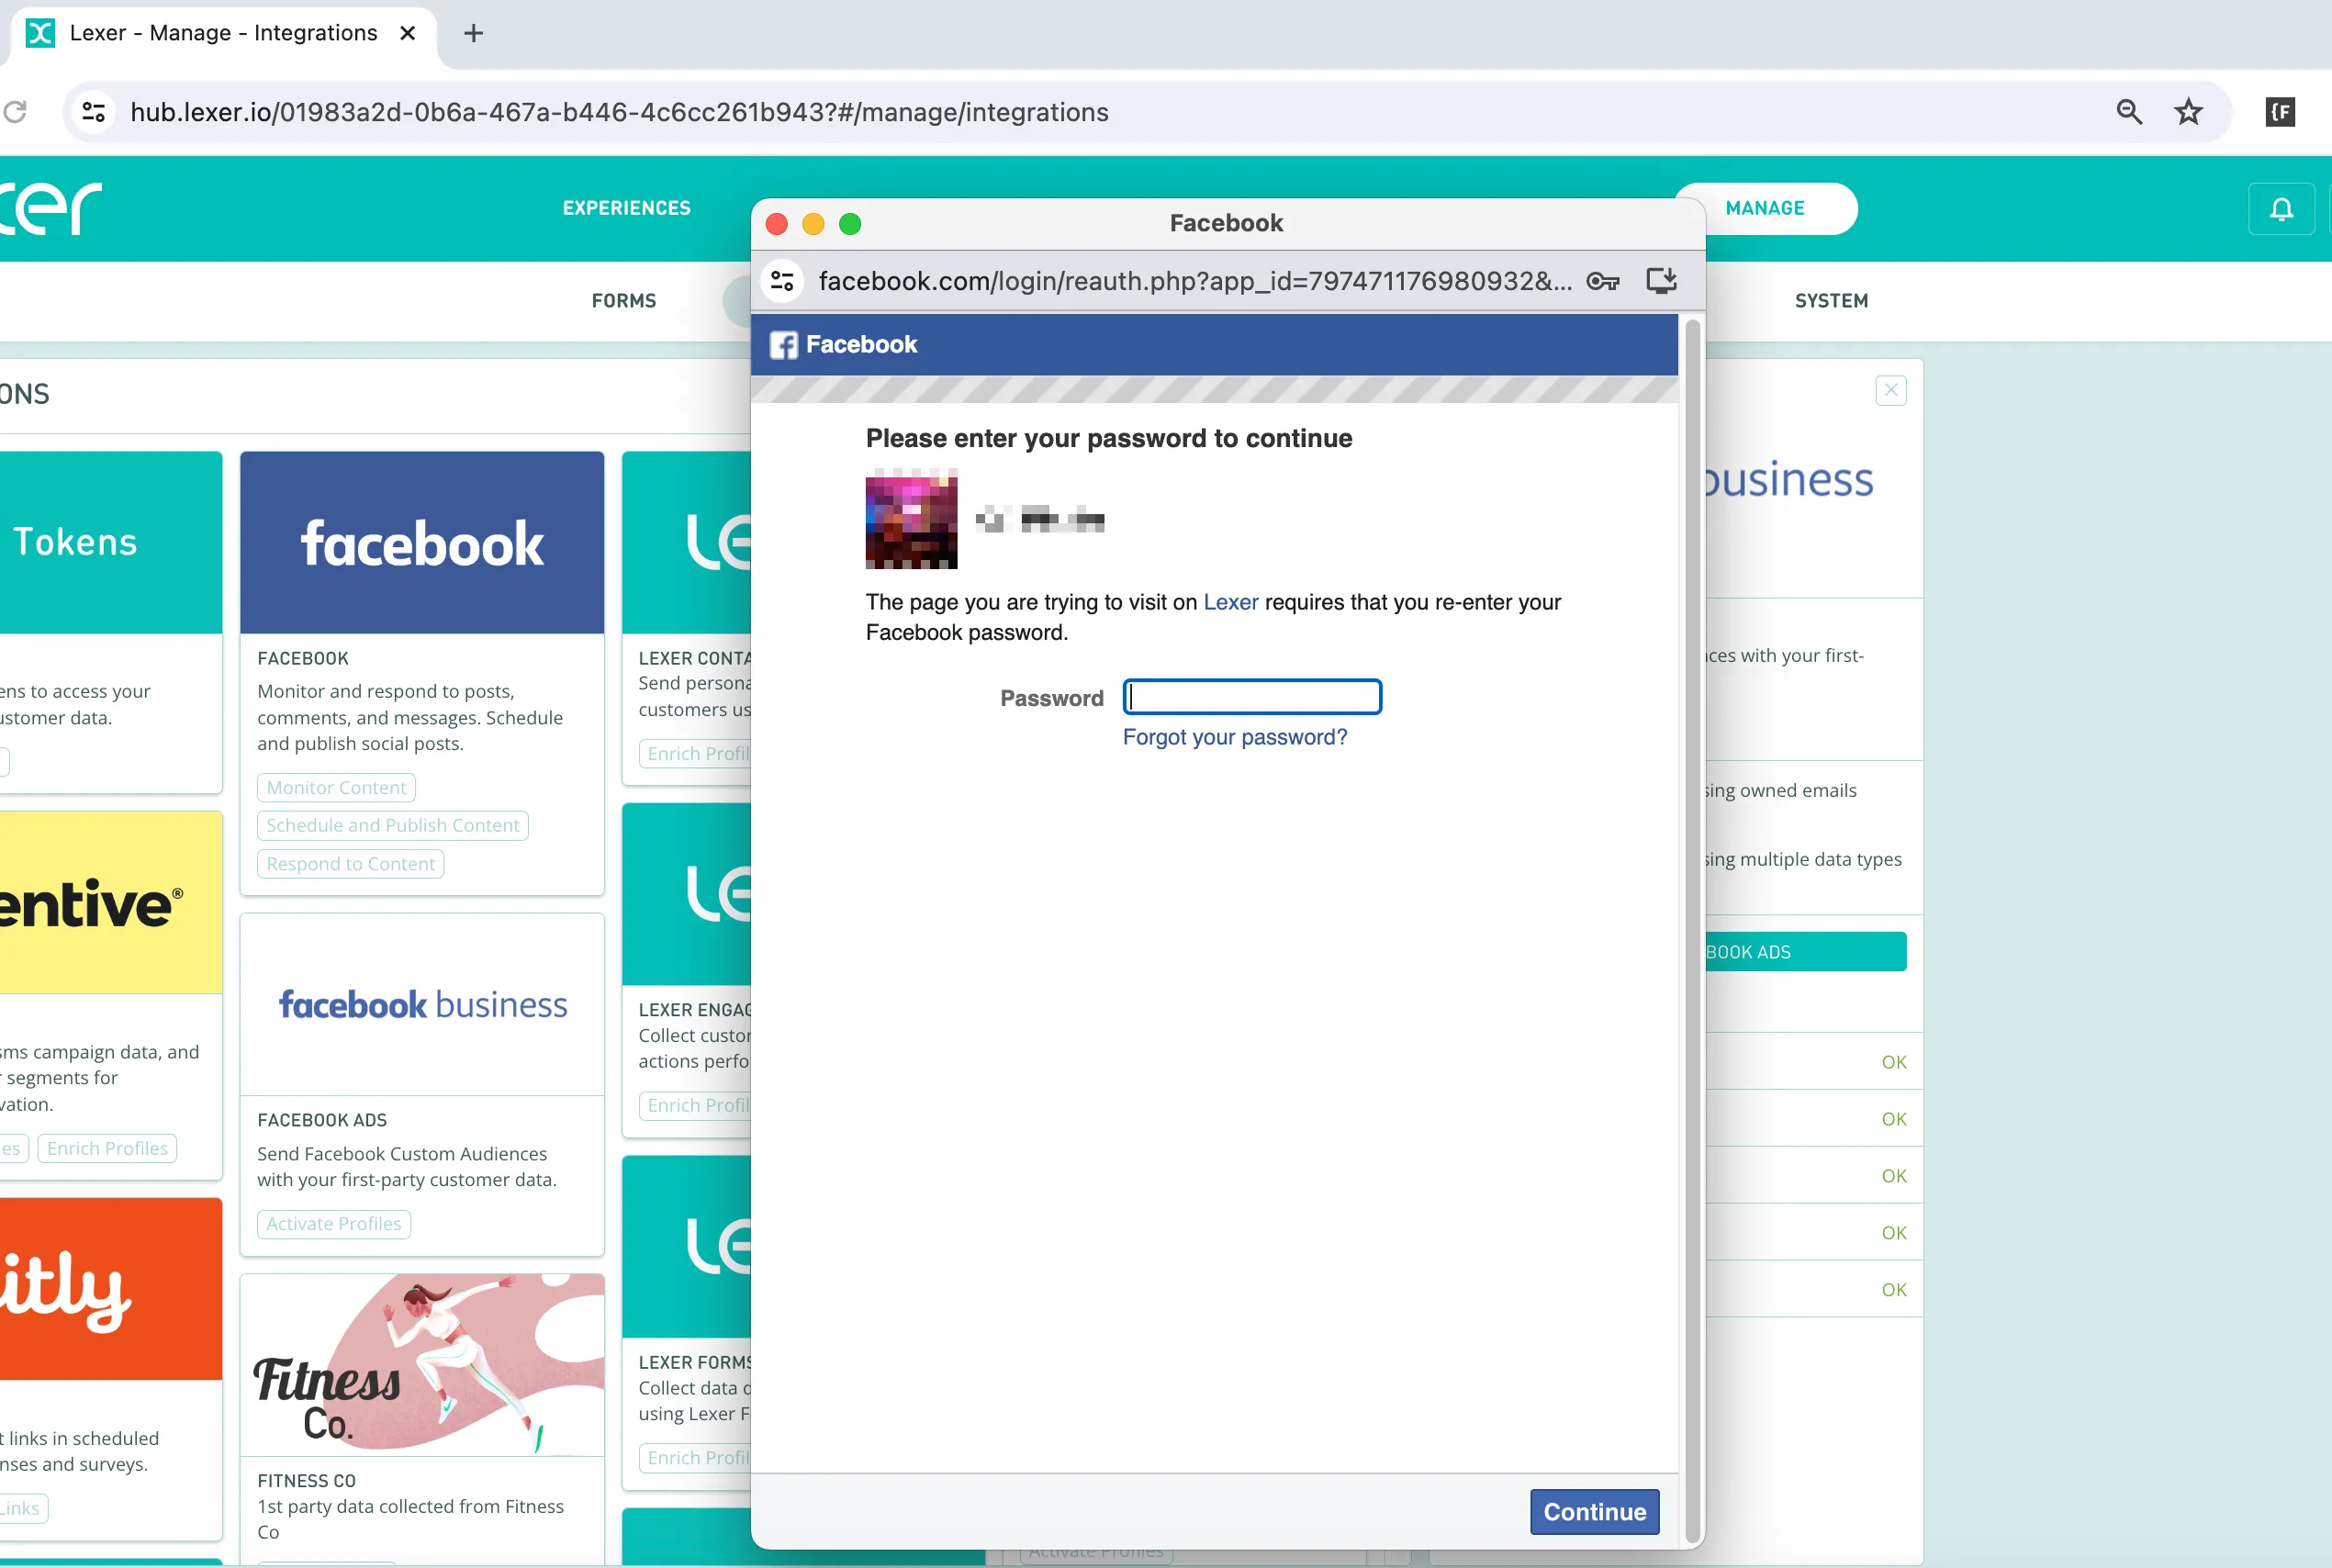
3. Enter your personal Facebook details, and login.
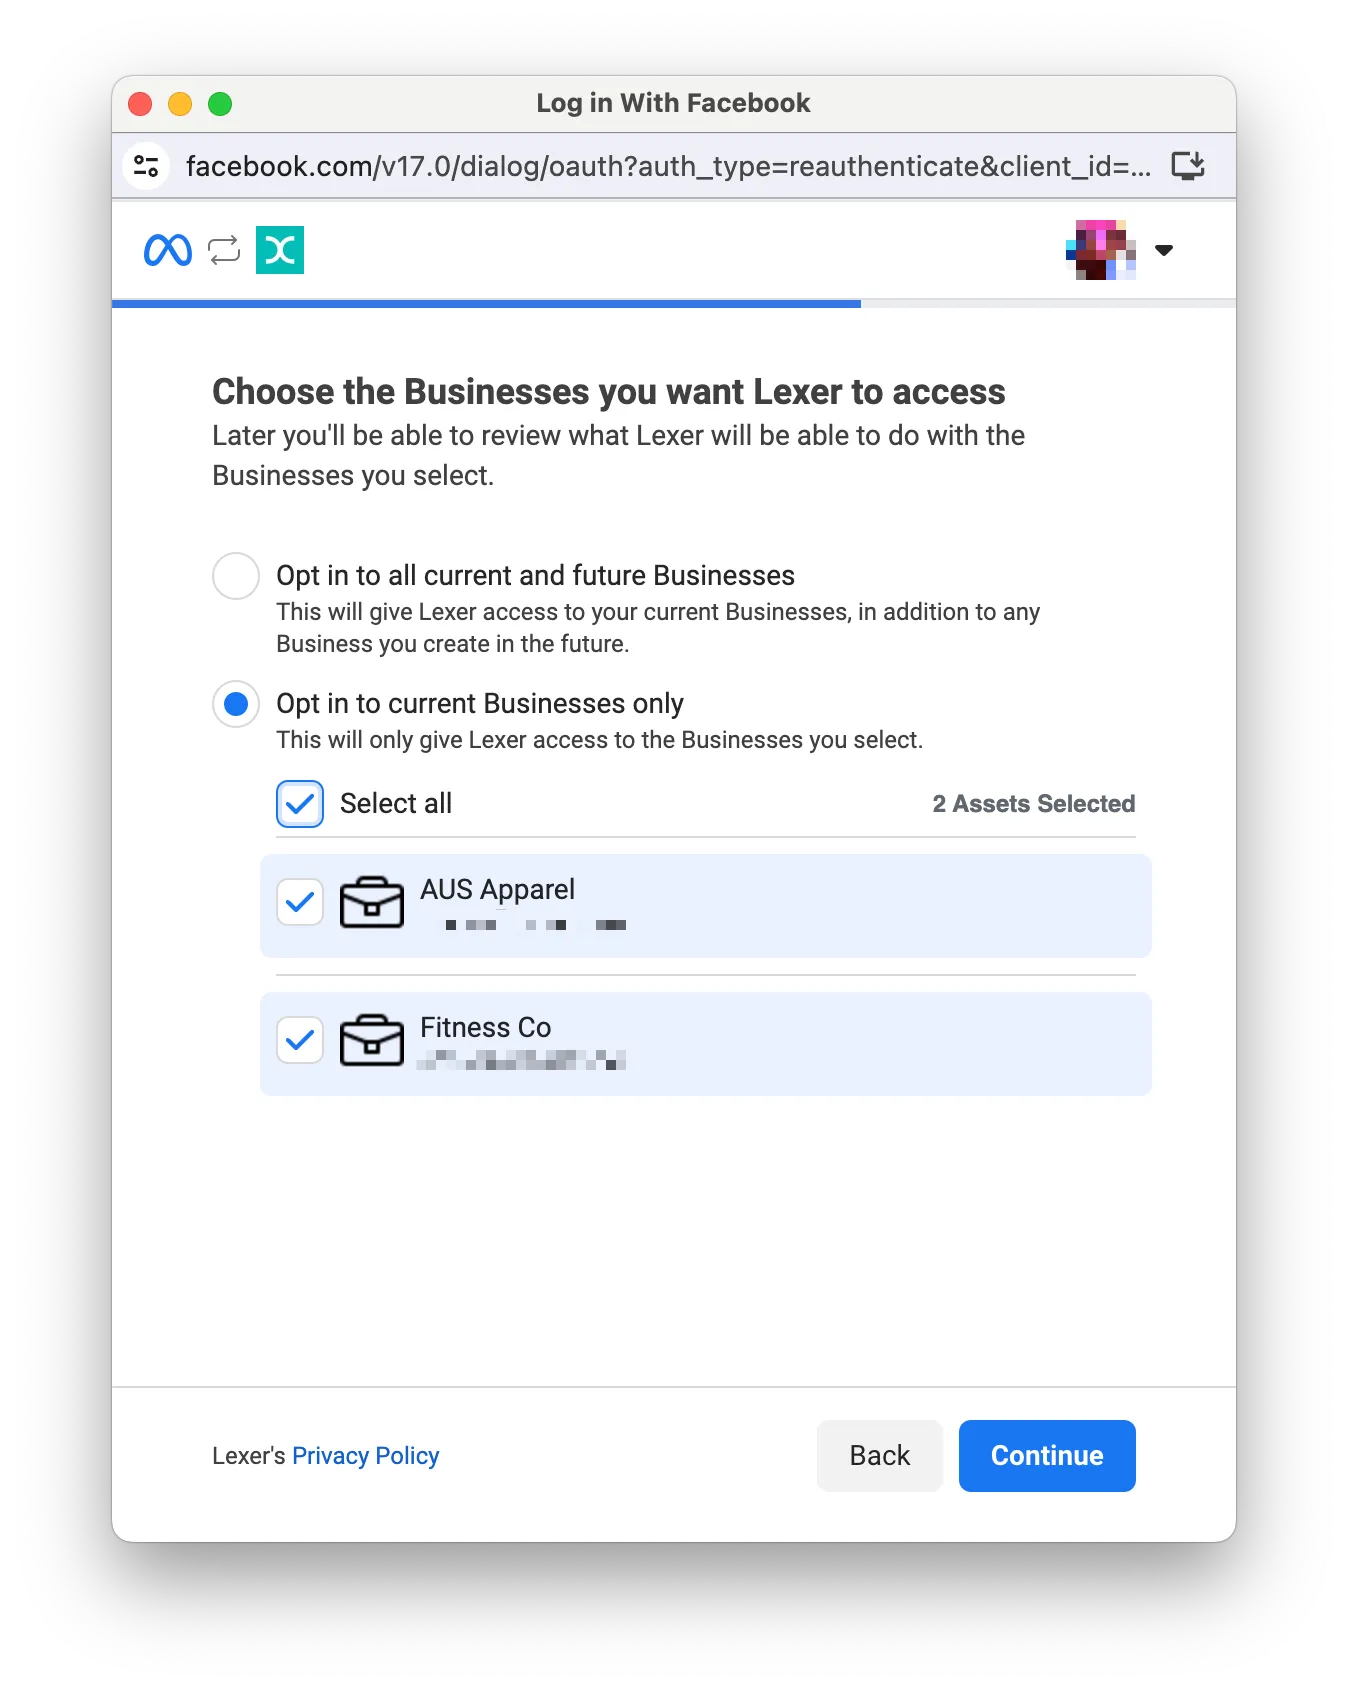
4. Select the accounts you’d like to integrate and accept the permission requirements.
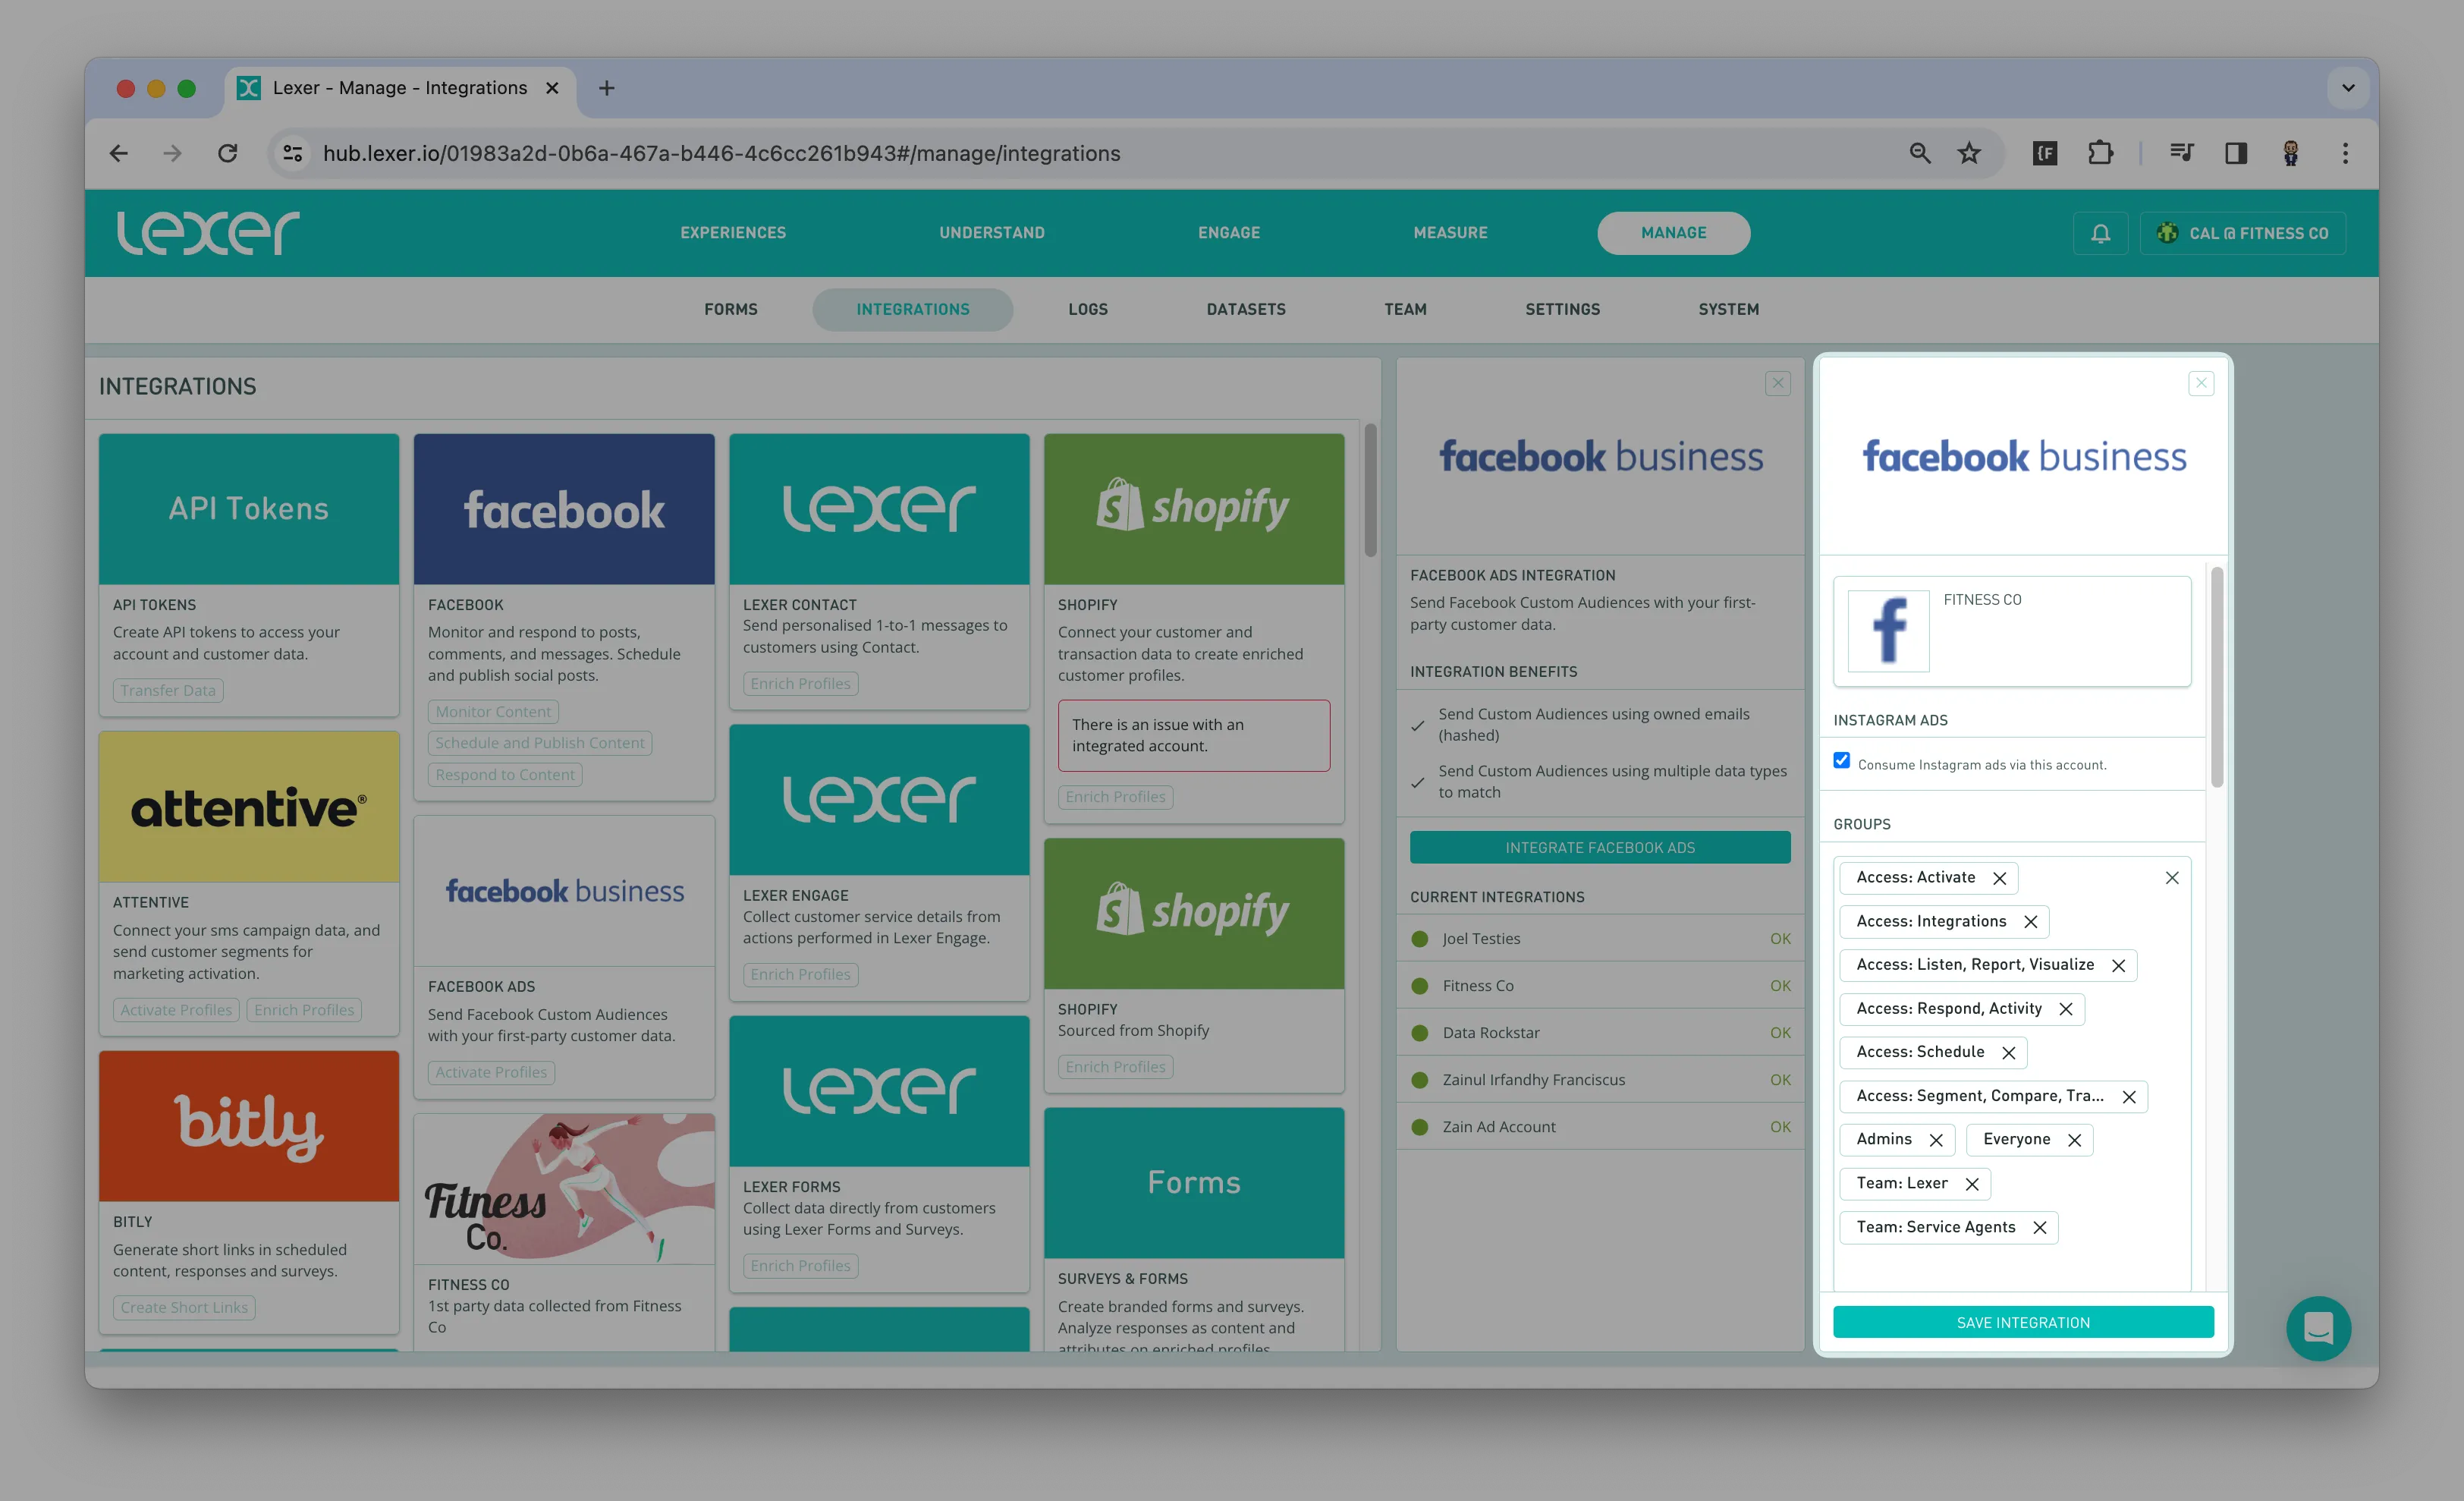
5. Choose the Groups permitted to access these accounts.
6. Click Save integration.
Once your account has been integrated, we can build an activation with Lexer Activate, permitting you to send custom audiences to Facebook. Please contact Lexer Support (support@lexer.io) to build this activation for you.
Meta Business Suite permissions
The last step to make sure you have the full functionality of the Facebook integration is to provide full access to the staff members that will manage the integration. If they will need to reintegrate the account or change any settings relating to the integration, its probably a good idea to provide them with these permissions. To be able to do the following steps you will need to have Meta Business Suite admin access.
1. Login to your Meta Business Suite.
2. Click on the All tools hamburger icon on the left side of the page.
3. Click on the Settings tool.

4. Once you've opened up settings, click on People.
5. Click on the user you want to provide the relevant settings.

6. Finally, provide the user Full control and Save.

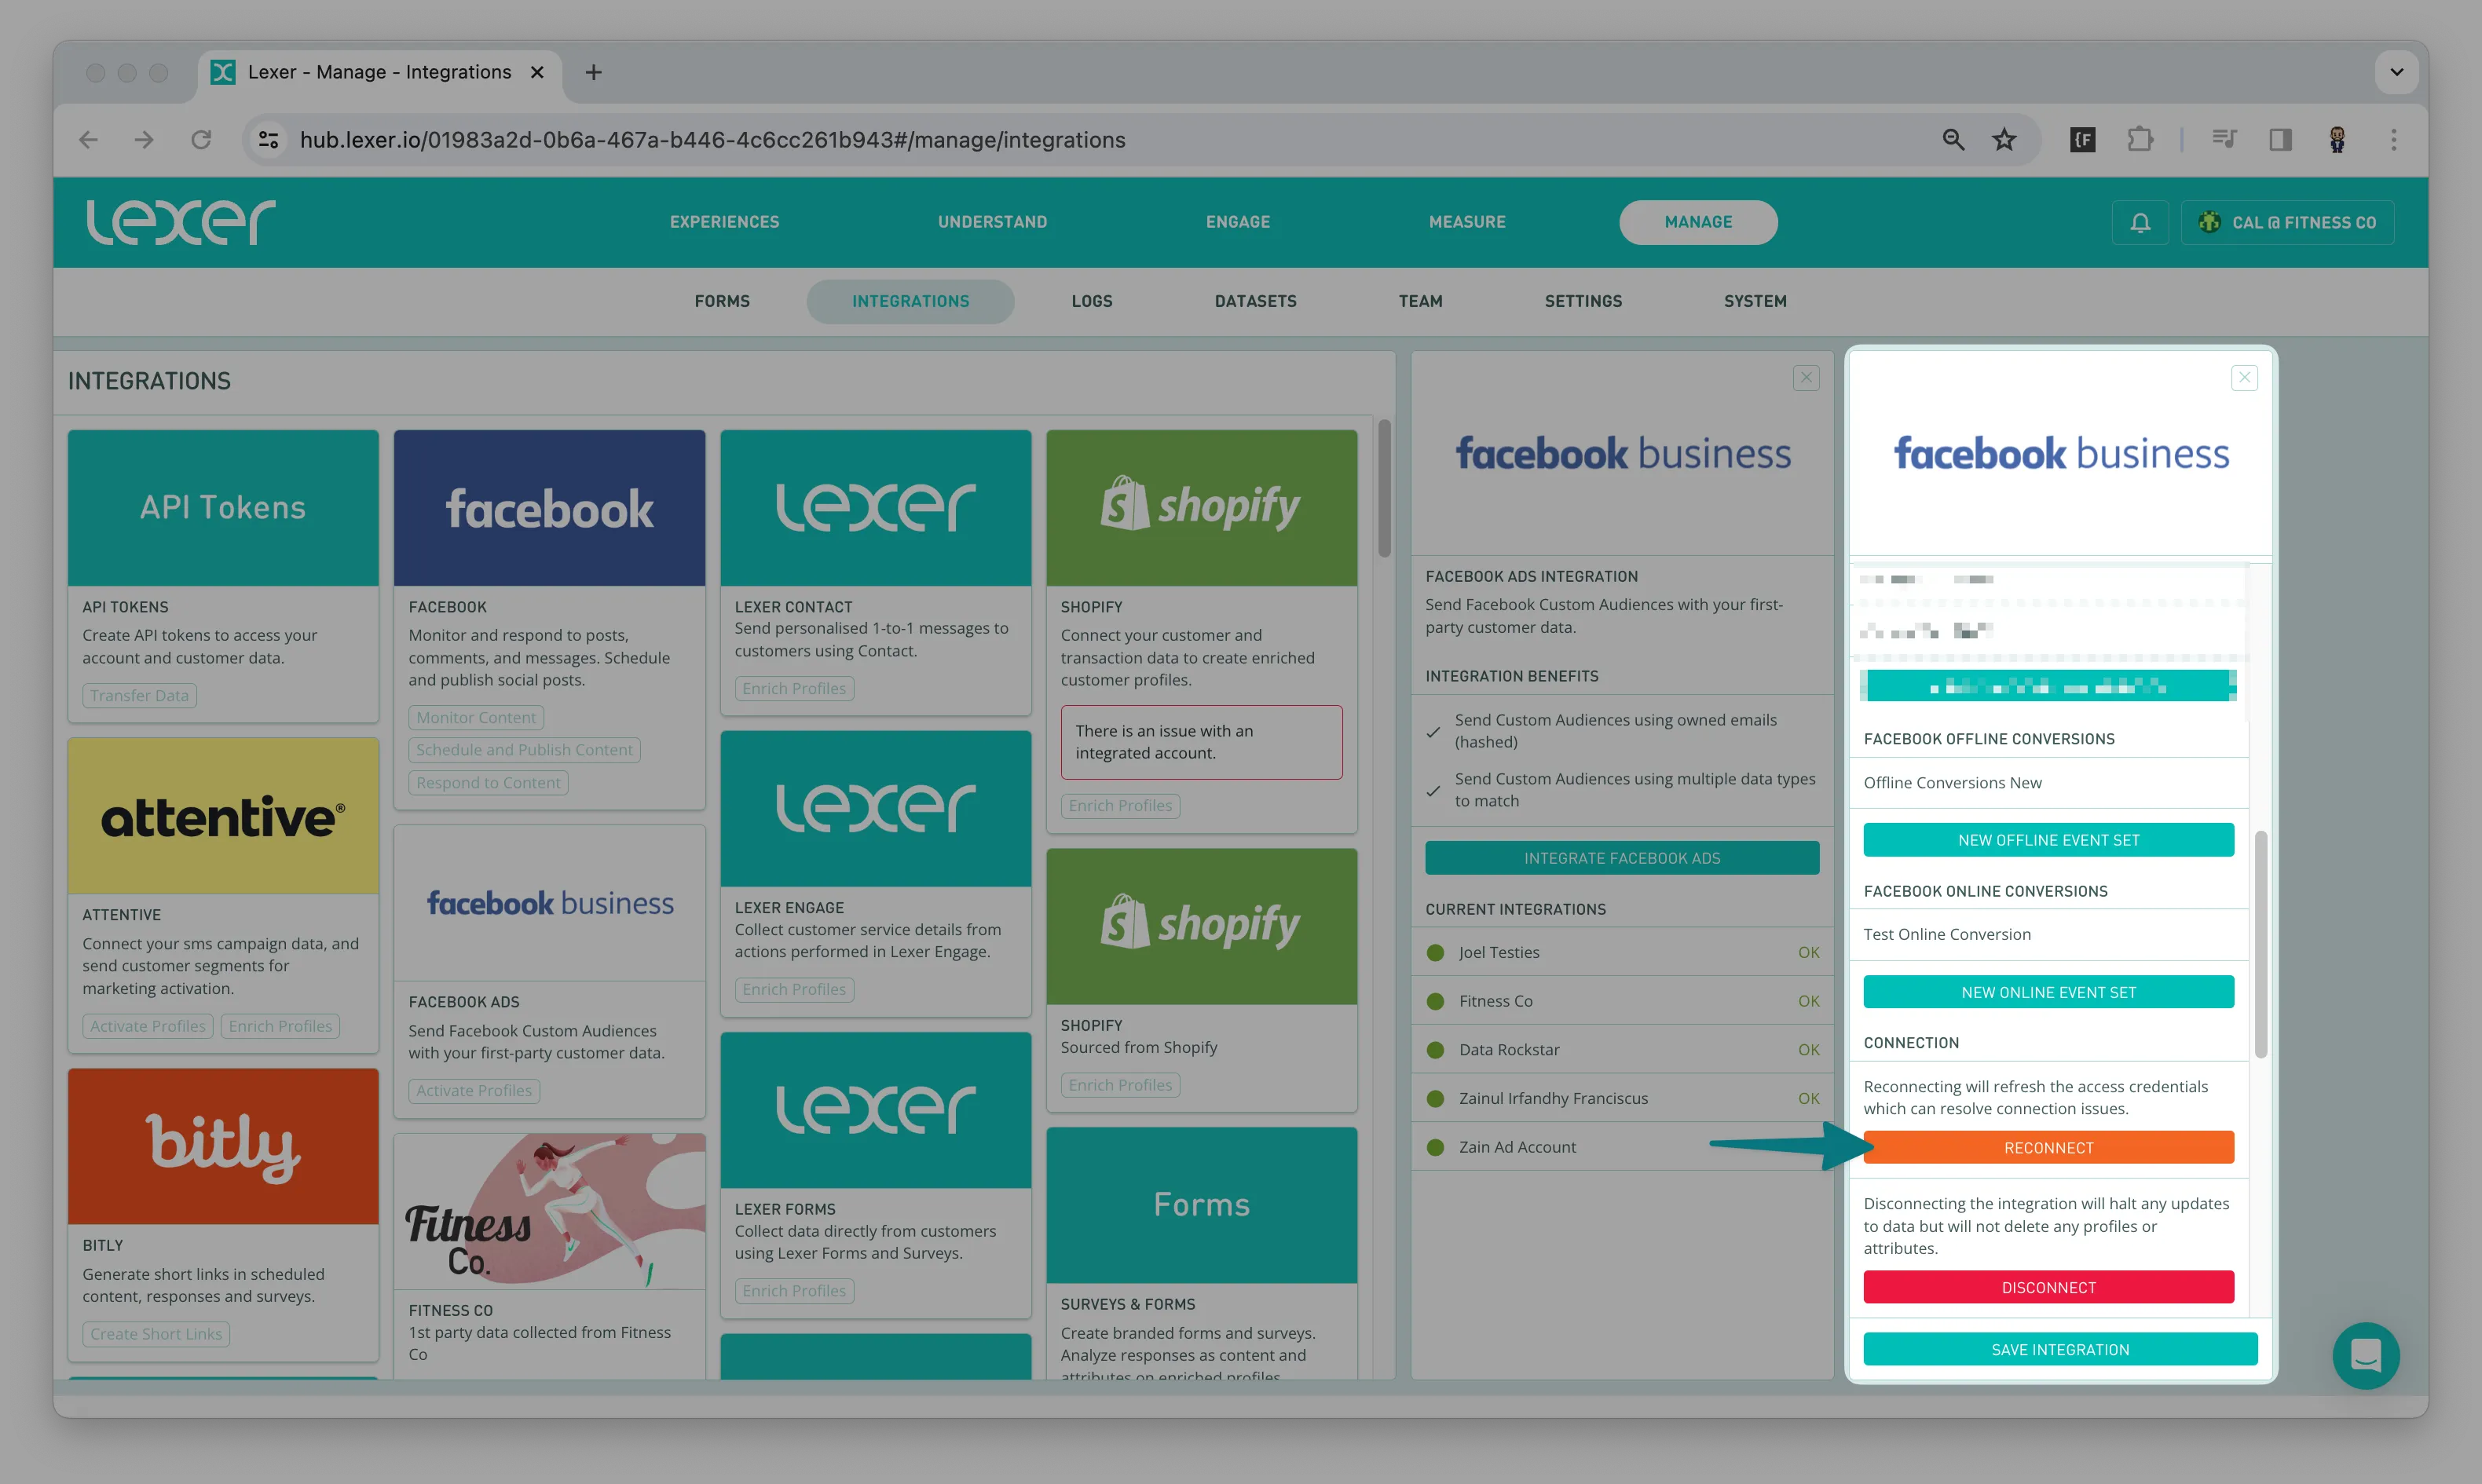
Re-integrating your accounts
Sometimes we can lose connection to your accounts due to a change of password, or another easy to fix problem. We’ll alert the account admin by email as soon as this happens, and ask them to follow a few quick prompts to reconnect. All users can check the status of their integrations at any time via a coloured status symbol in Lexer Integrate (Green = connected, Red = re-integrate now).
Re-integrating is nice and easy, open the integration and click on Reconnect.
Send an email list to Facebook
Here we'll help you send Profiles from Lexer Segment to Facebook as part of a custom audience. But before you get started you’ll need to complete the following checklist:
- I have a Facebook business account, with a Facebook account integrated to Lexer.
- I have admin permissions to access and send data to the Facebook business account.
- I have prepared Segments of Profiles within Lexer Segment.
For more information about how to use Facebook business manager, check out their help docs here.
If you need a refresh on setting up Segment, head here.
Multi-match Audiences
Think of multi-match audiences as a way for Facebook to find your customer's profile when you don't have their email or mobile number. Instead, Facebook asks for other details like their first and last name, country, postcode, or US state. This can be useful for customers you don't have an email address for. Please reach out to your Success Manager if you would like this set up.
Creating your activation
In order to use your Facebook Ads account, you'll need to activate your audiences using Activate. Learn more about Activate here.
Start by navigating to Engage > Activate.
- Click on New activation.
- Select the facebook business integration that you have integrated, specifically using the configuration of your choice.
- Select a Segment that you would like to activate.
- Fill in the required details in the Settings. Read through these settings and choose options that suit your needs.
- Agree to the terms, and click Run activation.

Set and forget – auto-updating audiences
You have the option to enable always-on audiences to Facebook, which will add and subtract customers as they move in and out of our Segment. As we’re targeting HIGH SPEND customers in this example, let’s assume we have a really cool offer for them once they reach our threshold (as defined in our Segment). As a customer reaches this threshold, they will be automatically added to our audience. Likewise should they fall out of this Segment, they’ll be automatically removed from our audience.
Okay I’ve sent my audience, what next?
Once you’ve sent an audience, you can begin to create a campaign on your Facebook Ad account. You will be notified via email you once an audience has been sent. We’ll also email you if something goes wrong. The moment you receive that email your audience should be immediately available in your Facebook Ad account. It may take a few hours before it is ready to use, but you can start making your ad right away.
Let’s get out of Lexer and head over to your Facebook Business Manager and Ads account.
Have my audiences been created or updated in Facebook Ads?
- Open Facebook Ads Manager
- Click on the hamburger menu, in the top left corner, and select All Tools.
- Under the "Assets" column, click on Audiences.
- Locate Your Customer List Audience. It may take some time for the processing to be completed, so check back later if you don't see it right away.
- If you want to verify the audiences have been matched correctly, consider the following:
- Audience Size: Make sure the volume of customers sent have been matched to Facebook users.
- Creation Date: Check the date to see if it matches when you sent the data to Facebook.
- Details: Shows a breakdown of the information used for matching (this may be limited for privacy reasons).
If everything aligns with the audience you sent from the Hub, you are good to go!
Create your Facebook campaign
Facebook makes regular changes to their ad platform, if anything in this guide doesn’t look right, let our Support team (support@lexer.io) know. You can find details of Meta's processes here. You can check out Meta’s ads specific educational content about how to Create an Ad in Ads Manager.
The following instructions showcase where in the process you can add an audience from the Hub.
Head to business.facebook.com and make sure you’re logged into the correct account.
- From here head to the Facebook Ads Manager and click on + Create near the top left hand corner of the screen.
- Select the Sales campaign objective. You can check out the other campaign objectives here.
- Select Manual sales campaign under Manual setup.
- Make sure your role in the Facebook ads account is set to Ad account admin.
- Scroll down to Advantage+ shopping campaigns and search for the audience you’ve created in the Hub
- Continue with the prompts in your Ads account.
You can find more content about how to publish a Facebook Ad and some suggested strategies here.
You're done!
Awesome news! You're now ready to rock some amazing Facebook Ads campaigns through your Lexer Hub. We've covered everything about Facebook Ads, from what it is to its benefits, and activation process. If you find yourself feeling stuck or confused along the way, don't worry! Just reach out to Lexer Support via the chat bot in the bottom right on your browser, and we'll be more than happy to assist you. You've got this!