
Cordial
This integration is in beta
As with all beta tests, not everything will be perfect. If you run into any issues, please submit a support ticket.
Connecting Lexer and Cordial
Cordial is a marketing and data platform that allows marketers to create, scale, and optimize personalized experiences across email and mobile. Lexer supports connecting to both the Cordial API and SFTP. This allows us to both pull and push data between the two systems respectively.
In this article, we explain how to establish an API connection that lets you consume campaign engagement data from Cordial, as well as connecting Lexer to your Cordial SFTP, which enables the activating of Lexer Segments into Cordial for campaign segmentation and personalization.
Benefits of a Cordial integration
Integrating your Cordial account with Lexer provides a number of benefits, such as:
- Importing your contacts as enriched profiles.
- Creating attributes that can be used for customer segmentation and analysis
Integration in a nutshell
Here's a summary of how Cordial integrates with Lexer:
Direction
What direction does the data flow?
✅ Data in: enriched customer profiles.
✅ Data out: Enriched customer segments ready for activation.
Type
Lexer loads these types of data
⬜️ SMS
Source method
How Lexer loads data from this source.
✅ File (S3)
Destination method
How Lexer sends data to this source.
✅ File (SFTP)
Status
What is the status of the integration?
Full Release
Lexer product compatibility
What Lexer products is the integration compatible with?
✅ Compare
✅ Segment
✅ Track
⬜️ Activate
⬜️ Listen
⬜️ Respond
⬜️ Serve
Attributes
No attributes will be created as part of this integration.
Attributes
This integration allows for some flexibility, the output of the integration depends on your available data and what you send through to Lexer. In addition, your attributes could be named in a different way to other clients. If you would like a list of attributes related to this integration, please email your Success Manager.
Attributes
What attributes are created when integrated with Lexer?
Cordial Relationship
✅ Cordial Record
Cordial Email Engagement
✅ Email Source
✅ Number of Emails Sent
✅ Email Engagement Category
✅ Email Opt-In Status
✅ Campaigns Sent
✅ Email Open Rate
✅ Email Click Rate
✅ Email Subscribe Date
✅ Last Email Open
✅ Open Date
✅ Campaigns Opened
✅ List Name
✅ Date of Last Open
✅ Date of Last Click
✅ Click Dates
✅ Last Email Click
✅ Campaigns Clicked
Attributes
These are the standard attributes that Lexer can create from the data received via this integration. The exact attributes will depend on what data is made available and sent into Lexer. Keep in mind, your attribute names may vary slightly. If you have any questions or would like to explore custom options, please contact your Success Manager.
Customer attributes
Address 1
Address 2
Avatar
Bio
Birth day
Birth month
Birth year
City
Communication opt in
Country
Customer id
Date of birth
Employee flag
Engage id
First name
Full name
Gender
Generation
Identity search
Inferred gender
Last name
Mobile
Next birthday
Postcode
Provider id
Record
State
Username
Zip
Email engagement attributes
Email campaigns clicked
Email campaigns opened
Email campaigns sent
Email click date
Email click rate
Email email engagement category
Email emails sent
Email last click date
Email last open date
Email open date
Email open rate
Email opt in status
Email source
Email subscribe date
Email sha256
ESP record
SMS event attributes
Transactional attributes
Product attributes
Connecting to the Cordial API
Connecting to the Cordial API requires you to create an API key within Cordial's UI. Cordial have this helpful guide that explains the process.
When creating an API Key in Cordial you must whitelist IP addresses. This ensures that only Lexer's servers can communicate with your Cordial data. Make sure you add all 9 IP addresses below:
- 13.236.23.243
- 3.105.80.117
- 3.104.174.102
- 3.104.16.54
- 3.105.15.111
- 3.105.117.64
- 52.26.215.110
- 52.26.99.95
- 52.89.188.197
Once your key has been generated, navigate to Integrations via Manage within Lexer.
- Find the Cordial tile and click on it.
- Click Integrate Cordial.
- Name the integration appropriately if you are connecting more than one account so you can easily differentiate.
- Paste in your API key.
- Click Save Integration.
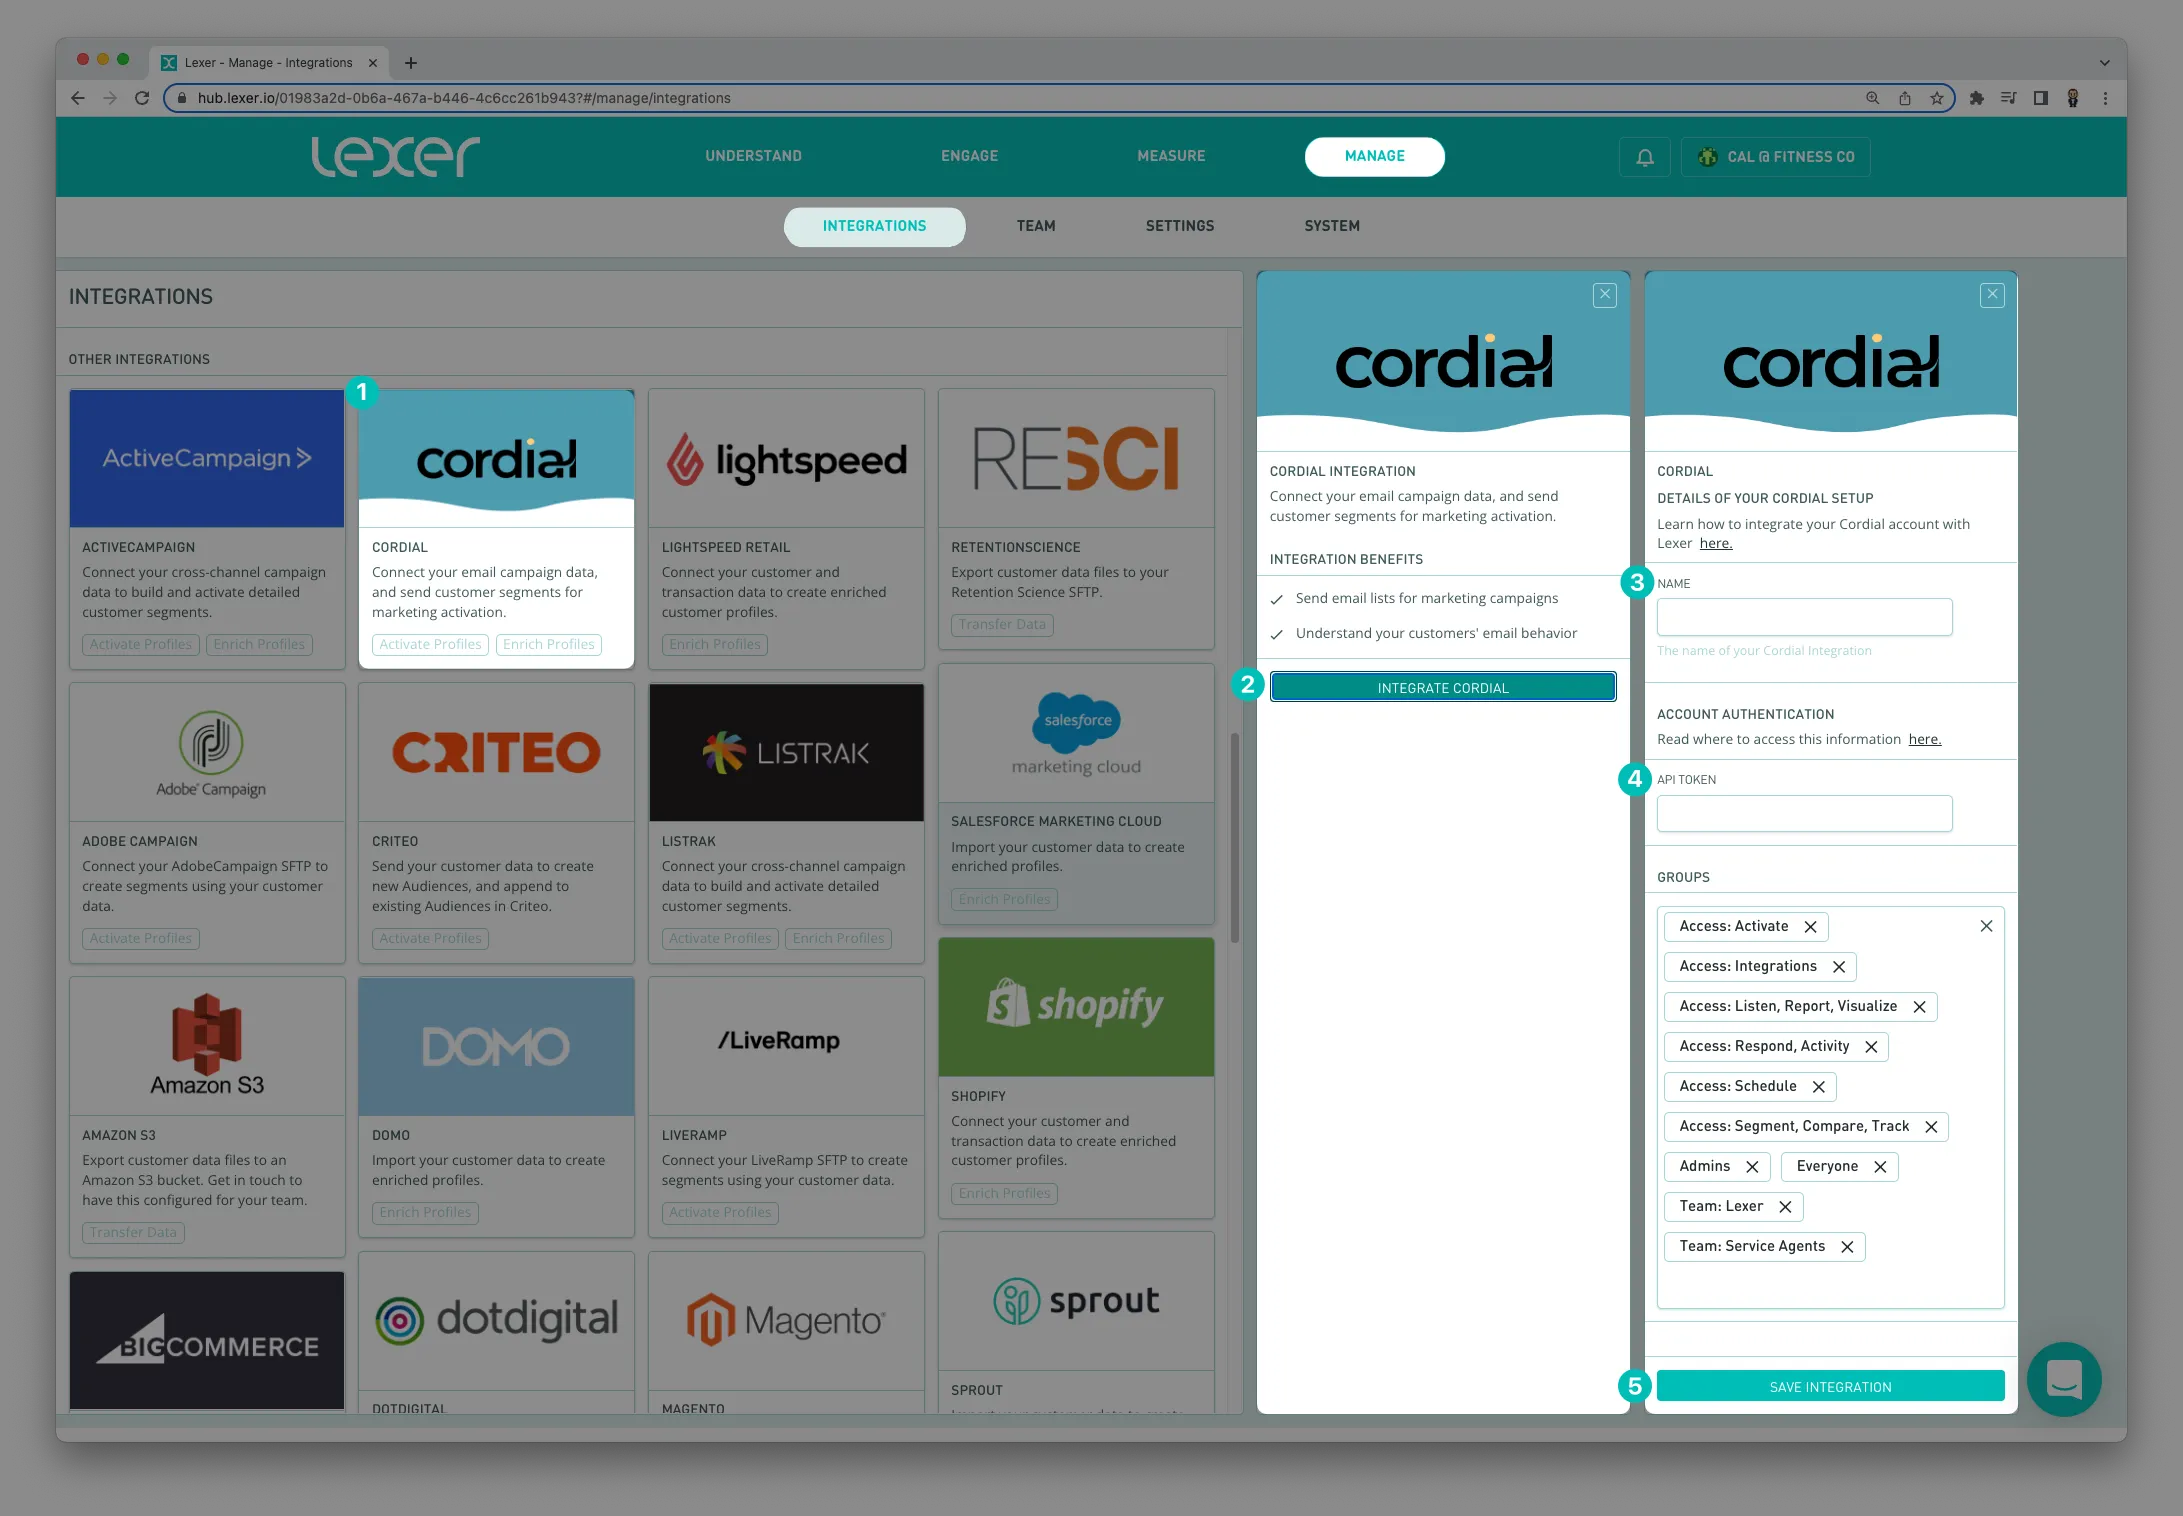
You've now successfully connected your Cordial account to Lexer via the Cordial API. Lexer can now start consuming your campaign engagement data, enriching your CDP profiles.
Connecting your Cordial SFTP
You can link your Cordial and Lexer hubs via SFTP to enable sending of customer profiles from Lexer, into Cordial. This allows the enrichment of Cordial data, as well as the adding of new records.
To connect both hubs, you first need to have your Cordial SFTP whitelisted by Lexer. This involves generating a Public Key in Cordial's UI, and then sending that to Lexer Support or your Success Manager. You will also need to provide the three IP addresses below;
- 75.26.3.241/32
- 52.9.134.47/32
- 52.9.134.92/32
Creating a Public Key in Cordial
You will first need to login to your Cordial account to create a Public Key. Once logged in:
- Under your username, in the top right hand corner, navigate to Account Settings.
- On the left hand side of screen, click on Secrets Vault.
- Create a new "secret" (key) by clicking the New button, and giving it a name, and description.
- After you save it, a pop up will appear with a long string of numbers, letters and symbols. You will need to send this to Lexer Support or your Success Manager.
From here, our team will ensure your key and the IP addresses above are whitelisted against your Lexer SFTP. Once we've notified you that this has been done, you will be able to start transferring CSV files containing records from Lexer into Cordial.
Using a FIXED VALUE field to make audiences "segment ready" in Cordial
To ensure you can recreate your Segment in Cordial, you will need to use the FIXED ATTRIBUTE VALUE field. Given we are effectively sending across a CSV of customer data, this is simply adding a column to that CSV file.

Create a new Segment in the hub to determine the target audience you intend to activate to Cordial. To learn more about how to create a segment, click here.
Navigate to Engage > Activate.
Sending records to Cordial
- Determine the segment you would like to send to Cordial.
- Navigate to Cordial and login.
- Navigate to Contacts > Import Contacts.
- Select the SFTP option, and enter the details as displayed in the table below. If you are unsure about any of these please contact Lexer Support (support@lexer.io).
- Next to Authentication select Saved Key and drop the drop down select your previously saved public key.
- You can elect to have your file imported instantly or on a schedule, if you want to maintain the audience in Cordial select schedule.
- Click Continue and follow the prompts to import your data and name your import.
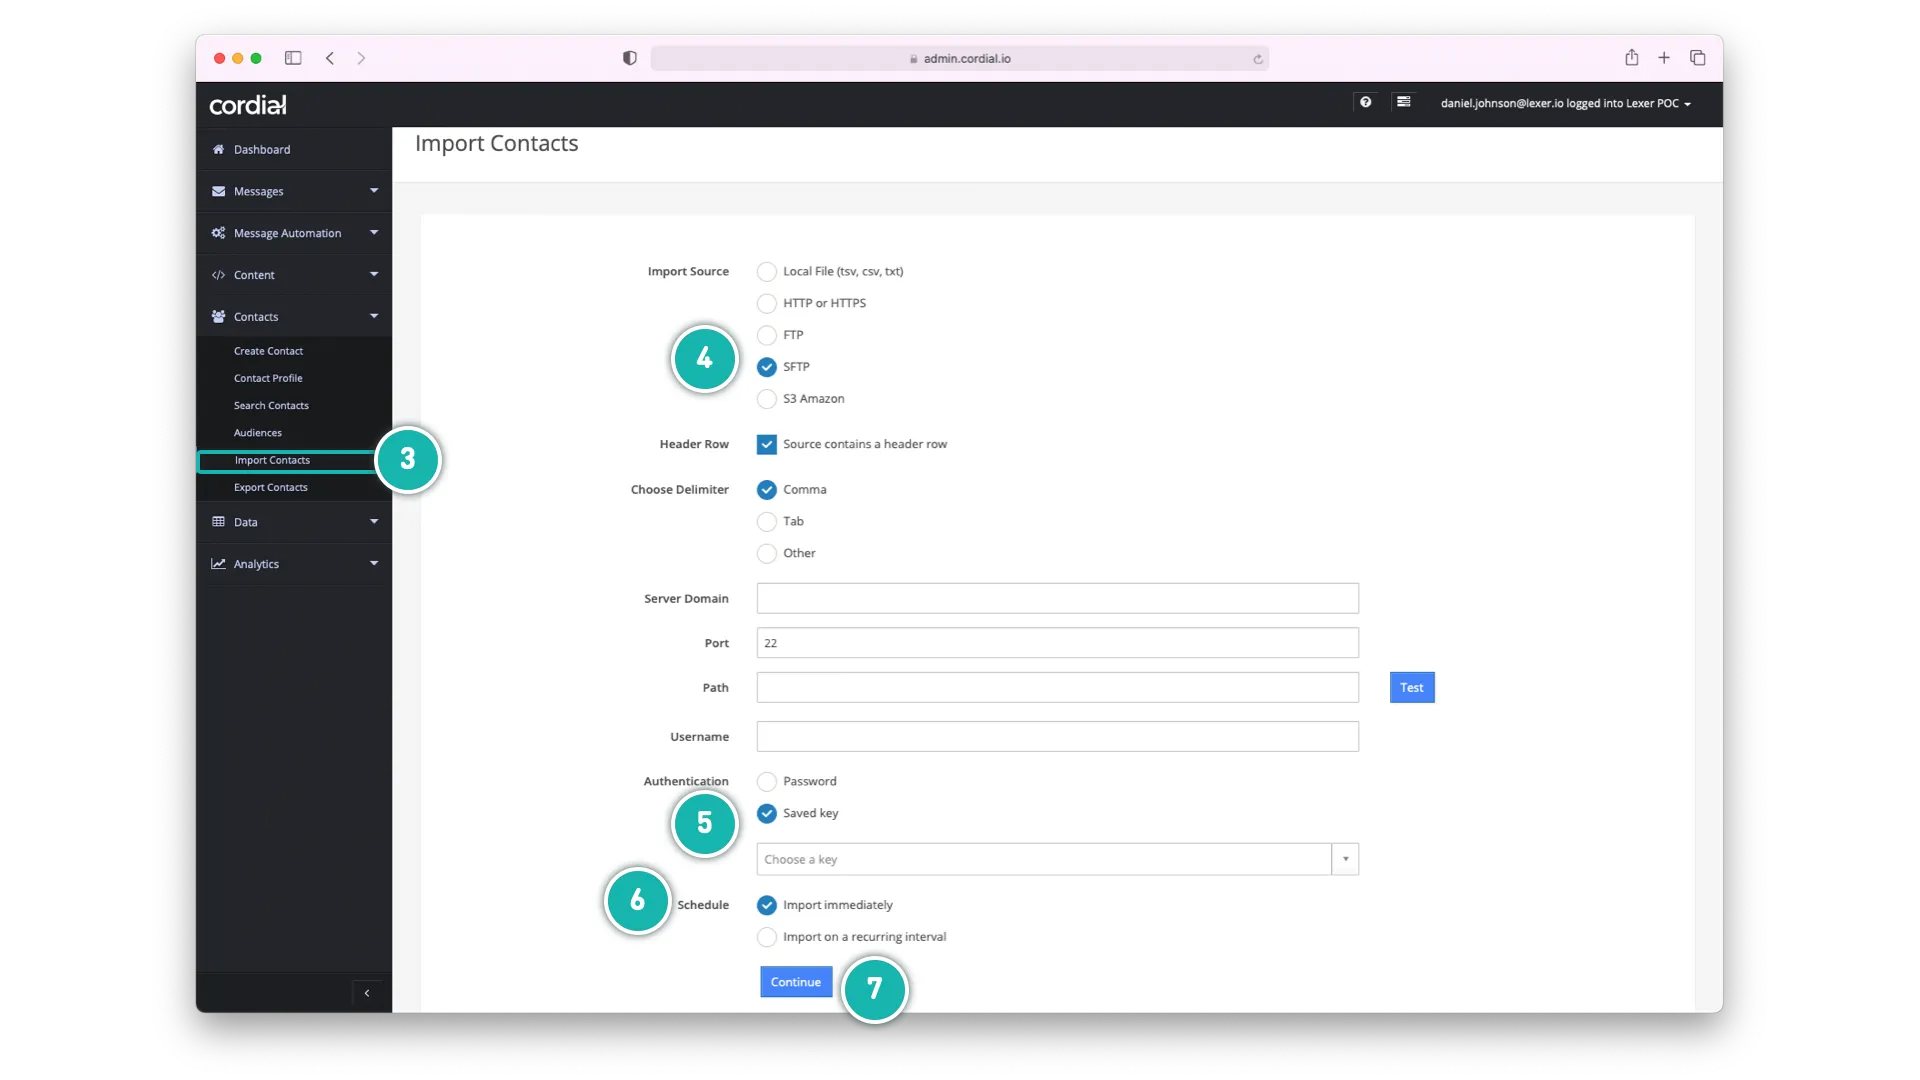
- Server Domain (AU customers): au.transfer.lexer.io
- Server Domain (US customers): us.transfer.lexer.io
- Port: 22
- Path: exports/cordial/<file_name>.csv
- Username: eg Lexer would be lexer
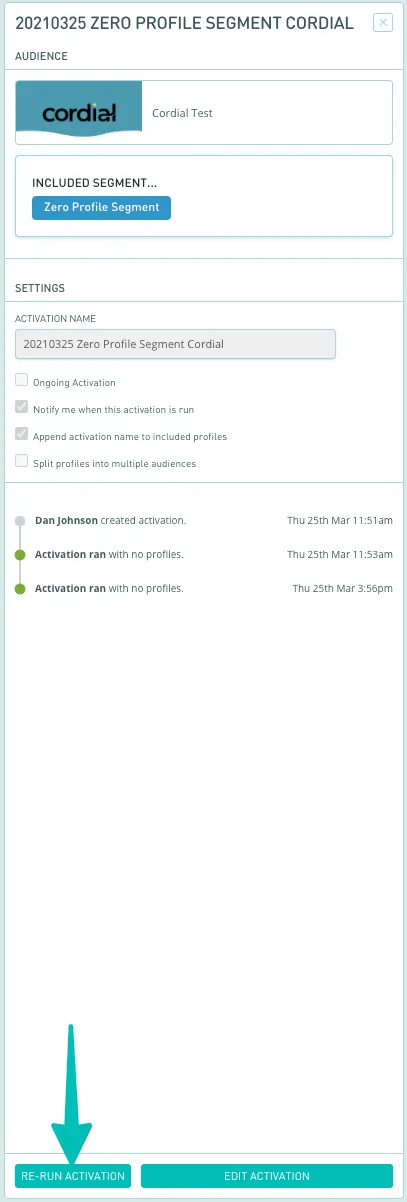
Finally, you can click RUN ACTIVATION / RE-RUN ACTIVATION
You're done!
Congratulations, your Cordial account should now be integrated and activated in Lexer. We've gone through what Cordial is, the type of integration it is, its benefits, and how to integrate and activate it. There's a lot of steps to follow here and if you feel stuck or confused please don't hesitate to reach out to Lexer Support (support@lexer.io) if you need any help.