
Salesforce Marketing Cloud
This integration is in beta
As with all beta tests, not everything will be perfect. If you run into any issues, please submit a support ticket.
Connect your Salesforce Marketing Cloud account with Lexer
You can connect your Salesforce Marketing Cloud account with Lexer, to import your customer data and create enriched identity profiles. This will also allow you to activate Segments for email marketing campaigns.
What about ExactTarget?
ExactTarget was an email marketing platform acquired by Salesforce in 2013, and rebranded to Salesforce Marketing Cloud. Throughout Lexer, we’ll always refer to Salesforce Marketing Cloud (SFMC) but know that the names “Salesforce Marketing Cloud” and “ExactTarget” refer to the same product.
Benefits of a Salesforce Marketing Cloud integration
Integrating your Salesforce Marketing Cloud account with Lexer provides a number of benefits, such as
- Import your contacts as enriched Profiles
- Send audiences for targeted marketing campaigns
- Sync data between your Lexer CDP and Salesforce Marketing Cloud
Integration in a nutshell
Here's a summary of how Salesforce Marketing Cloud integrates with Lexer:
Direction
What direction does the data flow?
✅ Data in: enriched customer profiles.
✅ Data out: enriched customer segments for activation.
Type
Lexer loads these types of data
✅ Email (ESP)
Source method
How Lexer loads data from this source.
✅ Email (ESP)
Destination method
How Lexer sends data to this source.
✅ API
Status
What is the status of the integration?
Full Release
Lexer product compatibility
What Lexer products is the integration compatible with?
✅ Activate
✅ Compare
✅ Segment
✅ Track
⬜️ Listen
⬜️ Respond
⬜️ Serve
Attributes
No attributes will be created as part of this integration.
Attributes
This integration allows for some flexibility, the output of the integration depends on your available data and what you send through to Lexer. In addition, your attributes could be named in a different way to other clients. If you would like a list of attributes related to this integration, please email your Success Manager.
Attributes
What attributes are created when integrated with Lexer?
Please talk to your Success Manager about what attributes might be suitable.
Attributes
These are the standard attributes that Lexer can create from the data received via this integration. The exact attributes will depend on what data is made available and sent into Lexer. Keep in mind, your attribute names may vary slightly. If you have any questions or would like to explore custom options, please contact your Success Manager.
Customer attributes
Address 1
Address 2
Birth day
Birth month
Birth year
City
Communication opt in
Country
Customer id
Date of birth
Employee flag
Engage id
First name
Full name
Gender
Generation
Identity search
Inferred gender
Last name
Mobile
Next birthday
Postcode
Provider id
Record
State
Username
Zip
Email engagement attributes
Email click date
Email click rate
Email engagement category
Emails sent
Email last click date
Email last open date
Email open date
Email open rate
Email opt in status
Email source
Email subscribe date
Email sha256
ESP record
SMS event attributes
Transactional attributes
Product attributes
API Access
Before we can connect the two accounts, you’ll need to provide Lexer access to your Salesforce Marketing Cloud account. We can achieve this by creating a Salesforce Marketing Cloud application. Please note, if your Salesforce Marketing Cloud account contains more than one brand, you will need to create an "Installed Package" for each brand.
You will now see a summary page with a Components section. This section lists your Client ID and Client Secret settings, which we’ll need to paste securely into Lexer as detailed below.
Once you’ve configured the components, navigate to Access and select only the brand you’d like this "Installed Package" to be used for.
How do I integrate my account?

- Select the Salesforce Marketing Cloud tile
- Click Integrate Salesforce Marketing Cloud
- Enter your Salesforce account name (this could be your brand, or sub-brand name)
- Paste in your Base Authentication URI
- Paste in your Client ID and Client Secret generated from making your Installed Package
- Click Save
Extracting data from Salesforce Marketing Cloud
When Lexer extracts data from your Salesforce Marketing Cloud account, we encourage you to create two unique Data Extensions per brand. This ensures that the data we need to populate your CDP is correct and formatted in line with your own internal expectations.
We've included a schema guide below for each Data Extension.
Data Extension #1 "Lexer Customer Table"
Data Extension #2 "Lexer Email Engagement Table"
Sending data to Salesforce Marketing Cloud
This article will guide you in activating Segments from Lexer to Salesforce Marketing Cloud (formerly ExactTarget). The activation allows you to create and update existing lists, update existing Data Extensions, and enrich your customer contact data in Salesforce Marketing Cloud.
Before you get started, make sure you’ve done the following:
- Connected your Salesforce Marketing Cloud account with Lexer.
- Created an activation to Salesforce Marketing Cloud (reach out to Lexer Support (support@lexer.io) if not)
- Built your Segment(s) in Lexer Segment
Lists, Data Extensions and All Subscribers
Salesforce Marketing Cloud allows you to target both Lists of customers, and Data Extensions containing customer data. What’s important to understand is both of these are fed from a catch-all “list” All Subscribers.
Lists
A List is a group of your customers. You can create an unlimited number of Lists depending on the number of customer segments you require.
Lists can:
- Contain a maximum of 500,000 contacts
- Take longer to update than a Data Extension
Data Extensions
A data extension is a table within your Salesforce database containing your data, think of it like a dynamic list that can automatically update based on rules (just like a Segment in Lexer Segment). You can use data extensions to store sendable subscriber data - like lists, or to hold relational data. If you activate directly to a data extension, any contacts you add that don’t match the rule conditions of the data extension could be removed when it next syncs with your All Subscribers list.
Data extensions can:
- Hold more than 500,000 contacts
- Import faster than updating Lists
- Permit you to setup triggered email sends
Syncing your data with Salesforce Marketing Cloud
Whether you use Lists or Data Extensions, you will likely want to ensure the data within your Lexer CDP is synced with Salesforce Marketing Cloud. To do this, we want to send our Segment to List – All Subscribers. We recommend using a Segment containing all Profiles, setting it to auto-update, and letting it run automatically indefinitely.
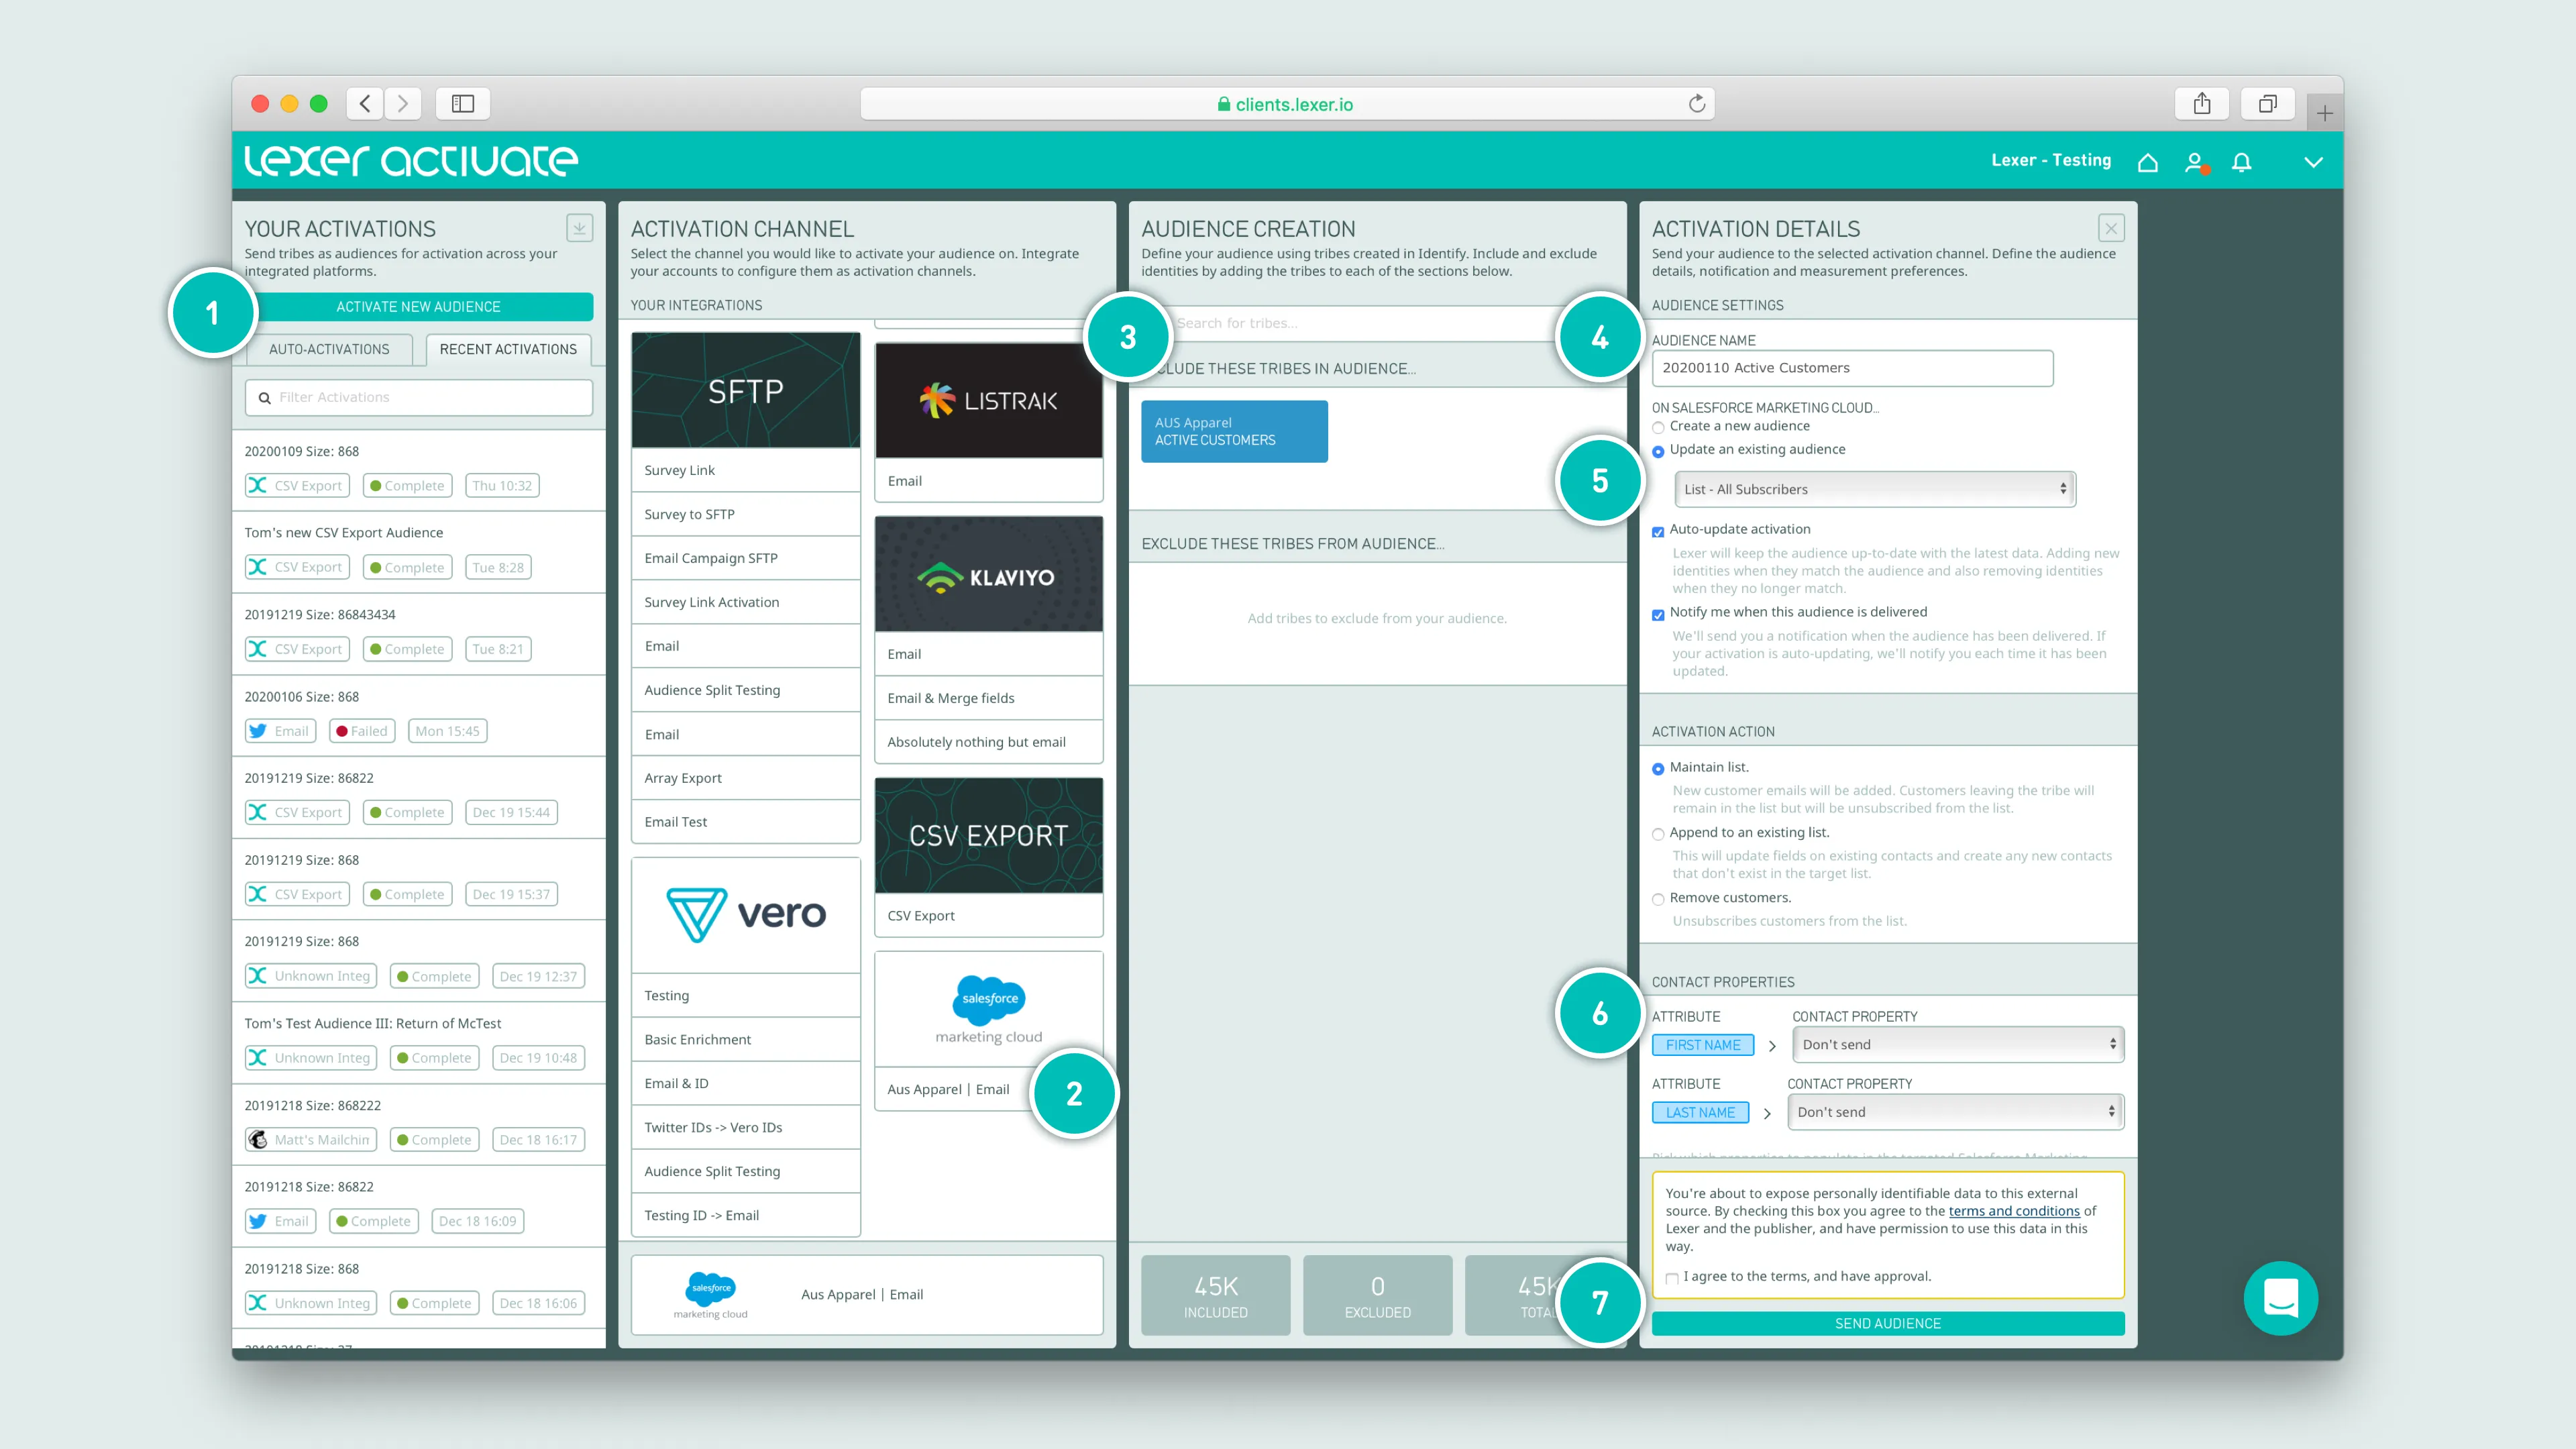
- Click ACTIVATE NEW AUDIENCE to get started
- Select your Salesforce Marketing Cloud activation tile
- Add your “Customer Universe” Segment (containing all your customer records)
- Update the audience name as required (this won’t appear in Salesforce)
- Set your activation to Update an existing audience it should default to List - All Subscribers
- Set which Contact Properties you’d like to sync, ensuring you map each ATTRIBUTE to it’s correct Property
- Agree to terms, and click Send Audience
Creating a new List
We also support creating a new List which can be used for one-off campaigns or similar.
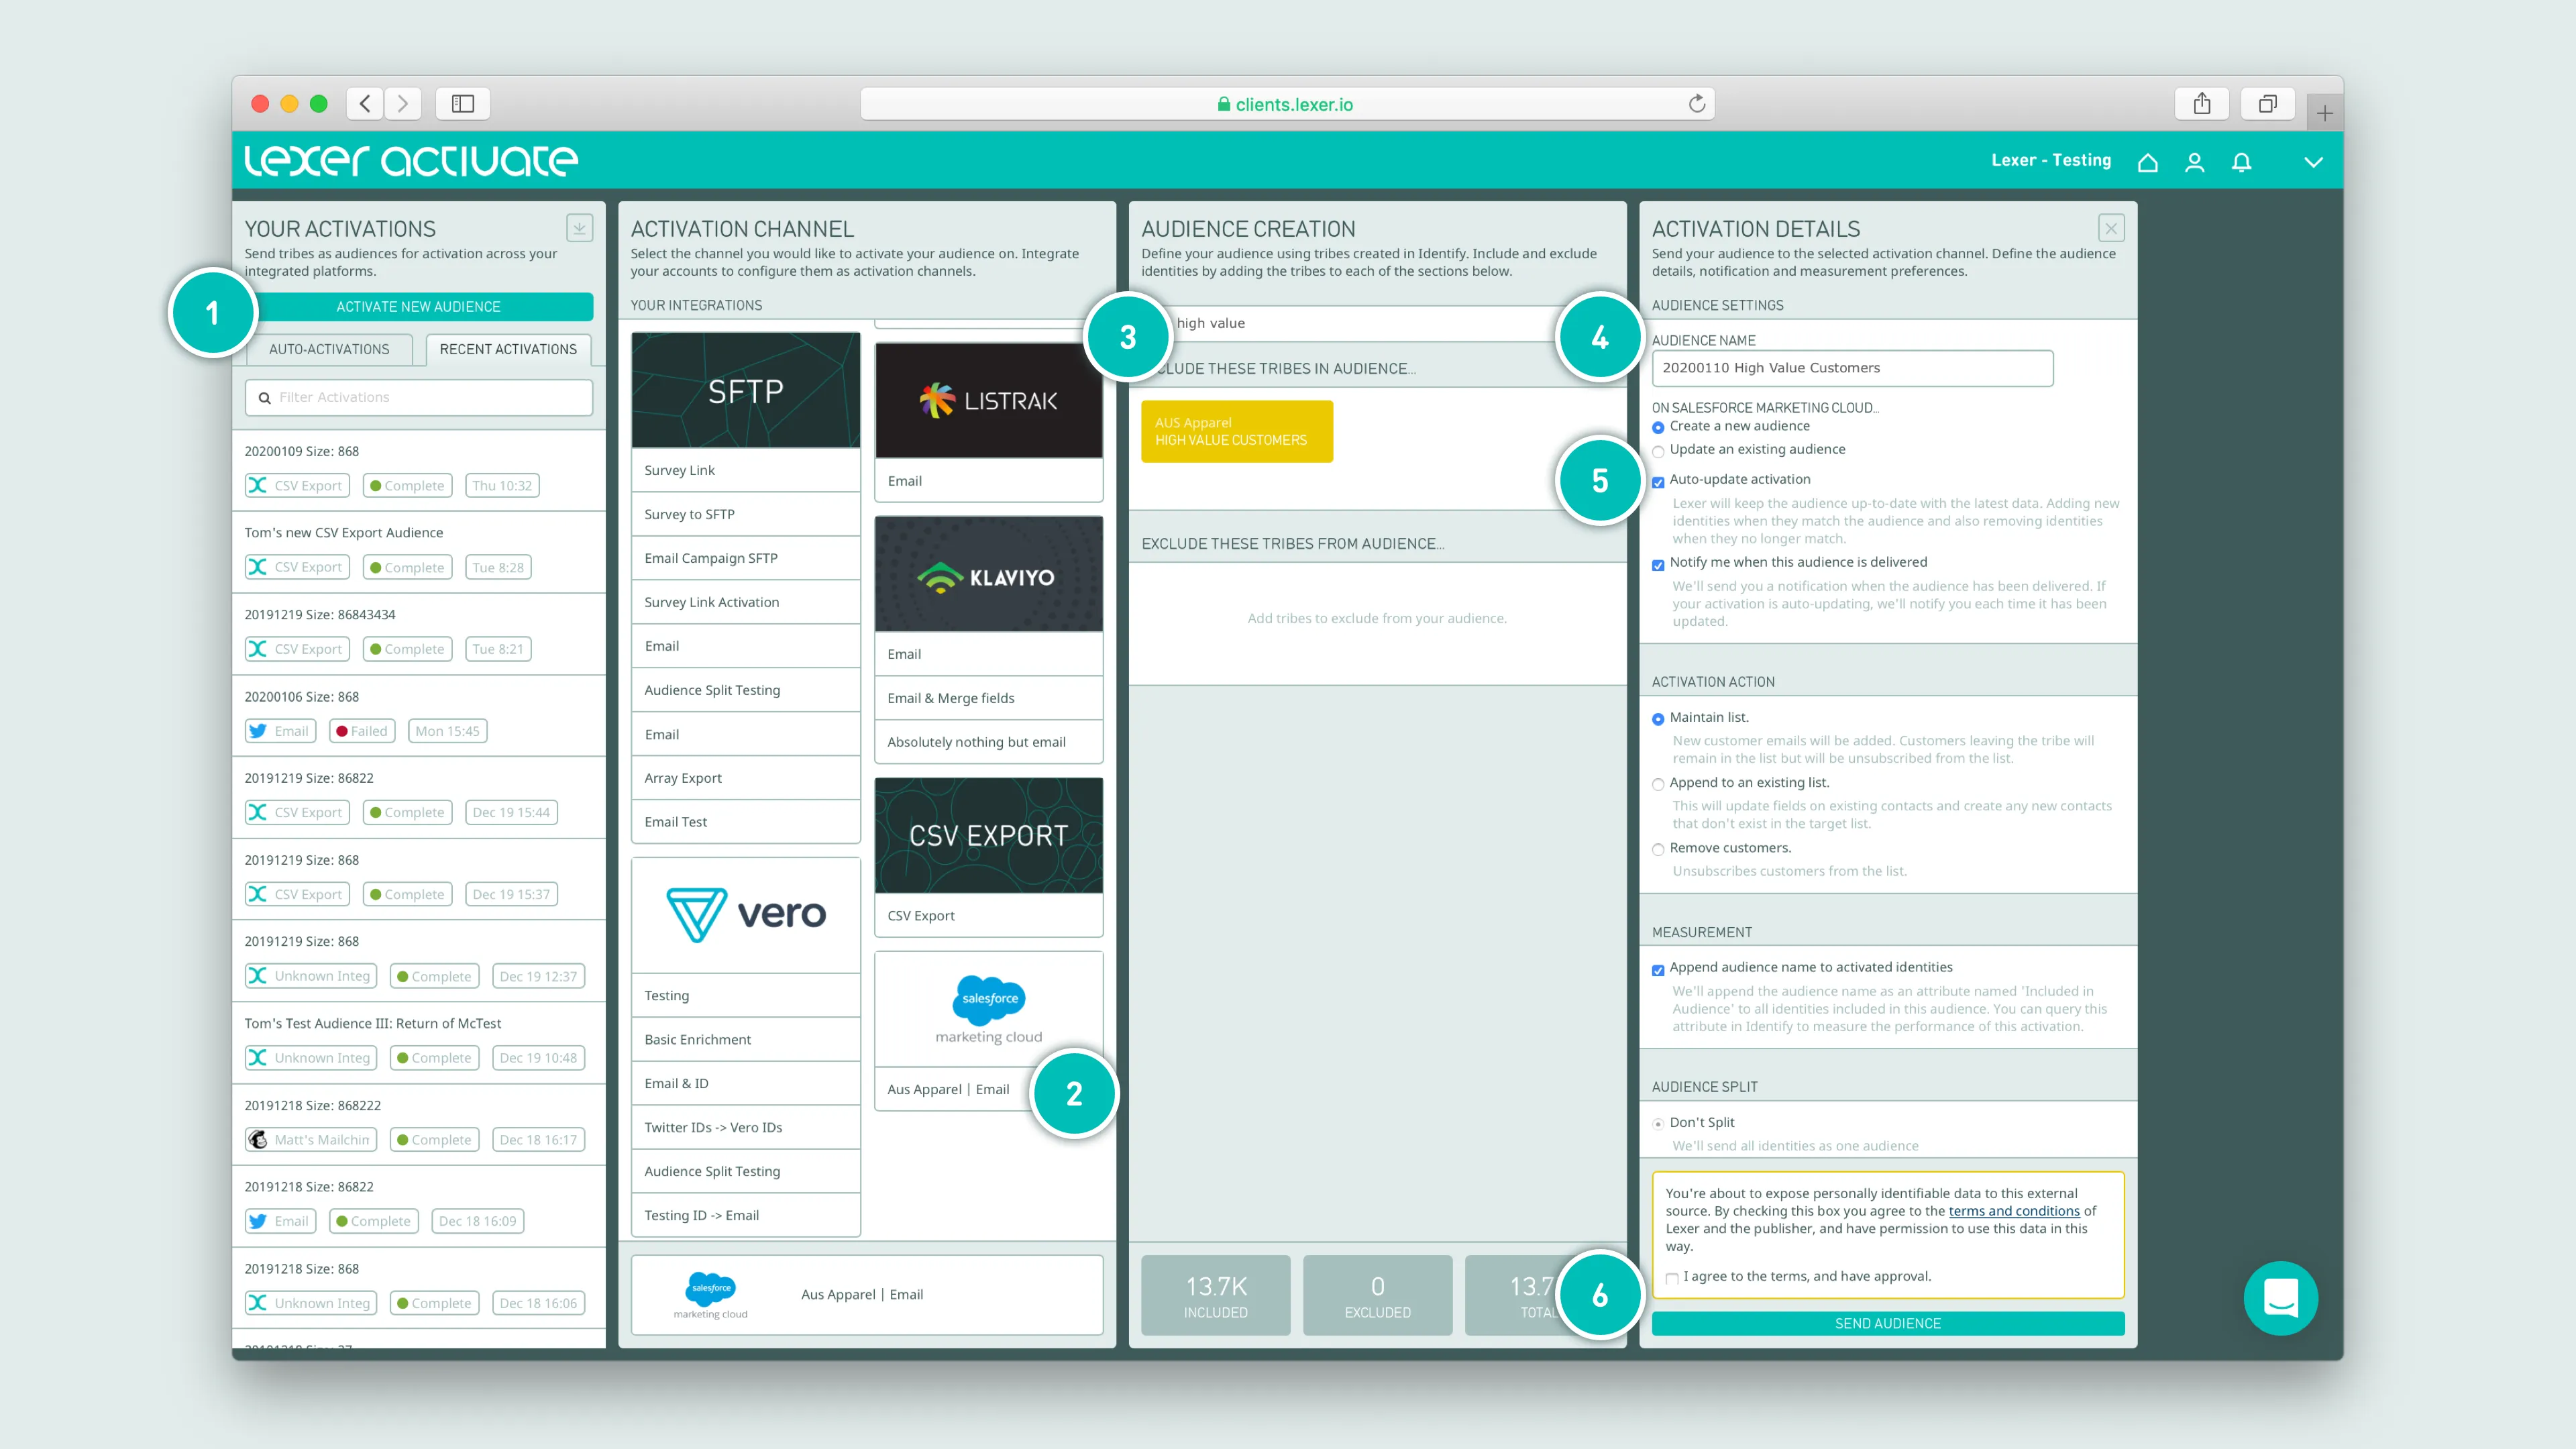
- Click ACTIVATE NEW AUDIENCE to get started
- Select your Salesforce Marketing Cloud activation tile
- Add your one-off campaign Segment
- Update the audience name (this will become the List’s name)
- Select Auto-update activation if maintaining this list is important
- Agree to terms, and click SEND AUDIENCE
Set and forget – auto-updating audiences
Lexer Activate permits you to automatically update your lists and contacts within Salesforce Marketing Cloud. With this selected, Lexer will add or remove customers from your List or Data Extension, as customers enter and leave your Segment.
Okay I’ve sent my audience, what next?
The moment your activation has been confirmed as sent in Activate, you’ll see records begin to update in Salesforce Marketing Cloud. We’ll send you an email to let you know once an audience has been sent – the time this takes will vary, depending on the size of the audience.
Sending an email with Salesforce Marketing Cloud and Email Studio
Salesforce have heaps of documentation around their Email Studio platform, you can check out those materials here.